
# SELinux 初探
CentOS 5.x 之后,SELinux 已经是个非常完备的核心模块了,尤其是 CentOS 提供了很多管理 SELinux 的指令与机制,因此在整理架构上面是单纯且容易操作管理的,所以在没有自行开发网络服务软件以及使用其他第三方协力软件的情况下,也就是全部使用 CentOS 官方提供的软件来使用我们服务器的情况下,建议不要关闭 SELinux
# 什么是 SELinux
Security Enhanced Linux 的缩写 SELinux,字面意思是安全强化的 LInux。至于强化的是哪个部分?下面来了解下
# 当初设计的目标:避免资源的误用
SELinux 是由美国国家安全局(NSA)开发的,需求来源于内部员工资源误用导致系统出现问题;
资源误用:将一个 /var/www/html/ 目录权限设置成 777,那么当启动 www 服务器软件,就意味着这个软件触发的进程拥有对该目录写入的权限,只要通过该进程服务器对目录大量写入,就会导致系统硬盘资源被爆破
SELinux 是在进行进程、文件等西部权限设置依据的一个核心模块,由于启动网络服务的也是进程,因此刚好也能够控制网络服务是否能存取系统资源的一道关卡
在讲解 SELinux 之前,先回顾一下之前讲到的:系统文件权限与用户之间的关系
# 传统的文件权限与账户关系:自主式访问控制 DAC
第 13 章中讲到:系统账户主要分为系统管理员(root)与一般用户,他们能否使用系统上的文件资源与 rwx 权限设置有关。(各种权限设置对 root 无效)。当某个进程想要对文件进行存取时,系统会根据该进程的拥有者、群组,并比对文件的权限,若通过权限检查,就可以存取该文件
这种存取文件的方式被称为 自主式访问控制 Discretionary Access Controller 简称 DAC,基本上就是依据进程的拥有者与文件资源的 rwx 权限来决定有无存取的能力。DAC 有如下困扰:
- root 具有最高的权限:只要取得属于 root 的进程,那么就很危险
- 使用者可以取得进程来变更文件资源的访问权限:如果将某个目录权限不小心设置为 777,由于对任何人的权限会变成 rwx,因此该目录就会被任何人所任意存取
# 以政策规则规定特定进程读取特定文件:委任式访问控制 MAC
为了避免 DAC 的困扰,SELinux 导入了委任式访问控制 Mandatory Access Control 简称 MAC
MAC 可以针对特定的进程与特定的文件资源来进行权限的控制。即使你是 root,那么在使用不同的进程时,你所能取得的权限并不一定是 root,而需要看当时该进程的设置。如此一来针对控制的「主体」变成了「进程」而不是使用者,但是真个系统进程很多、文件也很多,一项一项控制太麻烦,所以 SELinux 也提供一些预设的政策 Policy ,并在该政策内提供多个规则 rule,让你可以选择是否启用该控制规则
在该种模式下,进程能够活动的空变小了。比如:www 服务器软件达成进程为 httpd 这个程序,默认情况下, httpd 仅能在 /var/www 目录下存取文件,如果 httpd 进程要去其他目录存储数据时,除了规则设置要开放外,目标目录也要设置成 httpd 可读取的模式 type 才行,限制非常多,所以,即使 httpd 这个进程被黑客取得了控制权限,它也无权限浏览其他的目录文件
简单说,针对 Apache 这个 www 网络服务使用 DAC 或 MAC 的结果来说,两者的关系可用下图来说明

圆环表示画地为牢,DAC 模式下,由于是 root,牢房对 root 无效。在 MAC 下,牢房就生效了
# SELinux 的运作模式
强调:SELinux 是通过 MAC 方式来管控 进程,进程是主体,而目标则是该进程能否读取的文件资源。
主体 Subject:可以看成就是 进程
目标 Object:目标资源,一般就是文件系统
政策 Policy:会根据某些服务来制定基本的存取安全性政策,政策内还会有详细的规则 rule 来指定不同的服务开放某些资源的存取。在目前的 CentOS 7.x 里面仅提供 3 个主要的政策:
- targeted:针对网络服务限制较多,针对本机限制较少,是预设的政策
- minimum:由 target 修正而来,仅针对选择的进程来保护
- mls:完整的 SELinux 限制,限制方面较严格
安全性本文 security context
主体是否能存取目标除了政策指定之外,主体与目标的安全性本文必须一致才能够顺利存取
security context 类似文件系统的 rwx,如果设置错误,你的某些服务(主体进程)就无法存取文件系统(目标资源),就会出现权限不符对的错误信息了
由于 SELinux 重点在保护进程读取文件系统的权限,上述说明的示意图如下:
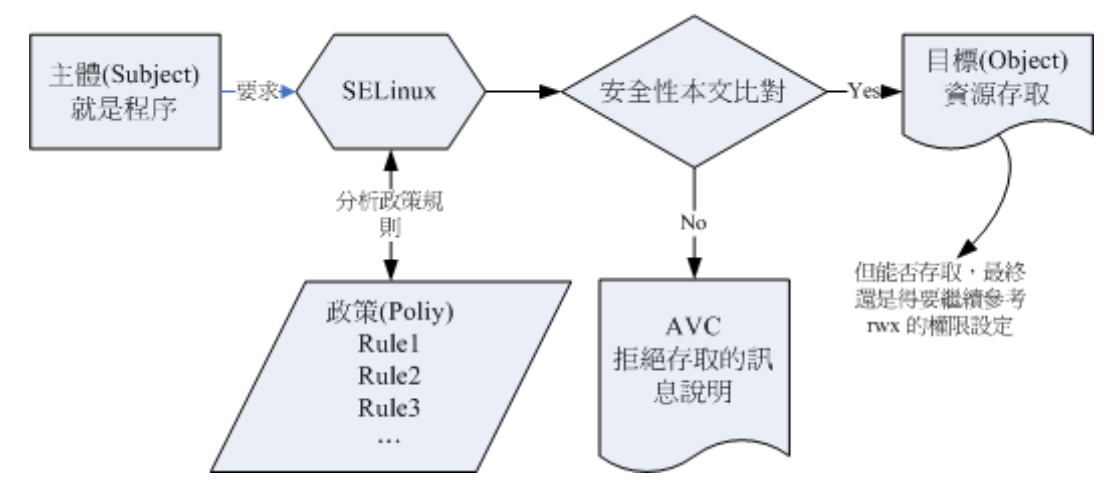
传统的进程与文件的 rwx 方式,在这中间增加了 SELinux 月 安全性本文 规则 ,通过了这些规则之后,才和传统的进程与文件的 rwx 方式一致。
笔者理解为是通过拦截器的方式,出台了 SELinux ,前面通过 SElinux 拦截细化权限,符合要求的再去到传统的方式,这样一来就对传统的加强了
# 安全性本文 Security Context
CentOS 7.x 的 target 政策提供了非常多的规则,只需要如何开启关闭某项规则即可。
安全性本文则非常麻烦,可能需要自行配置它,比如你常常设置文件的 rwx 权限,那么这个安全性本文就类似,可以看成是 SELinux 中的 rwx
安全性本文存在于主体进程中与目标文件资源中,物理位置是放在文件的 inode 中,因此主体进程想要读取目标文件资源时,同样需要读取 inode,这就可以对比安全性本文一级 rwx 等权限是否正确了。
观察安全性本文可使用 ls -Z ,但是前提是需要启动 SELinux 才行,下个小节会介绍如何启动 SELinux,这里先介绍知识点
[root@study ~]# ls -Z
-rw-r--r--. root root unconfined_u:object_r:admin_home_t:s0 accountadd.sh
-rw-r--r--. root root unconfined_u:object_r:admin_home_t:s0 accountadd.txt
-rwxr--r--+ root root unconfined_u:object_r:admin_home_t:s0 acl_test1
-rw-r--r--. root root unconfined_u:object_r:admin_home_t:s0 addaccount2.sh
-rw-------. root root system_u:object_r:admin_home_t:s0 anaconda-ks.cfg
-rw-r--r--. root root system_u:object_r:admin_home_t:s0 initial-setup-ks.cfg
# 上述字段很长的那一栏就是安全性本文了
2
3
4
5
6
7
8
安全性本文主要用冒号分割为三个字段,含义如下:
identify:身份
相当于账户方面的身份识别,常见有几下几种类型
unconfined_u:不受限的用户
该文件来自不受限的进程所产生的,一般来说,可以使用可登录账号来取得 bash,预设的 bash 环境是不受 SELinux 管制的,因为 bash 并不是什么特别的网络服务,因此在该 bash 进程所产生的文件,其身份识别大多就是该类型了
system_u:系统用户
基本上,如果是系统会软件本身所提供的文件,大多就是该类型,如果是用户通过 bash 自己建立的文件,大多则是不受限的 unconfined_u 身份,如果是网络服务所产生的文件,或则是系统服务运行过程中所产生的文件,则大部分是 system_u
role:角色
通过该字段,可以知道这个资料是属于进程、文件资源还是代表使用者,一般的角色有:
- object_r:代表的是文件或目录等文件资源
- system_r:代表的是进程,不过一般使用者也会被指定为 system_r
type:类型,最重要
在预设的 targeted 政策中, identify 与 role 字段基本上是不重要的,而 type 是最重要的,基本上,一个主体进程能不能读取到这个文件资源,与类型字段有关,而类型字段在文件与进程的定义不相同:
- type:在文件资源(object)上面称为类型(type)
- domain:在主体进程(subject)则称为领域(domain)
domain 需要与 type 搭配,则该进程才能够顺利的读取文件资源
# 进程与文件 SELinux type 字段的相关性
通过身份识别与角色字段的定义,我们可以大概某个进程所代表的意义
# 观察下系统 进程的 SELinux 相关信息
[root@study ~]# ps -eZ
LABEL                             PID TTY          TIME CMD
system_u:system_r:init_t:s0         1 ?        00:00:01 systemd
system_u:system_r:kernel_t:s0       2 ?        00:00:00 kthreadd
system_u:system_r:kernel_t:s0       4 ?        00:00:00 kworker/0:0H
system_u:system_r:kernel_t:s0       5 ?        00:00:00 kworker/u2:0
...
system_u:system_r:sshd_t:s0-s0:c0.c1023 2344 ? 00:00:00 sshd
unconfined_u:unconfined_r:unconfined_t:s0-s0:c0.c1023 2350 ? 00:00:00 sshd
unconfined_u:unconfined_r:unconfined_t:s0-s0:c0.c1023 2353 pts/0 00:00:00 bash
unconfined_u:unconfined_r:unconfined_t:s0-s0:c0.c1023 2415 pts/0 00:00:00 su
unconfined_u:unconfined_r:unconfined_t:s0-s0:c0.c1023 2424 pts/0 00:00:00 bash
system_u:system_r:kernel_t:s0    2726 ?        00:00:00 kworker/u2:2
system_u:system_r:kernel_t:s0    2778 ?        00:00:00 kworker/0:1
system_u:system_r:kernel_t:s0    2836 ?        00:00:00 kworker/0:3
system_u:system_r:kernel_t:s0    2877 ?        00:00:00 kworker/0:0
system_u:system_r:ksmtuned_t:s0  2885 ?        00:00:00 sleep
unconfined_u:unconfined_r:unconfined_t:s0-s0:c0.c1023 2886 pts/0 00:00:00 ps

# 基本上进程主要分为两大类,
# 一种是系统有受限的 system_u:system_r,
# 另一种可能是用户自己的,比较不受限的进程(通常是本机用户自己执行的程序 ) unconfined_u:unconfined_r

# unconfined_u:unconfined_r:unconfined_t:s0-s0:c0.c1023 2424 pts/0 00:00:00 bash
# 比如上面这个进程,就是我们自己执行命令所在的 bash
1
2
3
4
5
6
7
8
9
10
11
12
13
14
15
16
17
18
19
20
21
22
23
24
25
26
27基本上,这些对于资料在 targeted 政策下的对应对下
身份识别 角色 对应在 targeted 的意义 unconfined_u unconfined_r 一般可登陆使用者的进程,比较没有受限的进程。大多数都是用户已经顺利登陆系统(不论是网络还是本机登陆来取得可用的 shell)后,所用来操作系统的进程,如 bash x window 相关富安居等 system_u system_r 由于为系统账户,因此是非交谈式的系统运行进程,大多数的系统进程均是这种类型 如上所述,在预设的 target 政策下,最重要的是 type 字段,主体与目标之间是否具有可读写的权限,与进程的 domain 与文件的 type 有关。这两者的关系可以使用 crond 以及他的配置文件来说明
# 1. 先看看 crond 这个进程的安全本文内容
[root@study ~]# ps -eZ | grep cron
system_u:system_r:crond_t:s0-s0:c0.c1023 1398 ? 00:00:00 atd
system_u:system_r:crond_t:s0-s0:c0.c1023 1400 ? 00:00:00 crond
# 这个安全本文的类型名称为 crond_t 格式

# 2. 看看 /usr/ssbin/crond 、 /etc/cron.d、/etc/cron.d 文件的安全本文内容
[root@study ~]# ll -Zd /usr/sbin/crond /etc/crontab /etc/cron.d
drwxr-xr-x. root root system_u:object_r:system_cron_spool_t:s0 /etc/cron.d
-rw-r--r--. root root system_u:object_r:system_cron_spool_t:s0 /etc/crontab
-rwxr-xr-x. root root system_u:object_r:crond_exec_t:s0 /usr/sbin/crond
1
2
3
4
5
6
7
8
9
10
11执行
/usr/ssbin/crond后,该程序编程的进程 domain 类似是 crond_t,它能够读取的配置文件是system_cron_spool_t类型。因此无论/etc/crontab与/etc/cron.d以及/var/spool/cron都会是相关的 SELinux 类型(/var/spool/cron为user_cron_spool_t类型)。下面图示说明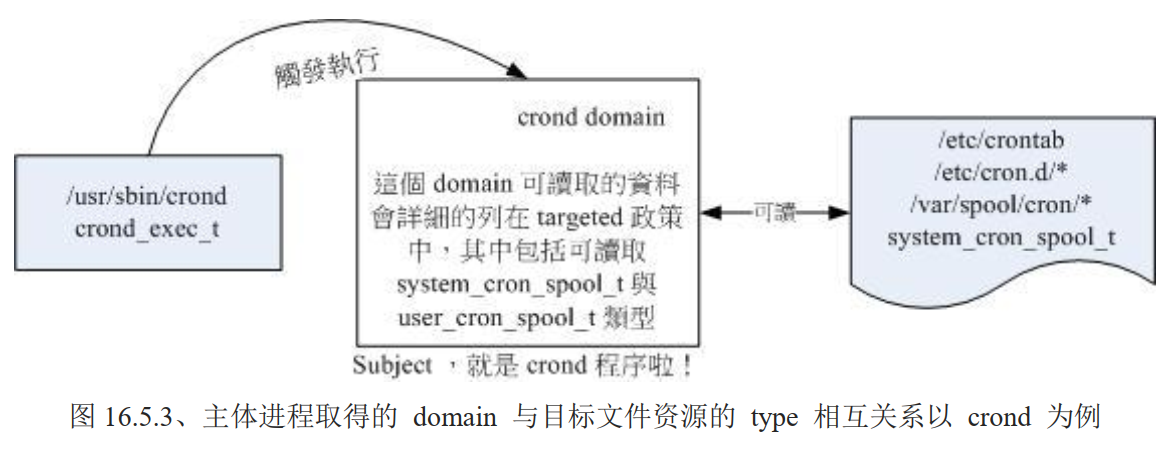
- crond 执行后,具有 crond_exec_t 类型
- 该文件类型会造成主体进程 Subject 具有 crond 这个领域 domain,政策针对这个领域有许多规则,其中就包括可以读取的目标资源类型
- 由于 crond domain 被设置为可以读取 system_cron_spool_t 类型的目标文件 object,因此你的配置文件放到
/etc/cron.d/目录下,就能够被 crond 进程读取了 - 但是最终能不能读到正确的资料,还需要看传统的 rwx 是否符合 Linux 的权限规范
下面来测试上述说明
# 1. 假设你因为不熟悉的缘故,因此是在 root 家目录建立一个如下的 cron 设置
[root@study ~]# vim checktime
10 * * * * root sleep 60s

# 2. 发现文件放错目录了,又不想要保留副本,因此使用 mv 移动到正确的目录
[root@study ~]# mv checktime /etc/cron.d/
[root@study ~]# ll /etc/cron.d/checktime
-rw-r--r--. 1 root root 26 Mar 17 13:12 /etc/cron.d/checktime
# 权限是 644,任何进程都可以读取

# 3. 强制重新启动 crond,然后查看登录日志
[root@study ~]# systemctl restart crond
[root@study ~]# tail /var/log/cron
Mar 17 13:01:01 study run-parts(/etc/cron.hourly)[3889]: finished mcelog.cron
Mar 17 13:10:01 study CROND[3972]: (root) CMD (/usr/lib64/sa/sa1 1 1)
Mar 17 13:14:01 study crond[1400]: ((null)) Unauthorized SELinux context=system_u:system_r:system_cronjob_t:s0-s0:c0.c1023 file_context=unconfined_u:object_r:admin_home_t:s0 (/etc/cron.d/checktime)
Mar 17 13:14:01 study crond[1400]: (root) FAILED (loading cron table)
Mar 17 13:15:08 study crond[1400]: (CRON) INFO (Shutting down)
Mar 17 13:15:08 study crond[4073]: (CRON) INFO (RANDOM_DELAY will be scaled with factor 13% if used.)
Mar 17 13:15:08 study crond[4073]: ((null)) Unauthorized SELinux context=system_u:system_r:system_cronjob_t:s0-s0:c0.c1023 file_context=unconfined_u:object_r:admin_home_t:s0 (/etc/cron.d/checktime)
Mar 17 13:15:08 study crond[4073]: (root) FAILED (loading cron table)
Mar 17 13:15:08 study crond[4073]: (CRON) INFO (running with inotify support)
Mar 17 13:15:08 study crond[4073]: (CRON) INFO (@reboot jobs will be run at computer's startup.)

# 上述日志中有 Unauthorized 的信息,表示有错误,因为原本的安全本文与文件的实际安全本文无法搭配的缘故,
# 信息还列出了 SELinux context 与 file_context 的信息,表示的确不匹配
2
3
4
5
6
7
8
9
10
11
12
13
14
15
16
17
18
19
20
21
22
23
24
25
26
从如上的测试来看,上述测试由于安全本文不匹配导致进程无法读取该文件
# SELinux 三种模式的启动、关闭与观察
并非所有的 Linux distribution 都支持 SELinux,CentOS 7.x 本身就有支持 SELinux,所以你不需要自行编译 SELinux 到你的 Linux 核心中。目前 SELinux 是否启动有三种模式:
- enforcing:强制模式,表示 SELinux 运行中,且已经正确的开始限制 domain/type 了
- permissive:宽容模式,表示 SELinux 运行中,不过仅有警告进行并不会实际限制 domain/type 的存取。这种模式可以用来 debug SELinux 的配置
- disabled:SELinux 关闭中
三种模式的示意图如下:

注意:并非有所的进程都受 SELinux 的管控,注意是有 受限的进程主体,可以通过 ps -eZ 来观察该进程是否有受限(confined)。下面来观察 crond 与 bash 程序是否有被限制
[root@study ~]# ps -eZ | grep -E 'cron|bash'
system_u:system_r:crond_t:s0-s0:c0.c1023 1398 ? 00:00:00 atd
unconfined_u:unconfined_r:unconfined_t:s0-s0:c0.c1023 2353 pts/0 00:00:00 bash
unconfined_u:unconfined_r:unconfined_t:s0-s0:c0.c1023 2424 pts/0 00:00:00 bash
system_u:system_r:crond_t:s0-s0:c0.c1023 4073 ? 00:00:00 crond
2
3
4
5
因为目前 target 这个政策下,只有第 3 个字段 type 会有影响,因此可以看到 crond 有 crond_t 类型,是受限的,而 bash 是 unconfined_t 类型,是不受限的,也就是说 bash 不会经过上图的流程,而直接去判定 rwx
可以通过以下方式获取当前的 SELinux 模式
[root@study ~]# getenforce
Enforcing
2
查询当前 SELinux 的政策(Policy)
sestatus [-vb]

选项与参数:
	-v:检查 /etc/sestatus.conf 内的文件与进程的安全性本文内容
	-b:将目前政策的规则布尔值列出,即某些规则 rule 是否要启动(0/1)
2
3
4
5
# 范例 1:列出目前 SELinux 使用的哪个政策 Policy

[root@study ~]# sestatus
SELinux status:                 enabled				# SELinux 是否启动
SELinuxfs mount:                /sys/fs/selinux		# SELinux 的相关文件数据挂载点
SELinux root directory:         /etc/selinux		# SELinux 的根目录所在
Loaded policy name:             targeted			# 当前的政策
Current mode:                   enforcing			# 当前模式
Mode from config file:          enforcing			# 目前配置文件内规范的 SELinux 模式
Policy MLS status:              enabled				# 是否含有 MLS 的模式机制
Policy deny_unknown status:     allowed				# 是否预设抵挡未知的主体进程
Max kernel policy version:      31
2
3
4
5
6
7
8
9
10
11
12
上述信息科知道,SELinux 目前的政策是 targeted ,可通过如下方式修改
[root@study ~]# vim /etc/selinux/config
# This file controls the state of SELinux on the system.
# SELINUX= can take one of these three values:
#     enforcing - SELinux security policy is enforced.
#     permissive - SELinux prints warnings instead of enforcing.
#     disabled - No SELinux policy is loaded.
SELINUX=enforcing		 	# 可选择为上述 3 个
# SELINUXTYPE= can take one of three values:
#     targeted - Targeted processes are protected,
#     minimum - Modification of targeted policy. Only selected processes are protected.
#     mls - Multi Level Security protection.
SELINUXTYPE=targeted		# 可选值为上述 3 个
2
3
4
5
6
7
8
9
10
11
12
# SElinux 的启动与关闭
由于 SElinux 是整合到核心中去的,因此修改上述配置文件之后,需要重新启动。
注意:如果从 disable 转到启动 SELinux 的模式时,由于系统必须要针对文件写入安全性本文信息,因此开机过程需要耗费不少时间等待重新写入 SELinux 安全性本文(有时也称为SELinux Label),而且在写完之后还需要重新启动一次,启动成功之后,再使用 getenforce 和 sestatus 来观察是否有成功启动到 Enforcing 模式
如果当前已经是 Enforcing 模式,可能由于一些设置问题大道至 SELinux 让某些服务无法正常的运行,此时可将模式修改为宽容模式(permissive),让 SELinux 只发出警告信息
setenforce [0|1]

选项与参数:
	0:转成 permissive 宽容模式
	1:转成 Enforcing 强制模式
注意:无法在 Disabled 模式下进程模式的切换
2
3
4
5
6
某些时候从 Disabled 换成 Enforcing 之后,有部分服务可能无法顺利启动,可能会报错 /lib/xxx 数据没有权限读取的错误信息。这大多数是由于重新写入 Selinux type(Relabel)出错的原因,使用 Permissive 模式就没有该错误。最简单的办法是在 Permissive 模式下使用指令 restorecon -Rv / 重新还原所有 SELinux 的类型
# SELinux 政策内的规则管理
# SELinux 各个规则的布尔值查询:getsebool
getsebool [-a] [规则名称]

选项与参数:
	-a:列出目前系统上所有 SELinux 规则的布尔值为开启或关闭(on/off)
2
3
4
# 范例 1:查询所有的布尔值设置
[root@study ~]# getsebool -a
abrt_anon_write --> off
abrt_handle_event --> off
abrt_upload_watch_anon_write --> on
...
cron_can_relabel --> off		# 这个与 cron 有关
cron_system_cronjob_use_shares --> off
cron_userdomain_transition --> on
...
httpd_anon_write --> off		# 与网页 http 有关
httpd_builtin_scripting --> on
httpd_can_check_spam --> off
# 每一行都是一个规则
2
3
4
5
6
7
8
9
10
11
12
13
14
# SELinux 各个规则规范的主体进程能够读取的文件 SELinux type 查询 seinfo、sesearch
上述指令知道了所有的规则开启情况,可以通过 seinfo、sesearch 等工具来查看每个规则具体在限制什么。
上述工具并未预装,请拿出安装光盘挂载到 /mnt 目录下,安装
[root@study ~]# blkid
/dev/sr0: UUID="2019-09-11-18-50-31-00" LABEL="CentOS 7 x86_64" TYPE="iso9660" PTTYPE="dos"
/dev/sda1: UUID="e9d54afb-2afe-42de-87fe-9f55d747fcd9" TYPE="xfs"
/dev/sda2: UUID="CNUXwS-J3Lh-0nDA-TssW-l1vT-90us-MHYnT1" TYPE="LVM2_member"
/dev/mapper/centos_study-root: UUID="d7e09bb4-2f04-4ed4-b377-91a22fe85ce7" TYPE="xfs"
/dev/mapper/centos_study-swap: UUID="684eebc0-3f70-4fc1-9a5d-d683f6a07cd0" TYPE="swap"
[root@study ~]# mount /dev/sr0 /mnt/
mount: /dev/sr0 is write-protected, mounting read-only
[root@study ~]# yum install /mnt/Packages/setools-console-*
...
Complete!
[root@study ~]# umount /mnt/  # 卸载光盘
2
3
4
5
6
7
8
9
10
11
12
seinfo [-Atrub]

选项与参数:
	-A:列出 SELinux 的状态、规则布尔值、身份识别、角色、类型等所有信息
	-u:列出 SELinux 的所有身份识别 user 种类
	-r:列出 SELinux 的所有角色 role 种类
	-t:列出 SELinux 的所有类型 type 种类
	-b:列出所有规则的种类(布尔值)
2
3
4
5
6
7
8
# 范例 1:列出 SELinux 在此政策下的统计状态
[root@study ~]# seinfo

Statistics for policy file: /sys/fs/selinux/policy
Policy Version & Type: v.31 (binary, mls)

   Classes:           130    Permissions:       272
   Sensitivities:       1    Categories:       1024
   Types:            4792    Attributes:        253
   Users:               8    Roles:              14
   Booleans:          316    Cond. Expr.:       362
   Allow:          107360    Neverallow:          0
   Auditallow:        157    Dontaudit:       10020
   Type_trans:      18129    Type_change:        74
   Type_member:        35    Role allow:         39
   Role_trans:        416    Range_trans:      5899
   Constraints:       143    Validatetrans:       0
   Initial SIDs:       27    Fs_use:             32
   Genfscon:          103    Portcon:           614
   Netifcon:            0    Nodecon:             0
   Permissives:         0    Polcap:              5

# 当前政策是 targeted ? (哪里显示的?),此政策下的 Types 类型有 4792 个
# SELinux 的规则(Booleans)有 316 条
2
3
4
5
6
7
8
9
10
11
12
13
14
15
16
17
18
19
20
21
22
23
24
在前面讲到过几个身份识别 user 与 角色 role,seinfo 可以查询到所有的种类,可自行查询
在前面讲到 /etc/cron.d/checktime 的 SElinux type 类型不太对,我们知道 crond 进程的 type 是 crond_t,那么查找下 crond_t 能够读取的文件 SELinux type 有哪些
sesearch [-A] [-s 主体类别] [-t 目标类别] [-b 布尔值]

选项与参数:
	-A:列出后面数据中,允许「读取或放行」的相关数据
	-t:后面还要接 type、例如 -t httpd_t
	-b:后面接 SELinux 的规则,例如 -b httpd_enable_ftp_server
2
3
4
5
6
7
# 范例 1:找出 crond_t 主体进程能够读取的文件 SELinux type

[root@study ~]# sesearch -A -s crond_t | grep spool
   allow crond_t var_spool_t : dir { ioctl read getattr lock search open } ;
   allow crond_t system_cron_spool_t : dir { ioctl read getattr lock search open } ;
   allow crond_t user_cron_spool_t : lnk_file { read getattr } ;
   allow crond_t user_cron_spool_t : file { ioctl read write create getattr setattr lock append unlink link rename open } ;
   allow crond_t system_cron_spool_t : file { ioctl read write create getattr setattr lock append unlink link rename open } ;
   allow crond_t var_spool_t : file { ioctl read getattr lock open } ;
   allow crond_t cron_spool_t : file { ioctl read write create getattr setattr lock append unlink link rename open } ;
   allow daemon user_cron_spool_t : file { ioctl read write getattr lock append } ;
   allow crond_t cron_spool_t : dir { ioctl read write getattr lock add_name remove_name search open } ;
   allow crond_t user_cron_spool_t : dir { ioctl read write getattr lock add_name remove_name search open } ;
   allow crond_t user_cron_spool_t : file { ioctl read write create getattr setattr lock append unlink link rename open } ;
   allow crond_t system_cron_spool_t : file { ioctl read write create getattr setattr lock append unlink link rename open } ;

# allow 后面是主体进程以及文件的 SELinux type,上面数据是截取出来的
# crond_t 可以读取 system_cron_spool_t 的文件/目录类型等

# 范例 2:找出 crond_t 是否能读取 /etc/cron.d/checktime 这个我们自定义的配置文件?
[root@study ~]# ll -Z /etc/cron.d/checktime
-rw-r--r--. root root unconfined_u:object_r:admin_home_t:s0 /etc/cron.d/checktime
# 两个重点:SELinux type 为 admin_home_t,一个是文件(file)

[root@study ~]# sesearch -A -s crond_t | grep admin_home_t
   allow domain admin_home_t : dir { getattr search open } ;
   allow crond_t admin_home_t : dir { ioctl read getattr lock search open } ;
   allow userdom_filetrans_type admin_home_t : lnk_file { read getattr } ;
   allow userdom_filetrans_type admin_home_t : dir { ioctl read write getattr lock add_name remove_name search open } ;
   allow domain admin_home_t : lnk_file { read getattr } ;
   allow crond_t admin_home_t : lnk_file { read getattr } ;

# 发现有 crond_t admin_home_t 存在,不过这个是总体的信息
# 没有针对某些规则的查询,所以不能确定 checktime 能否被读取,但是基本上就是 SELinux type 出现问题,才无法读取的
2
3
4
5
6
7
8
9
10
11
12
13
14
15
16
17
18
19
20
21
22
23
24
25
26
27
28
29
30
31
32
33
34
现在知道了 /etc/cron.d/checktime 是 SELinux type 错误导致无法读取的。看来在 getsebool -a 中看到的 httpd_enable_homedirs 是什么?又是规范了哪些主体进程能够读取的 SELinux type
[root@study ~]# semanage boolean -l | grep httpd_enable_homedirs
httpd_enable_homedirs          (off  ,  off)  Allow httpd to enable homedirs
# httpd_enable_homedirs 的功能是允许 httpd 进程读取用户家目录

# 范例 3:列出该规则中,主体进程能够读取的文件  SELinux type
[root@study ~]# sesearch -A -b httpd_enable_homedirs
Found 77 semantic av rules:
   allow httpd_t user_home_type : lnk_file { read getattr } ;
   allow httpd_suexec_t user_home_type : lnk_file { read getattr } ;
   allow httpd_suexec_t user_home_dir_t : lnk_file { read getattr } ;
   allow httpd_t nfs_t : lnk_file { read getattr } ;
   allow httpd_sys_script_t nfs_t : file { ioctl read getattr lock open } ;
   allow httpd_sys_script_t cifs_t : lnk_file { read getattr } ;
   allow httpd_user_script_t user_home_type : lnk_file { read getattr } ;
   allow httpd_user_script_t user_home_type : dir { getattr search open } ;
   allow httpd_t cifs_t : file { ioctl read getattr lock open } ;
   allow httpd_sys_script_t nfs_t : dir { getattr search open } ;
   allow httpd_sys_script_t nfs_t : dir { ioctl read getattr lock search open } ;
   allow httpd_sys_script_t nfs_t : dir { getattr search open } ;
   allow httpd_sys_script_t nfs_t : dir { ioctl read getattr lock search open } ;
   allow httpd_t user_home_dir_t : dir { getattr search open } ;
   allow httpd_sys_script_t cifs_t : file { ioctl read getattr lock open } ;
   allow httpd_sys_script_t user_home_dir_t : dir { getattr search open } ;
   allow httpd_sys_script_t user_home_dir_t : lnk_file { read getattr } ;
   xxx
 # 从上面的数据才可以理解,主要是放行 httpd_t 能否读取用户家目录的文件 (笔者这里是懵逼的没有看出来)
 # 所以,如果该规则没有启动,基本上 httpd_t 这种进程就无法读取用户家目录下的文件
2
3
4
5
6
7
8
9
10
11
12
13
14
15
16
17
18
19
20
21
22
23
24
25
26
27
# 修改 SELinux 规则的布尔值 setsebool
查询到某个 SELinux rule ,并且以 seaserch 知道该规则的用途后,可以通过下面的方式来管理
setsebool [-p] [规则名称][0|1]

-P:直接将设置值写入配置文件,该设置数据未来会生效
2
3
# 范例 1:查询 httpd_enable_homedirs 这个规则的状态,并且修改这个规则为不同的布尔值
[root@study ~]# getsebool httpd_enable_homedirs
httpd_enable_homedirs --> off			# 关闭状态
[root@study ~]# setsebool -P httpd_enable_homedirs 1		# 开启它
[root@study ~]# getsebool httpd_enable_homedirs
httpd_enable_homedirs --> on
2
3
4
5
6
7
# SELinux 安全本文的修改
SELinux 对受限的主体进程没有影响:
- 考虑 SELinux 的三种类型
- 考虑 SELinux的政策规则是否放行
- 比对 SELinux type 关系
上面讲解过可以通过 sesearch 来找到主体进程与文件的 SELinux type 关系,那么怎么修改文件的 SELinux type,能让主体进程读到呢?
# 使用 chcon 手动修改文件的 SELinux type
chcon [-R] [-t type] [-u user] [-r role] 文件
chcon [-R] --reference=范例文件 文件

选项与参数:
	-R:连同该目录下的次目录也同时修改
	-t:后面接安全性本文的类型字段,例如 httpd_sys_content_t
	-u:后面接身份识别,例如 system_u (不重要)
	-r:后面接角色,例如 system_r (不重要)
	-v:若有变化成功,将变动的结果列出来
	--reference=文件:拿某个文件档范例来修改后续接的文件的类型
2
3
4
5
6
7
8
9
10
# 范例 1:查询 /etc/hosts 的 SELinux type,并将该类型套用到 /etc/cron.d/checktime 上
[root@study ~]# ll -Z /etc/hosts
-rw-r--r--. root root system_u:object_r:net_conf_t:s0  /etc/hosts
# net_conf_t 是上面文件中的类型
[root@study ~]# chcon -v -t net_conf_t /etc/cron.d/checktime
changing security context of '/etc/cron.d/checktime'
[root@study ~]# ll -Z /etc/cron.d/checktime
-rw-r--r--. root root unconfined_u:object_r:net_conf_t:s0 /etc/cron.d/checktime

# 范例 2:直接以 /etc/shadow 的 type 套用
[root@study ~]# chcon -v --reference=/etc/shadow /etc/cron.d/checktime
changing security context of '/etc/cron.d/checktime'
[root@study ~]# ll -Z /etc/shadow /etc/cron.d/checktime
-rw-r--r--. root root system_u:object_r:shadow_t:s0    /etc/cron.d/checktime
----------. root root system_u:object_r:shadow_t:s0    /etc/shadow
2
3
4
5
6
7
8
9
10
11
12
13
14
15
16
上面的示例并不能解决 crond 不能读取 /etc/cron.d/checktime 的问题,因为需要改成 /etc/cron.d 下的标准 type 才行。可以使用 restorecon 来让 SELinux 自己默认解决目录下的 type 问题
# 使用 restorecon 让文件恢复正确的 SELinux type
restorecon [-Rv] 文件或目录

选项与参数:
	-R:连同次目录一起修改
	-v:将过程显示到屏幕上
2
3
4
5
# 范例 3:将 /etc/cron.d/ 下的文件都恢复成预设的 SELinux type
[root@study ~]# restorecon -Rv /etc/cron.d/
restorecon reset /etc/cron.d/checktime context system_u:object_r:shadow_t:s0->system_u:object_r:system_cron_spool_t:s0

# 上面将  shadow_t 改成了 system_cron_spool_t 类型

# 范例 4:重新启动 crond 看看有没有正确启动 checktime
[root@study ~]# systemctl restart crond
[root@study ~]# tail /var/log/cron
Mar 17 16:01:01 study CROND[5886]: (root) CMD (run-parts /etc/cron.hourly)
Mar 17 16:01:01 study run-parts(/etc/cron.hourly)[5886]: starting 0anacron
Mar 17 16:01:01 study run-parts(/etc/cron.hourly)[5898]: finished 0anacron
Mar 17 16:01:01 study run-parts(/etc/cron.hourly)[5886]: starting mcelog.cron
Mar 17 16:01:01 study run-parts(/etc/cron.hourly)[5904]: finished mcelog.cron
Mar 17 16:10:01 study CROND[5989]: (root) CMD (/usr/lib64/sa/sa1 1 1)
Mar 17 16:12:48 study crond[4073]: (CRON) INFO (Shutting down)
Mar 17 16:12:48 study crond[6068]: (CRON) INFO (RANDOM_DELAY will be scaled with factor 62% if used.)
Mar 17 16:12:49 study crond[6068]: (CRON) INFO (running with inotify support)
Mar 17 16:12:49 study crond[6068]: (CRON) INFO (@reboot jobs will be run at computer's startup.)
# 没有报错信息
2
3
4
5
6
7
8
9
10
11
12
13
14
15
16
17
18
19
20
从这里看来 restorecon 很方便,chcon 还是比较麻烦的
# semanage 默认目录的安全性本文查询与修改
为什么 restorecon 可以恢复原本的 SELinux type 呢?那一定是有个地方在记录每个文件/目录的 SELinux 默认类型
- 如何查询预设的 SELinux type
- 如何增加、修改、删除 预设的 SELinux type
semanage {login|user|port|interface|fcontext|translation} -l
semanage fcontext -{a|d|m} [-frst] file_spec

选项与参数:
	fcontext:主要用在安全性本文方面的用途, -l 为查询
	-a:增加;可以增加一些目录的默认安全性本文类型设置
	-m:修改
	-d:删除
2
3
4
5
6
7
8
# 范例 1:查询 /etc/   /etc/cron.d/ 的预设 SELinux type
[root@study ~]# semanage fcontext -l | grep -E '^/etc |^/etc/cron'
/etc/cron.daily(/.*)?                              all files          system_u:object_r:bin_t:s0
/etc/cron.weekly(/.*)?                             all files          system_u:object_r:bin_t:s0
/etc/cron.hourly(/.*)?                             all files          system_u:object_r:bin_t:s0
/etc/cron.monthly(/.*)?                            all files          system_u:object_r:bin_t:s0
/etc/cron.minutely/openshift-facts                 regular file       system_u:object_r:openshift_cron_exec_t:s0
/etc/cron\.(daily|monthly)/acct                    regular file       system_u:object_r:acct_exec_t:s0
/etc/cron\.(daily|weekly)/sysklogd                 regular file       system_u:object_r:logrotate_exec_t:s0
/etc/cron\.(daily|monthly)/mailman                 regular file       system_u:object_r:mailman_queue_exec_t:s0
/etc/cron\.(daily|weekly)/man-db.*                 regular file       system_u:object_r:mandb_exec_t:s0
/etc/cron\.(daily|monthly)/radiusd                 regular file       system_u:object_r:radiusd_exec_t:s0
/etc/cron\.(daily|weekly)/ntp-simple               regular file       system_u:object_r:ntpd_exec_t:s0
/etc/cron\.(daily|weekly)/ntp-server               regular file       system_u:object_r:ntpd_exec_t:s0
/etc/cron\.((daily)|(weekly)|(monthly))/freeradius regular file       system_u:object_r:radiusd_exec_t:s0
/etc/cron\.d(/.*)?                                 all files          system_u:object_r:system_cron_spool_t:s0
/etc/cron\.daily/[sm]locate                        regular file       system_u:object_r:locate_exec_t:s0
/etc/cron\.weekly/(c)?fingerd                      regular file       system_u:object_r:fingerd_exec_t:s0
/etc                                               all files          system_u:object_r:etc_t:s0
/etc/crontab                                       regular file       system_u:object_r:system_cron_spool_t:s0
/etc/cron\.daily/prelink                           regular file       system_u:object_r:prelink_cron_system_exec_t:s0
/etc/cron\.daily/calamaris                         regular file       system_u:object_r:calamaris_exec_t:s0
/etc/cron\.daily/certwatch                         regular file       system_u:object_r:certwatch_exec_t:s0
/etc/cron\.monthly/proftpd                         regular file       system_u:object_r:ftpd_exec_t:s0
2
3
4
5
6
7
8
9
10
11
12
13
14
15
16
17
18
19
20
21
22
23
24
25
看 /etc/cron\.d(/.*)? all files system_u:object_r:system_cron_spool_t:s0 这一行,这也是为什么直接使用 vim 在 /etc/cron.d 下新建文件时,预设 SELinux type 是正确的。
练习:下面要建立一个 /srv/mycron 目录,默认也是需要变成 system_cron_spool_t 时
# 1. 先建立 mycron 目录,再放入配置文件,观察 SELinux type
[root@study ~]# mkdir /srv/mycron
[root@study ~]# cp /etc/cron.d/checktime /srv/mycron/
[root@study ~]# ll -dZ /srv/mycron/ /srv/mycron/checktime
drwxr-xr-x. root root unconfined_u:object_r:var_t:s0   /srv/mycron/
-rw-r--r--. root root unconfined_u:object_r:var_t:s0   /srv/mycron/checktime
# 发现变成了 var_t

# 2. 观察上层 /srv 的 SELinux type
[root@study ~]# semanage fcontext -l | grep '^/srv'
/srv/.*                                            all files          system_u:object_r:var_t:s0
/srv/([^/]*/)?www(/.*)?                            all files          system_u:object_r:httpd_sys_content_t:s0
/srv/([^/]*/)?ftp(/.*)?                            all files          system_u:object_r:public_content_t:s0
/srv/([^/]*/)?rsync(/.*)?                          all files          system_u:object_r:public_content_t:s0
/srv/([^/]*/)?www/logs(/.*)?                       all files          system_u:object_r:httpd_log_t:s0
/srv/node(/.*)?                                    all files          system_u:object_r:swift_data_t:s0
/srv/gallery2(/.*)?                                all files          system_u:object_r:httpd_sys_content_t:s0
/srv/lib/gitosis(/.*)?                             all files          system_u:object_r:gitosis_var_lib_t:s0
/srv/gallery2/smarty(/.*)?                         all files          system_u:object_r:httpd_sys_rw_content_t:s0
/srv/loopback-device(/.*)?                         all files          system_u:object_r:swift_data_t:s0
/srv                                               all files          system_u:object_r:var_t:s0
# 可以看到这里默认就是  var_t 类型的

# 3. 将 mycron 默认值改为 system_cron_spool_t
[root@study ~]# semanage fcontext -a -t system_cron_spool_t "/srv/mycron(/.*)?"
[root@study ~]# semanage fcontext -l | grep '^/srv/mycron'
/srv/mycron(/.*)?                                  all files          system_u:object_r:system_cron_spool_t:s0

# 4. 回复 /srv/mycron 以及子目录相关的 SELinux type
[root@study ~]# restorecon -Rv /srv/mycron/
restorecon reset /srv/mycron context unconfined_u:object_r:var_t:s0->unconfined_u:object_r:system_cron_spool_t:s0
restorecon reset /srv/mycron/checktime context unconfined_u:object_r:var_t:s0->unconfined_u:object_r:system_cron_spool_t:s0
2
3
4
5
6
7
8
9
10
11
12
13
14
15
16
17
18
19
20
21
22
23
24
25
26
27
28
29
30
31
32
通过这个例子来看,restorecon 的确是很方便 ,学会这些基础的工具,对于 SELinux 来说基本上也够用了
# 一个网络服务案例及登录文件协助
本章在 SELinux 小节中介绍到的各个指令,尤其是 setsebool、chcon、restorecon 等都是为了当你的某些网络服务无法正常提供相关功能时,才需要进行修改的一些指令动作。
可以通过主动检查的方式来检查是否有 SELinux 产生的错误。而不是等客户端联机失败来反馈
# setroubleshoot:错误信息写入 /var/log/messages
几乎所有 SELinux 相关的程序都是以 se 开头,该服务时错误克服,启动后,会将关于 SELinux 的错误信息与克服方法记录到 /var/log/messages 与 /var/log/setroubleshoot/* 中
需要安装:setroubleshoot 与 setroubleshoot-server。原本 SELinux 信息是两个服务来记录的,分别是 auditd 与 setroubleshoot。在 CentOS 6.x 起整合成 auditd 了。所以安装好 setroubleshoot-server 后,需要重新启动 auditd 服务,否则 setroubleshoot 功能不会被启动
实际上。CentOS 7.x 对 setroubleshoot 的运行方式是:先由 auditd 去呼叫 audispd 服务,然后 audispd 服务启动 sedispatch 程序, sedispatch 再将原本的 auditd 信息转成 setroubleshoot 的信息,存储下来
[root@study ~]# rpm -qa | grep setroubleshoot
setroubleshoot-3.2.30-7.el7.x86_64
setroubleshoot-plugins-3.0.67-4.el7.noarch
setroubleshoot-server-3.2.30-7.el7.x86_64
2
3
4
在预设的情况下 setroubleshoot 被安装了,记得刚安装 setroubleshoot 的话,需要重新启动 auditd 服务的、
目前我们没有任何受限的网络服务主体进程在运行,下面使用一个简单的 FTP 服务器软件示例,来了解上面讲到的许多重点应用
# 实例说明:通过 vsftpd 这个 FTP 服务器来存取系统上的文件
在 CentOS 7.x 环境下, FTP 的默认服务器软件主要是 vsftpd
详细的 FTP 协议在服务器篇讲解,这里简单利用 vsftpd 与 FTP 的协议来讲解 SELinux 的问题与错误克服。
下面只接受一些简单的 FTP 知识:客户端需要使用 FTP 账户登录 FTP 服务器,有一个称为「匿名 (anonymous)」的账户可以登录系统,但是这个匿名的账户登录后,只能存取一个特定的目录,而无法脱离该目录
在 vsftpd 中,一般用户与匿名者的家目录说明如下:
- 匿名者:如果使用浏览器来联机到 FTP 服务器,那预设就是使用匿名者登录系统。匿名者的家目录默认是在
/var/ftp中,同时,匿名者在家目录下只能下载数据,不能上传数据到 FTP 服务器,同时匿名者无法离开 FTP 服务器的/var/ftp目录 - 一般 FTP 账户:在预设情况下,所有 UID 大于 1000 的账户,都可以使用 FTP 来登录系统,登录系统后,所有的账户都能够取得自己家目录下的文件数据,预设也可以上传、下载文件的
为了避免与之前章节的用户产生误解情况,创建一个名为 ftptest 的账户,且账户密码为 myftp123
[root@study ~]# useradd -s /sbin/nologin ftptest
[root@study ~]# echo "myftp123" | passwd --stdin ftptest
Changing password for user ftptest.
passwd: all authentication tokens updated successfully.
2
3
4
下面来安装 vsftp 服务器软件(还是在光盘中安装,前面挂载那样)
[root@study ~]# yum install /mnt/Packages/vsftpd-3*

[root@study ~]# systemctl start vsftpd		# 启动 vsftpd 服务
[root@study ~]# systemctl enable vsftpd		# 设置为开机启动
Created symlink from /etc/systemd/system/multi-user.target.wants/vsftpd.service to /usr/lib/systemd/system/vsftpd.service.
[root@study ~]# netstat -tlnp
Active Internet connections (only servers)
Proto Recv-Q Send-Q Local Address           Foreign Address         State       PID/Program name
tcp        0      0 127.0.0.1:631           0.0.0.0:*               LISTEN      1374/cupsd
tcp        0      0 127.0.0.1:25            0.0.0.0:*               LISTEN      1578/master
tcp        0      0 127.0.0.1:6010          0.0.0.0:*               LISTEN      2350/sshd: mrcode@p
tcp        0      0 0.0.0.0:111             0.0.0.0:*               LISTEN      1/systemd
tcp        0      0 192.168.122.1:53        0.0.0.0:*               LISTEN      1975/dnsmasq
tcp        0      0 0.0.0.0:22              0.0.0.0:*               LISTEN      1378/sshd
tcp6       0      0 ::1:631                 :::*                    LISTEN      1374/cupsd
tcp6       0      0 ::1:25                  :::*                    LISTEN      1578/master
tcp6       0      0 ::1:6010                :::*                    LISTEN      2350/sshd: mrcode@p
tcp6       0      0 :::111                  :::*                    LISTEN      1/systemd
tcp6       0      0 :::21                   :::*                    LISTEN      6656/vsftpd
tcp6       0      0 :::22                   :::*                    LISTEN      1378/sshd

# 可以看到   6656/vsftpd 这行数据,代表已经启动了
2
3
4
5
6
7
8
9
10
11
12
13
14
15
16
17
18
19
20
21
22
# 匿名者无法下载的问题
模拟一些 FTP 的常用状态,假设将 /etc/securetty 以及主要的 /etc/sysctl.conf 放置给所有人下载,那么可以能会这样做
[root@study ~]# cp -a /etc/securetty /etc/sysctl.conf /var/ftp/pub
[root@study ~]# ll /var/ftp/pub/
total 8
-rw-------. 1 root root 221 Oct 31  2018 securetty
-rw-r--r--. 1 root root 449 Aug  9  2019 sysctl.conf
2
3
4
5
6
一般来说,默认要给用户下载的 FTP 文件会放在 /var/ftp/pub 目录中。下面使用简单的终端机浏览器 curl 来观察
# 1. 查看 FTP 根目录下有哪些内容
[root@study ~]# curl ftp://localhost
drwxr-xr-x    2 0        0              42 Mar 17 09:03 pub
# 确实看到了 pub 目录

# 2. 查看 pub 目录内的内容
[root@study ~]# curl ftp://localhost/pub
curl: (78) RETR response: 550
# 无法访问,是因为 pub 是一个目录需要后缀 / 结尾
[root@study ~]# curl ftp://localhost/pub/
-rw-------    1 0        0             221 Oct 30  2018 securetty
-rw-r--r--    1 0        0             449 Aug 08  2019 sysctl.conf

# 3. 查看里面的文件内容
[root@study ~]# curl ftp://localhost/pub/sysctl.conf
# sysctl settings are defined through files in
# /usr/lib/sysctl.d/, /run/sysctl.d/, and /etc/sysctl.d/.
#
# Vendors settings live in /usr/lib/sysctl.d/.
# To override a whole file, create a new file with the same in
# /etc/sysctl.d/ and put new settings there. To override
# only specific settings, add a file with a lexically later
# name in /etc/sysctl.d/ and put new settings there.
#
# For more information, see sysctl.conf(5) and sysctl.d(5).

# 上面不是错误信息,是哪个文件的内容

# 4. 继续查看下一个文件内容
[root@study ~]# curl ftp://localhost/pub/securetty
curl: (78) RETR response: 550
# 这里看不到了,但是 securetty 的确是一个文件而不是一个目录,基本原因应该是权限问题
# 因为 vsftpd 默认放在 /var/ftp/pub 内的资料,无论什么 SELinux type 几乎都可以被读取才对

# 5. 修正权限后,再观察一次 securetty 文件
[root@study ~]# ll /var/ftp/pub/
total 8
-rw-------. 1 root root 221 Oct 31  2018 securetty
-rw-r--r--. 1 root root 449 Aug  9  2019 sysctl.conf
# 可以看到 securetty 的其他人权限没有。改变成其他人也可以读取
[root@study ~]# chmod a+r /var/ftp/pub/securetty
[root@study ~]# curl ftp://localhost/pub/securetty
console
vc/1
vc/2
vc/3
# 此时已经能看到文件内容了

# 6. 修正 SELinux type 的内容(非必须)
[root@study ~]# restorecon -Rv /var/ftp/
restorecon reset /var/ftp/pub/securetty context system_u:object_r:etc_runtime_t:s0->system_u:object_r:public_content_t:s0
restorecon reset /var/ftp/pub/sysctl.conf context system_u:object_r:system_conf_t:s0->system_u:object_r:public_content_t:s0
2
3
4
5
6
7
8
9
10
11
12
13
14
15
16
17
18
19
20
21
22
23
24
25
26
27
28
29
30
31
32
33
34
35
36
37
38
39
40
41
42
43
44
45
46
47
48
49
50
51
52
上述列子告诉我们,要先从权限角度来检查,如果无法被读取 ,可能是因为没有 r 或则没有 rx 权限,并不一定是 SELinux 引起的。下面看看用一般账户登录
# 无法从家目录下载文件的问题分析与解决
由于通过一般账户,前面建立的 ftptest 账户登录的话,文字型的 FTP 客户端软件,默认会将用户引导在根目录,而不是家目录,因此,访问的 URL 需要更改一下
# 0. 在 ftptest 家目录下创建一些数据
[root@study ~]# echo  ~ftptest/
/home/ftptest/
[root@study ~]# echo "testing" >  ~ftptest/test.txt
[root@study ~]# cp -a /etc/hosts /etc/sysctl.conf ~ftptest/
[root@study ~]# ll ~ftptest/
total 12
-rw-r--r--. 1 root root 158 Jun  7  2013 hosts
-rw-r--r--. 1 root root 449 Aug  9  2019 sysctl.conf
-rw-r--r--. 1 root root   8 Mar 17 17:23 test.txt

# 1. 一般账户直接登录 FTP 服务器,同时变换目录到家目录
[root@study ~]# curl ftp://ftptest:myftp123@localhost/~/
curl: (67) Access denied: 530			# 这里报错了
# 注意:书上在增加 ftptest 用户的时候,使用的是 /sbin/nologin,就无法访问 ftp,这里修改下,就可以了
[root@study ~]# usermod -s  /bin/bash ftptest
[root@study ~]# curl ftp://ftptest:myftp123@localhost/~/
-rw-r--r--    1 0        0             158 Jun 07  2013 hosts
-rw-r--r--    1 0        0             449 Aug 08  2019 sysctl.conf
-rw-r--r--    1 0        0               8 Mar 17 09:23 test.txt
# 看左边的权限也是没有问题的
# 从这里开始,笔者的实验和书上的结果对不上了,下面只记录书上的操作指令
# 就是因为上面修改用户的 bash 后,虽然可以访问了,但是下面的却可以下载文件,无法达到和书上的效果一样

# 2. 下载上面可以阅读的权限文件
[root@study ~]# curl ftp://ftptest:myftp123@localhost/~/test.txt
curl:(78) RETR response:550
# 无法访下载,是否是 SELinux 造成的?

# 3. 将 SELinux 从 Enforce 转成 Permissive
[root@study ~]# setenforce 0
[root@study ~]# curl ftp://ftptest:myftp123@localhost/~/test.txt
testing
[root@study ~]# setenforce 1	# 确定是 SELinux 权限问题后,改回来
# 需要该规则还是该 type?现在不知道
# 所以先查询下登录日志有没有相关的信息提供给我们处理

[root@study ~]# vim /var/log/messages
Aug 9 02:55:58 station3-39 setroubleshoot:SELinux is preventing /usr/sbin/vsftpd
	from lock access on the file /home/ftptest/test.txt. For complete SELinux messages.
	run sealert -l 3axxxxxxxx
# 之类的字样,关键词就是 sealert ,执行这条命令
[root@study ~]# sealert -l 3axxxxxxxx
SELinux is preventing /usr/sbin/vsftpd from lock access on the file /home/ftptest/test/txt.
# 下面说有 47.5% 的几率是由于这个原因所发生,并且可以使用 setsebool 去解决的意思
******* Plugin catchall_boolean(47.5 confidence) suggests ********

if you want to allow ftp to home dir
...
Do
setsebool -P ftp_home_dir 1

******* Plugin catchall(6.38confidence) suggests ********
DO
# grep vsftpd /var/log/audit/audit.log | audit2allow -M mypol
# semodule -i mypol.pp

# 下面就重要了,是整个问题发生的主要原因
Additional Information:
Source Context	system_u:system_r:ftpd_t:s0-s0:c0.c1023
Target Context	unconfined_u:object_r:user_home_t:s0
Target Objects	/home/ftptest/test/txt [ file ]
2
3
4
5
6
7
8
9
10
11
12
13
14
15
16
17
18
19
20
21
22
23
24
25
26
27
28
29
30
31
32
33
34
35
36
37
38
39
40
41
42
43
44
45
46
47
48
49
50
51
52
53
54
55
56
57
58
59
60
61
62
63
通过上面的测试,知道主要的问题发生在 SElinux 的 type 不是 vsftpd_t 所能读取的原因,上面 47.5 的概率问题,ftp_home_dir 是 SELinux rules 的配置
# 1. 确认下 SELinux 的模式,并且无法访问
[root@study ~]# getenforce
Enforcing
[root@study ~]# curl ftp://ftptest:myftp123@localhost/~/test.txt
curl:(78) RETR response:550
[root@study ~]# setsebool -P ftp_home_dir 1
Boolean ftp_home_dir is not defined
# 可惜笔者这里提示没有被定义,与书上对不上啊
2
3
4
5
6
7
8
# 一般账户用户从非正规目录上传/下载文件
提供 /srv/gogogo 目录给 ftptest 用户使用,该如何处理?假设不考虑 SELiunx 的话,就是如下方式
# 1. 处理好所需要的目录数据
[root@study ~]# mkdir /srv/gogogo
[root@study ~]# chgrp ftptest /srv/gogogo/
# 把用户组改成 ftptest 这个组
[root@study ~]# ll -d /srv/gogogo/
drwxr-xr-x. 2 root ftptest 22 3月  17 22:43 /srv/gogogo/
[root@study ~]# echo "test" > /srv/gogogo/test.txt
[root@study ~]# curl ftp://ftptest:myftp123@localhost//srv/gogogo/test.txt
curl: (78) RETR response: 550
# 访问不了,查看日志
[root@study ~]# grep sealert /var/log/messages | tail
Mar 17 22:46:35 study setroubleshoot: SELinux is preventing /usr/sbin/vsftpd from read access on the file test.txt. For complete SELinux messages run: sealert -l 88f08c09-c510-4518-bbcc-58bcee06ffb0

[root@study ~]# sealert -l 88f08c09-c510-4518-bbcc-58bcee06ffb0
SELinux is preventing /usr/sbin/vsftpd from read access on the file test.txt.

# 虽然这个可信度很高,不过,因为会全部方向 FTP,所以不考虑
*****  Plugin catchall_boolean (57.6 confidence) suggests   ******************

If you want to allow ftpd to full access
Then you must tell SELinux about this by enabling the 'ftpd_full_access' boolean.

Do
setsebool -P ftpd_full_access 1

# 因为是非正规目录的使用,所以这边加上预设 SELinux type 恐怕能解决
*****  Plugin catchall_labels (36.2 confidence) suggests   *******************

If you want to allow vsftpd to have read access on the test.txt file
Then you need to change the label on test.txt
Do
# 下面这一条数据
# semanage fcontext -a -t FILE_TYPE 'test.txt'
.... 很多数据
Then execute:
restorecon -v 'test.txt'		# 还有这一条数据,都是要参考的解决方案

*****  Plugin catchall (7.64 confidence) suggests   **************************

If you believe that vsftpd should be allowed read access on the test.txt file by default.
Then you should report this as a bug.
You can generate a local policy module to allow this access.
Do
allow this access for now by executing:
# ausearch -c 'vsftpd' --raw | audit2allow -M my-vsftpd
# semodule -i my-vsftpd.pp


Additional Information:
Source Context                system_u:system_r:ftpd_t:s0-s0:c0.c1023
Target Context                unconfined_u:object_r:var_t:s0
Target Objects                test.txt [ file ]
Source                        vsftpd
Source Path                   /usr/sbin/vsftpd
Port                          <Unknown>
Host                          study.centos.mrcode
Source RPM Packages
Target RPM Packages
Policy RPM                    selinux-policy-3.13.1-252.el7.noarch
Selinux Enabled               True
Policy Type                   targeted
Enforcing Mode                Enforcing
Host Name                     study.centos.mrcode
Platform                      Linux study.centos.mrcode 3.10.0-1062.el7.x86_64
                              #1 SMP Wed Aug 7 18:08:02 UTC 2019 x86_64 x86_64
Alert Count                   2
First Seen                    2020-03-17 22:46:17 CST
Last Seen                     2020-03-17 22:46:32 CST
Local ID                      88f08c09-c510-4518-bbcc-58bcee06ffb0

Raw Audit Messages
type=AVC msg=audit(1584456392.386:979): avc:  denied  { read } for  pid=10979 comm="vsftpd" name="test.txt" dev="dm-0" ino=35108539 scontext=system_u:system_r:ftpd_t:s0-s0:c0.c1023 tcontext=unconfined_u:object_r:var_t:s0 tclass=file permissive=0


Hash: vsftpd,ftpd_t,var_t,file,read

# 3. 查看 /var/ftp 的 SELinux type
[root@study ~]#  ll -Zd /var/ftp/
drwxr-xr-x. root root system_u:object_r:public_content_t:s0 /var/ftp/
[root@study ~]#  ll -Zd /srv/gogogo/
drwxr-xr-x. root ftptest unconfined_u:object_r:var_t:s0   /srv/gogogo/

# 4. 以 sealert 建议的方法来处理好 SELinux type
[root@study ~]# semanage fcontext -a -t public_content_t '/srv/gogogo(/.*)?'
[root@study ~]# restorecon -Rv /srv/gogogo
restorecon reset /srv/gogogo context unconfined_u:object_r:var_t:s0->unconfined_u:object_r:public_content_t:s0
restorecon reset /srv/gogogo/test.txt context unconfined_u:object_r:var_t:s0->unconfined_u:object_r:public_content_t:s0
# 再次访问就可以了
[root@study ~]# curl ftp://ftptest:myftp123@localhost//srv/gogogo/test.txt
test
2
3
4
5
6
7
8
9
10
11
12
13
14
15
16
17
18
19
20
21
22
23
24
25
26
27
28
29
30
31
32
33
34
35
36
37
38
39
40
41
42
43
44
45
46
47
48
49
50
51
52
53
54
55
56
57
58
59
60
61
62
63
64
65
66
67
68
69
70
71
72
73
74
75
76
77
78
79
80
81
82
83
84
85
86
87
88
89
90
在这个范例中,修改的是 type,前一个范例中修改的是 rule,不太一样的
# 无法变更 FTP 联机端口问题分析解决
比如你想要改变 FTP 默认的启动端口 21 改成 555,基本上,既然 SELinux 的主体进程大多是被受限的网络服务,很有可能连端口也限制了,下面尝试修改端口,来查看是怎么解决问题的
# 1. 先处理 vsftpd 的配置文件,加入 port 的端口参数
[root@study ~]# vim /etc/vsftpd/vsftpd.conf
listen_port=555

# 2. 重启服务,并查看日志
[root@study ~]# systemctl restart vsftpd
Job for vsftpd.service failed because the control process exited with error code. See "systemctl status vsftpd.service" and "journalctl -xe" for details.
[root@study ~]# grep sealert /var/log/messages
Mar 17 23:03:23 study setroubleshoot: SELinux is preventing /usr/sbin/vsftpd from name_bind access on the tcp_socket port 555. For complete SELinux messages run: sealert -l e3e3dee0-83eb-4cb8-b894-8be590fee082

[root@study ~]# sealert -l e3e3dee0-83eb-4cb8-b894-8be590fee082
SELinux is preventing /usr/sbin/vsftpd from name_bind access on the tcp_socket port 555.

# 这个 92.2 的概率,基本上就是这个了
*****  Plugin bind_ports (92.2 confidence) suggests   ************************

If you want to allow /usr/sbin/vsftpd to bind to network port 555
Then you need to modify the port type.
Do
# semanage port -a -t PORT_TYPE -p tcp 555
    where PORT_TYPE is one of the following: certmaster_port_t, cluster_port_t, ephemeral_port_t, ftp_data_port_t, ftp_port_t, hadoop_datanode_port_t, hplip_port_t, isns_port_t, port_t, postgrey_port_t, unreserved_port_t.

*****  Plugin catchall_boolean (7.83 confidence) suggests   ******************

If you want to allow nis to enabled
Then you must tell SELinux about this by enabling the 'nis_enabled' boolean.

Do
setsebool -P nis_enabled 1

*****  Plugin catchall (1.41 confidence) suggests   **************************

If you believe that vsftpd should be allowed name_bind access on the port 555 tcp_socket by default.
Then you should report this as a bug.
You can generate a local policy module to allow this access.
Do
allow this access for now by executing:
# ausearch -c 'vsftpd' --raw | audit2allow -M my-vsftpd
# semodule -i my-vsftpd.pp


Additional Information:
Source Context                system_u:system_r:ftpd_t:s0-s0:c0.c1023
Target Context                system_u:object_r:hi_reserved_port_t:s0
Target Objects                port 555 [ tcp_socket ]
Source                        vsftpd
Source Path                   /usr/sbin/vsftpd
Port                          555
Host                          study.centos.mrcode
Source RPM Packages           vsftpd-3.0.2-25.el7.x86_64
Target RPM Packages
Policy RPM                    selinux-policy-3.13.1-252.el7.noarch
Selinux Enabled               True
Policy Type                   targeted
Enforcing Mode                Enforcing
Host Name                     study.centos.mrcode
Platform                      Linux study.centos.mrcode 3.10.0-1062.el7.x86_64
                              #1 SMP Wed Aug 7 18:08:02 UTC 2019 x86_64 x86_64
Alert Count                   1
First Seen                    2020-03-17 23:03:20 CST
Last Seen                     2020-03-17 23:03:20 CST
Local ID                      e3e3dee0-83eb-4cb8-b894-8be590fee082

Raw Audit Messages
type=AVC msg=audit(1584457400.225:1008): avc:  denied  { name_bind } for  pid=11443 comm="vsftpd" src=555 scontext=system_u:system_r:ftpd_t:s0-s0:c0.c1023 tcontext=system_u:object_r:hi_reserved_port_t:s0 tclass=tcp_socket permissive=0


type=SYSCALL msg=audit(1584457400.225:1008): arch=x86_64 syscall=bind success=no exit=EACCES a0=4 a1=55e9e4d4e800 a2=1c a3=3 items=0 ppid=11440 pid=11443 auid=4294967295 uid=0 gid=0 euid=0 suid=0 fsuid=0 egid=0 sgid=0 fsgid=0 tty=(none) ses=4294967295 comm=vsftpd exe=/usr/sbin/vsftpd subj=system_u:system_r:ftpd_t:s0-s0:c0.c1023 key=(null)

Hash: vsftpd,ftpd_t,hi_reserved_port_t,tcp_socket,name_bind

# 3. 根据建议解决执行指令, 92% 哪个指令下面 PORT_TYPE 下面又可选的 ftp_port_t
# 但是笔者还是懵逼的,不知道为什么那么多里面就选这个了
[root@study ~]# semanage port -a -t ftp_port_t -p tcp 555
[root@study ~]# systemctl restart vsftpd
[root@study ~]# netstat -tlnp
Active Internet connections (only servers)
Proto Recv-Q Send-Q Local Address           Foreign Address         State       PID/Program name
tcp        0      0 127.0.0.1:631           0.0.0.0:*               LISTEN      1374/cupsd
tcp        0      0 127.0.0.1:25            0.0.0.0:*               LISTEN      1578/master
tcp        0      0 127.0.0.1:6010          0.0.0.0:*               LISTEN      2350/sshd: mrcode@p
tcp        0      0 127.0.0.1:6011          0.0.0.0:*               LISTEN      10579/sshd: root@pt
tcp        0      0 0.0.0.0:111             0.0.0.0:*               LISTEN      1/systemd
tcp        0      0 192.168.122.1:53        0.0.0.0:*               LISTEN      1975/dnsmasq
tcp        0      0 0.0.0.0:22              0.0.0.0:*               LISTEN      1378/sshd
tcp6       0      0 ::1:631                 :::*                    LISTEN      1374/cupsd
tcp6       0      0 ::1:25                  :::*                    LISTEN      1578/master
tcp6       0      0 ::1:6010                :::*                    LISTEN      2350/sshd: mrcode@p
tcp6       0      0 ::1:6011                :::*                    LISTEN      10579/sshd: root@pt
tcp6       0      0 :::555                  :::*                    LISTEN      11573/vsftpd
tcp6       0      0 :::111                  :::*                    LISTEN      1/systemd
tcp6       0      0 :::22                   :::*                    LISTEN      1378/sshd
# 可以看到 vsftpd 的端口变成了 555 了

# 4. 实验看看该 port 是否可用
[root@study ~]# curl ftp://localhost:555
drwxr-xr-x    2 0        0              42 Mar 17 09:03 pub
2
3
4
5
6
7
8
9
10
11
12
13
14
15
16
17
18
19
20
21
22
23
24
25
26
27
28
29
30
31
32
33
34
35
36
37
38
39
40
41
42
43
44
45
46
47
48
49
50
51
52
53
54
55
56
57
58
59
60
61
62
63
64
65
66
67
68
69
70
71
72
73
74
75
76
77
78
79
80
81
82
83
84
85
86
87
88
89
90
91
92
93
94
95
96
97