
# mysql select 流程 - 请求
前面探索了《前端连接交互探索》,这次应该可以探索下 mysql 中 select 命令流程了。
先来探索下两个分片表中的查询语句,主要是探索,这个交互流程:
- 前段发送的 select 语句经历什么?
- 是怎么交给后端连接的(也就是怎么让实际的 mysql 服务器查询的)
- nio 异步交互,这个数据是怎么返回前段客户端的
# 找到入口
在 reactor 模型中说道过,NIOReactor 是处理读写事件的,那么这个类就是入口
在 navicat 中执行一条简单的 sql 语句 SELECT * FROM employee 然后开始 debug
io.mycat.net.NIOReactor.RW#run 下面是伪代码,为了清楚的看到我们要找的代码

@Override
		public void run() {
			int invalidSelectCount = 0;
			Set<SelectionKey> keys = null;
			for (;;) {
				++reactCount;
				try {
					{
						invalidSelectCount = 0;
						for (SelectionKey key : keys) {
							AbstractConnection con = null;
							try {
                // 获取与 该key绑定的 attachment 对象,就是 ServerConnection
								Object att = key.attachment();
								if (att != null) {
									con = (AbstractConnection) att;
									if (key.isValid() && key.isReadable()) {
										try {
                      // 开始读取数据
											con.asynRead();
										} catch (IOException e) {
2
3
4
5
6
7
8
9
10
11
12
13
14
15
16
17
18
19
20
21
22
23
# nio 中 ServerConnection 是怎么和事件关联上的
那么这里就要补充下前一章没有说道的一个知识了,attachment 是什么时候和 key 绑定关联上的?
就是之前在在登录认证的时候,register 方法中关联的。
io.mycat.net.NIOSocketWR#register
public void register(Selector selector) throws IOException {
  try {
    // 这里:在注册的时候把 ServerConnection 当成 attachment 和 通道关联上了
    processKey = channel.register(selector, SelectionKey.OP_READ, con);
  } finally {
    if (con.isClosed.get()) {
      clearSelectionKey();
    }
  }
}
2
3
4
5
6
7
8
9
10
11
读取和解析协议包是  AbstractConnection 负责的,本章节重点不是看 nio 的解析。
io.mycat.net.AbstractConnection#onReadData
找到该方法,在 onReadData 中读取到一个包之后,会调用 handle方法
io.mycat.net.AbstractConnection#handle

@Override
public void handle(byte[] data) {
  if (isSupportCompress()) {
    List<byte[]> packs = CompressUtil.decompressMysqlPacket(data, decompressUnfinishedDataQueue);
    for (byte[] pack : packs) {
      if (pack.length != 0) {
        handler.handle(pack);
      }
    }
  } else {
    // 之前说到过,在登录成功之后就把处理器给换成  FrontendCommandHandler 类了;
    // 这里其实才是真正的 入口。从这里开始才是一条语句 开始的地方
    handler.handle(data);
  }
}
2
3
4
5
6
7
8
9
10
11
12
13
14
15
16
17
18
19
20
# select 分析
FrontendCommandHandler 类最主要的方法就是下面贴出来的代码, 根据 mysql 协议中的命令类型转调具体的方法。
关于协议命令可以参考 mysql 官网文档 (opens new window)
io.mycat.net.handler.FrontendCommandHandler#handle

public FrontendCommandHandler(FrontendConnection source) {
    this.source = source;
    this.commands = source.getProcessor().getCommands();
}

@Override
public void handle(byte[] data)
{
    // 这个先忽略,我目前也不知道 loadData 是什么功能
    if(source.getLoadDataInfileHandler()!=null&&source.getLoadDataInfileHandler().isStartLoadData())
    {
        MySQLMessage mm = new MySQLMessage(data);
        int  packetLength = mm.readUB3();
        if(packetLength+4==data.length)
        {
            source.loadDataInfileData(data);
        }
        return;
    }
    switch (data[4])
    {
        case MySQLPacket.COM_INIT_DB:
            commands.doInitDB();
            source.initDB(data);
            break;
        // 查询语句  入口
        case MySQLPacket.COM_QUERY:
            // this.commands = source.getProcessor().getCommands();
            // 现在来看 NIOProcessor 功能之一就是统计 sql 查询次数
            // 这里只是把 query 的次数 +1 了
            commands.doQuery();
            source.query(data);
            break;
        case MySQLPacket.COM_PING:
            commands.doPing();
            source.ping();
            break;
        case MySQLPacket.COM_QUIT:
            commands.doQuit();
            source.close("quit cmd");
            break;
        case MySQLPacket.COM_PROCESS_KILL:
            commands.doKill();
            source.kill(data);
            break;
        case MySQLPacket.COM_STMT_PREPARE:
            commands.doStmtPrepare();
            source.stmtPrepare(data);
            break;
        case MySQLPacket.COM_STMT_SEND_LONG_DATA:
        	commands.doStmtSendLongData();
        	source.stmtSendLongData(data);
        	break;
        case MySQLPacket.COM_STMT_RESET:
        	commands.doStmtReset();
        	source.stmtReset(data);
        	break;
        case MySQLPacket.COM_STMT_EXECUTE:
            commands.doStmtExecute();
            source.stmtExecute(data);
            break;
        case MySQLPacket.COM_STMT_CLOSE:
            commands.doStmtClose();
            source.stmtClose(data);
            break;
        case MySQLPacket.COM_HEARTBEAT:
            commands.doHeartbeat();
            source.heartbeat(data);
            break;
        default:
                 commands.doOther();
                 source.writeErrMessage(ErrorCode.ER_UNKNOWN_COM_ERROR,
                         "Unknown command");

    }
}
2
3
4
5
6
7
8
9
10
11
12
13
14
15
16
17
18
19
20
21
22
23
24
25
26
27
28
29
30
31
32
33
34
35
36
37
38
39
40
41
42
43
44
45
46
47
48
49
50
51
52
53
54
55
56
57
58
59
60
61
62
63
64
65
66
67
68
69
70
71
72
73
74
75
76
77
78
io.mycat.net.FrontendConnection#query(byte[])
public void query(byte[] data) {

		// 取得语句
		String sql = null;
		try {
      // 把数据解析成 mysql 消息包
			MySQLMessage mm = new MySQLMessage(data);
			mm.position(5);
			sql = mm.readString(charset);
		} catch (UnsupportedEncodingException e) {
			writeErrMessage(ErrorCode.ER_UNKNOWN_CHARACTER_SET, "Unknown charset '" + charset + "'");
			return;
		}
		// 这里需要注意了
    // 由于 navicat 这样的工具发送查询 sql 前还会发送其他的命令
    // 比如这次 debug 过程中,
    // 会发送 SET PROFILING=1; 命令
    // SHOW STATUS 命令
    // 最后才会看到我们这次要测试的语句
		this.query( sql );
	}
2
3
4
5
6
7
8
9
10
11
12
13
14
15
16
17
18
19
20
21
io.mycat.net.FrontendConnection#query(java.lang.String)
public void query(String sql) {

  if (sql == null || sql.length() == 0) {
    writeErrMessage(ErrorCode.ER_NOT_ALLOWED_COMMAND, "Empty SQL");
    return;
  }

  if (LOGGER.isDebugEnabled()) {
    LOGGER.debug(new StringBuilder().append(this).append(" ").append(sql).toString());
  }

  // remove last ';'
  // 不支持多条语句查询,这里吧多条语句分隔符给去掉了
  if (sql.endsWith(";")) {
    sql = sql.substring(0, sql.length() - 1);
  }

  // 记录当前链接正在执行的 SQL
  this.setExecuteSql(sql);

  // 防火墙策略( SQL 黑名单/ 注入攻击)
  if ( !privileges.checkFirewallSQLPolicy( user, sql ) ) {
    writeErrMessage(ErrorCode.ERR_WRONG_USED,
        "The statement is unsafe SQL, reject for user '" + user + "'");
    return;
  }

  // DML 权限检查
  try {
    // 现在看来 io.mycat.config.MycatPrivileges 类封装了 权限相关的功能
    boolean isPassed = privileges.checkDmlPrivilege(user, schema, sql);
    if ( !isPassed ) {
      writeErrMessage(ErrorCode.ERR_WRONG_USED,
          "The statement DML privilege check is not passed, reject for user '" + user + "'");
      return;
    }
   } catch( com.alibaba.druid.sql.parser.ParserException e1) {
          writeErrMessage(ErrorCode.ERR_WRONG_USED,  e1.getMessage());
          LOGGER.error("parse exception", e1 );
      return;
     }

  // 执行查询
  if (queryHandler != null) {
    // 检查该用户,也就是 mycat 的逻辑用户是否是只读权限
    queryHandler.setReadOnly(privileges.isReadOnly(user));
    queryHandler.query(sql);

  } else {
    writeErrMessage(ErrorCode.ER_UNKNOWN_COM_ERROR, "Query unsupported!");
  }
}
2
3
4
5
6
7
8
9
10
11
12
13
14
15
16
17
18
19
20
21
22
23
24
25
26
27
28
29
30
31
32
33
34
35
36
37
38
39
40
41
42
43
44
45
46
47
48
49
50
51
52
53
# 目前为止小结
前面一条语句经过了如下流程:
- mysql 协议解包
- 只支持单条语句执行,去掉 ";"
- 防火墙策略检查
- DML 权限检测
- 用户权限检测
目前的类图交互

# 真正开始 sql 解析流程
io.mycat.server.ServerQueryHandler
io.mycat.server.ServerQueryHandler#query

@Override
public void query(String sql) {

  ServerConnection c = this.source;
  if (LOGGER.isDebugEnabled()) {
    LOGGER.debug(new StringBuilder().append(c).append(sql).toString());
  }
  // 解析出 语句的类型
  int rs = ServerParse.parse(sql);
  int sqlType = rs & 0xff;

  switch (sqlType) {
  //explain sql
  case ServerParse.EXPLAIN:
    ExplainHandler.handle(sql, c, rs >>> 8);
    break;
  //explain2 datanode=? sql=?
  case ServerParse.EXPLAIN2:
    Explain2Handler.handle(sql, c, rs >>> 8);
    break;
  case ServerParse.SET:
    SetHandler.handle(sql, c, rs >>> 8);
    break;
  case ServerParse.SHOW:
    ShowHandler.handle(sql, c, rs >>> 8);
    break;
  case ServerParse.SELECT:
    // 找到对应的 selectHandler 去处理
    // 一个静态类,并且把 当前的链接对象传递进去了
    SelectHandler.handle(sql, c, rs >>> 8);
    break;

...
2
3
4
5
6
7
8
9
10
11
12
13
14
15
16
17
18
19
20
21
22
23
24
25
26
27
28
29
30
31
32
33
34
35
io.mycat.server.handler.SelectHandler#handle

    public static void handle(String stmt, ServerConnection c, int offs) {
        int offset = offs;
        switch (ServerParseSelect.parse(stmt, offs)) {
            case ServerParseSelect.VERSION_COMMENT:
                SelectVersionComment.response(c);
                break;
            case ServerParseSelect.DATABASE:
            ...
            default:
               // 通过进一步解析之后,定位到语句,又委托回了 链接对象执行语句
               c.execute(stmt, ServerParse.SELECT);
2
3
4
5
6
7
8
9
10
11
12
13
io.mycat.server.ServerConnection#execute

public void execute(String sql, int type) {
  //连接状态检查
  if (this.isClosed()) {
    LOGGER.warn("ignore execute ,server connection is closed " + this);
    return;
  }
  // 事务状态检查
  if (txInterrupted) {
    writeErrMessage(ErrorCode.ER_YES,
        "Transaction error, need to rollback." + txInterrputMsg);
    return;
  }

  // 检查当前使用的DB
  String db = this.schema;
  boolean isDefault = true;
  if (db == null) {
    // 如果没有 db 则使用默认的 db
    // 这里的功能也就是为什么,在登录之后,没有调用 use xxxDB 也能正常工作的原因
    db = SchemaUtil.detectDefaultDb(sql, type);
    if (db == null) {
      writeErrMessage(ErrorCode.ERR_BAD_LOGICDB, "No MyCAT Database selected");
      return;
    }
    isDefault = false;
  }

  // 兼容PhpAdmin's, 支持对MySQL元数据的模拟返回
  //// TODO: 2016/5/20 支持更多information_schema特性
  if (ServerParse.SELECT == type
      && db.equalsIgnoreCase("information_schema") ) {
    MysqlInformationSchemaHandler.handle(sql, this);
    return;
  }

  if (ServerParse.SELECT == type
      && sql.contains("mysql")
      && sql.contains("proc")) {

    SchemaUtil.SchemaInfo schemaInfo = SchemaUtil.parseSchema(sql);
    if (schemaInfo != null
        && "mysql".equalsIgnoreCase(schemaInfo.schema)
        && "proc".equalsIgnoreCase(schemaInfo.table)) {

      // 兼容MySQLWorkbench
      MysqlProcHandler.handle(sql, this);
      return;
    }
  }

  // 获取当前 db 的配置
  SchemaConfig schema = MycatServer.getInstance().getConfig().getSchemas().get(db);
  if (schema == null) {
    writeErrMessage(ErrorCode.ERR_BAD_LOGICDB,
        "Unknown MyCAT Database '" + db + "'");
    return;
  }

  //fix navicat   SELECT STATE AS `State`, ROUND(SUM(DURATION),7) AS `Duration`, CONCAT(ROUND(SUM(DURATION)/*100,3), '%') AS `Percentage` FROM INFORMATION_SCHEMA.PROFILING WHERE QUERY_ID= GROUP BY STATE ORDER BY SEQ
  if(ServerParse.SELECT == type &&sql.contains(" INFORMATION_SCHEMA.PROFILING ")&&sql.contains("CONCAT(ROUND(SUM(DURATION)/"))
  {
    InformationSchemaProfiling.response(this);
    return;
  }

  /* 当已经设置默认schema时,可以通过在sql中指定其它schema的方式执行
   * 相关sql,已经在mysql客户端中验证。
   * 所以在此处增加关于sql中指定Schema方式的支持。
   */
  if (isDefault && schema.isCheckSQLSchema() && isNormalSql(type)) {
    SchemaUtil.SchemaInfo schemaInfo = SchemaUtil.parseSchema(sql);
    if (schemaInfo != null && schemaInfo.schema != null && !schemaInfo.schema.equals(db)) {
      SchemaConfig schemaConfig = MycatServer.getInstance().getConfig().getSchemas().get(schemaInfo.schema);
      if (schemaConfig != null)
        schema = schemaConfig;
    }
  }

  routeEndExecuteSQL(sql, type, schema);

}
2
3
4
5
6
7
8
9
10
11
12
13
14
15
16
17
18
19
20
21
22
23
24
25
26
27
28
29
30
31
32
33
34
35
36
37
38
39
40
41
42
43
44
45
46
47
48
49
50
51
52
53
54
55
56
57
58
59
60
61
62
63
64
65
66
67
68
69
70
71
72
73
74
75
76
77
78
79
80
81
82
83
开始路由计算
io.mycat.server.ServerConnection#routeEndExecuteSQL

public void routeEndExecuteSQL(String sql, final int type, final SchemaConfig schema) {
		// 路由计算
		RouteResultset rrs = null;
		try {
      // 在本场景中路由计算的大概功能是:
      // 1. 先从缓存中获取该语句是否有缓存过
      // 2. 没有命中,则再次路由解析。由于我配置的是两个分片表,这里解析完成之后
      //  rrs 中会包含两个节点的sql执行信息
			rrs = MycatServer
					.getInstance()
					.getRouterservice()
					.route(MycatServer.getInstance().getConfig().getSystem(),
							schema, type, sql, this.charset, this);

		} catch (Exception e) {
			StringBuilder s = new StringBuilder();
			LOGGER.warn(s.append(this).append(sql).toString() + " err:" + e.toString(),e);
			String msg = e.getMessage();
			writeErrMessage(ErrorCode.ER_PARSE_ERROR, msg == null ? e.getClass().getSimpleName() : msg);
			return;
		}
		if (rrs != null) {
			// 这里使用到了 io.mycat.server.NonBlockingSession#execute
      // 之前对每一个 前段链接都分配了一个 session
			session.execute(rrs, rrs.isSelectForUpdate()?ServerParse.UPDATE:type);
		}

 	}
2
3
4
5
6
7
8
9
10
11
12
13
14
15
16
17
18
19
20
21
22
23
24
25
26
27
28
29
30
路由计算是一个非常复杂的技术,这里不继续深入。还是继续探索交互流程
@Override
   public void execute(RouteResultset rrs, int type) {

       // clear prev execute resources
       clearHandlesResources();
       if (LOGGER.isDebugEnabled()) {
           StringBuilder s = new StringBuilder();
           LOGGER.debug(s.append(source).append(rrs).toString() + " rrs ");
       }

       // 检查路由结果是否为空
       // 在本场景中,由于是连个分片表,sql 语句是 SELECT * FROM employee
       // 所以返回了所有节点的信息
       RouteResultsetNode[] nodes = rrs.getNodes();
       if (nodes == null || nodes.length == 0 || nodes[0].getName() == null || nodes[0].getName().equals("")) {
           source.writeErrMessage(ErrorCode.ER_NO_DB_ERROR,
                   "No dataNode found ,please check tables defined in schema:" + source.getSchema());
           return;
       }

       boolean autocommit = source.isAutocommit();
       final int initCount = target.size();
       // 单节点执行逻辑
       if (nodes.length == 1) {
           singleNodeHandler = new SingleNodeHandler(rrs, this);
           if (this.isPrepared()) {
               singleNodeHandler.setPrepared(true);
           }

           try {
               if(initCount > 1){
                   checkDistriTransaxAndExecute(rrs,1,autocommit);
               }else{
                   singleNodeHandler.execute();
               }
           } catch (Exception e) {
               LOGGER.warn(new StringBuilder().append(source).append(rrs).toString(), e);
               source.writeErrMessage(ErrorCode.ERR_HANDLE_DATA, e.toString());
           }

       } else {
           // 多节点执行逻辑
           // 构造多节点处理器的时候,还检查了 limit 参数
           multiNodeHandler = new MultiNodeQueryHandler(type, rrs, autocommit, this);
           if (this.isPrepared()) {
               multiNodeHandler.setPrepared(true);
           }
           try {
               if(((type == ServerParse.DELETE || type == ServerParse.INSERT || type == ServerParse.UPDATE) && !rrs.isGlobalTable() && nodes.length > 1)||initCount > 1) {
                   checkDistriTransaxAndExecute(rrs,2,autocommit);
               } else {
                   // 多节点语句开始执行
                   multiNodeHandler.execute();
               }
           } catch (Exception e) {
               LOGGER.warn(new StringBuilder().append(source).append(rrs).toString(), e);
               source.writeErrMessage(ErrorCode.ERR_HANDLE_DATA, e.toString());
           }
       }

       if (this.isPrepared()) {
           this.setPrepared(false);
       }
   }
2
3
4
5
6
7
8
9
10
11
12
13
14
15
16
17
18
19
20
21
22
23
24
25
26
27
28
29
30
31
32
33
34
35
36
37
38
39
40
41
42
43
44
45
46
47
48
49
50
51
52
53
54
55
56
57
58
59
60
61
62
63
64
# 多节点开始执行
io.mycat.backend.mysql.nio.handler.MultiNodeQueryHandler
io.mycat.backend.mysql.nio.handler.MultiNodeQueryHandler#execute

public void execute() throws Exception {
  final ReentrantLock lock = this.lock;
  lock.lock();
  try {
    this.reset(rrs.getNodes().length);
    this.fieldsReturned = false;
    this.affectedRows = 0L;
    this.insertId = 0L;
  } finally {
    lock.unlock();
  }
  MycatConfig conf = MycatServer.getInstance().getConfig();
  startTime = System.currentTimeMillis();
  LOGGER.debug("rrs.getRunOnSlave()-" + rrs.getRunOnSlave());
  for (final RouteResultsetNode node : rrs.getNodes()) {
    BackendConnection conn = session.getTarget(node);
    // 先从自身session中查找是否有可用连接
    if (session.tryExistsCon(conn, node)) {
      LOGGER.debug("node.getRunOnSlave()-" + node.getRunOnSlave());
      node.setRunOnSlave(rrs.getRunOnSlave());	// 实现 master/slave注解
      LOGGER.debug("node.getRunOnSlave()-" + node.getRunOnSlave());
      _execute(conn, node);
    } else {
      // 给该节点语句创建新的 后端 mysql 连接
      LOGGER.debug("node.getRunOnSlave()1-" + node.getRunOnSlave());
      node.setRunOnSlave(rrs.getRunOnSlave());	// 实现 master/slave注解
      LOGGER.debug("node.getRunOnSlave()2-" + node.getRunOnSlave());

      // 根据节点名称获取信息,
      // 也就是 <dataNode name="dn1" dataHost="localhost1" database="mycat_dev_test_1"/> 配置映射的具体物理机信息
      // 里面包含了该节点的 mysql 连接池
      PhysicalDBNode dn = conf.getDataNodes().get(node.getName());
      dn.getConnection(dn.getDatabase(), autocommit, node, this, node);
      // 注意该方法不仅仅是获取连接,获取新连接成功之后,会通过层层回调,最后回调到本类 的connectionAcquired
      // 这是通过 上面方法的 this 参数的层层传递完成的。
      // connectionAcquired 进行执行操作:
      // session.bindConnection(node, conn);
      // _execute(conn, node);
    }

  }
}
2
3
4
5
6
7
8
9
10
11
12
13
14
15
16
17
18
19
20
21
22
23
24
25
26
27
28
29
30
31
32
33
34
35
36
37
38
39
40
41
42
43
44
这里就有点奇葩了,获取连接方法里面就直接执行了操作
io.mycat.backend.datasource.PhysicalDBNode#getConnection

public void getConnection(String schema,boolean autoCommit, RouteResultsetNode rrs,
							ResponseHandler handler, Object attachment) throws Exception {
		checkRequest(schema);
		if (dbPool.isInitSuccess()) {
			LOGGER.debug("rrs.getRunOnSlave() " + rrs.getRunOnSlave());
			if(rrs.getRunOnSlave() != null){		// 带有 /*db_type=master/slave*/ 注解
				// 注释执行处理
			}else{	// 没有  /*db_type=master/slave*/ 注解,按照原来的处理方式
				LOGGER.debug("rrs.getRunOnSlave() " + rrs.getRunOnSlave());	// null
        // 进行了一个事物判定,无事物就是自动提交
				if (rrs.canRunnINReadDB(autoCommit)) {
					dbPool.getRWBanlanceCon(schema,autoCommit, handler, attachment, this.database);
				} else {
					PhysicalDatasource writeSource =dbPool.getSource();
					//记录写节点写负载值
					writeSource.setWriteCount();
					writeSource.getConnection(schema, autoCommit,
							handler, attachment);
				}
			}

		} else {
			throw new IllegalArgumentException("Invalid DataSource:" + dbPool.getActivedIndex());
			}
		}
2
3
4
5
6
7
8
9
10
11
12
13
14
15
16
17
18
19
20
21
22
23
24
25
26
27
io.mycat.backend.datasource.PhysicalDBPool#getRWBanlanceCon
public void getRWBanlanceCon(String schema, boolean autocommit,
    ResponseHandler handler, Object attachment, String database) throws Exception {

  PhysicalDatasource theNode = null;
  ArrayList<PhysicalDatasource> okSources = null;
  switch (banlance) {
  case BALANCE_ALL_BACK: {
    // all read nodes and the standard by masters
    okSources = getAllActiveRWSources(true, false, checkSlaveSynStatus());
    if (okSources.isEmpty()) {
      theNode = this.getSource();

    } else {
      theNode = randomSelect(okSources);
    }
    break;
  }
  case BALANCE_ALL: {
    okSources = getAllActiveRWSources(true, true, checkSlaveSynStatus());
    theNode = randomSelect(okSources);
    break;
  }
      case BALANCE_ALL_READ: {
          okSources = getAllActiveRWSources(false, false, checkSlaveSynStatus());
          theNode = randomSelect(okSources);
          break;
      }
  case BALANCE_NONE:
  default:
    // 在本场景中走了默认的数据源,获取了 真实的物理机 mysql 配置
    // 里面包括了该物理机mysql实例的连接池
    /*  <dataHost name="localhost1" maxCon="2" minCon="1" balance="0"
              writeType="0" dbType="mysql" dbDriver="native" switchType="1" slaveThreshold="100"> */
    // return default write data source
    theNode = this.getSource();
  }

  if (LOGGER.isDebugEnabled()) {
    LOGGER.debug("select read source " + theNode.getName() + " for dataHost:" + this.getHostName());
  }
  //统计节点读操作次数
  theNode.setReadCount();
  // 所以这里获取一个连接来执行
  theNode.getConnection(schema, autocommit, handler, attachment);
}
2
3
4
5
6
7
8
9
10
11
12
13
14
15
16
17
18
19
20
21
22
23
24
25
26
27
28
29
30
31
32
33
34
35
36
37
38
39
40
41
42
43
44
45
public void getConnection(String schema, boolean autocommit,
		final ResponseHandler handler, final Object attachment)
		throws IOException {

	// 从当前连接map中拿取已建立好的后端连接
	BackendConnection con = this.conMap.tryTakeCon(schema, autocommit);
	if (con != null) {
		//如果不为空,则绑定对应前端请求的handler
		takeCon(con, handler, attachment, schema);
		return;
	} else {
		int activeCons = this.getActiveCount();
		if (activeCons + 1 > size) {
			LOGGER.error("the max activeConnnections size can not be max than maxconnections");
			throw new IOException("the max activeConnnections size can not be max than maxconnections");
		} else { // create connection
			LOGGER.info("no ilde connection in pool,create new connection for "	+ this.name + " of schema " + schema);
			createNewConnection(handler, attachment, schema);
		}
	}
}
2
3
4
5
6
7
8
9
10
11
12
13
14
15
16
17
18
19
20
21
private BackendConnection takeCon(BackendConnection conn,
			final ResponseHandler handler, final Object attachment,
			String schema) {

		conn.setBorrowed(true);

		if (!conn.getSchema().equals(schema)) {
			conn.setSchema(schema);
		}
		ConQueue queue = conMap.getSchemaConQueue(schema);
		// 给该 dataNode 队列增加执行次数
		queue.incExecuteCount();
		// 给连接绑定要执行的 io.mycat.route.RouteResultsetNode ,经过路由后的sql语句信息和需要在目标机器上执行的信息
		conn.setAttachment(attachment);
		conn.setLastTime(System.currentTimeMillis()); // 每次取连接的时候,更新下lasttime,防止在前端连接检查的时候,关闭连接,导致sql执行失败
    // 这里又回到了 io.mycat.backend.mysql.nio.handler.MultiNodeQueryHandler 中
		handler.connectionAcquired(conn);
		return conn;
	}
2
3
4
5
6
7
8
9
10
11
12
13
14
15
16
17
18
19
io.mycat.backend.mysql.nio.handler.MultiNodeQueryHandler#connectionAcquired
@Override
public void connectionAcquired(final BackendConnection conn) {
	final RouteResultsetNode node = (RouteResultsetNode) conn
			.getAttachment();
	// 在session上绑定 路由信息,和获取到的连接信息
	session.bindConnection(node, conn);
	_execute(conn, node);
}

private void _execute(BackendConnection conn, RouteResultsetNode node) {
	  // 如果 session 关闭则不继续执行
		if (clearIfSessionClosed(session)) {
			return;
		}
		// 在 连接上绑定一个响应处理器
		conn.setResponseHandler(this);
		try {
			conn.execute(node, session.getSource(), autocommit);
		} catch (IOException e) {
			connectionError(e, conn);
		}
	}
2
3
4
5
6
7
8
9
10
11
12
13
14
15
16
17
18
19
20
21
22
# 终于到了 mysql 连接执行语句的地方
io.mycat.backend.mysql.nio.MySQLConnection#execute


public void execute(RouteResultsetNode rrn, ServerConnection sc,
		boolean autocommit) throws UnsupportedEncodingException {
	if (!modifiedSQLExecuted && rrn.isModifySQL()) {
		modifiedSQLExecuted = true;
	}
	String xaTXID = null;
	if(sc.getSession2().getXaTXID()!=null){
		xaTXID = sc.getSession2().getXaTXID()+",'"+getSchema()+"'";
	}
	// 同步执行
	synAndDoExecute(xaTXID, rrn, sc.getCharsetIndex(), sc.getTxIsolation(),
			autocommit);
}

private void synAndDoExecute(String xaTxID, RouteResultsetNode rrn,
			int clientCharSetIndex, int clientTxIsoLation,
			boolean clientAutoCommit) {
		String xaCmd = null;

		boolean conAutoComit = this.autocommit;
		String conSchema = this.schema;
		boolean strictTxIsolation = MycatServer.getInstance().getConfig().getSystem().isStrictTxIsolation();
		boolean expectAutocommit = false;
		if (strictTxIsolation) {
			expectAutocommit = isFromSlaveDB() || clientAutoCommit;
		} else {
			expectAutocommit = (!modifiedSQLExecuted || isFromSlaveDB() || clientAutoCommit);
		}
		if (expectAutocommit == false && xaTxID != null && xaStatus == TxState.TX_INITIALIZE_STATE) {
			xaCmd = "XA START " + xaTxID + ';';
			this.xaStatus = TxState.TX_STARTED_STATE;
		}
		int schemaSyn = conSchema.equals(oldSchema) ? 0 : 1;
		int charsetSyn = 0;
		// 判定当前连接中的 字符集是否与前段连接中的字符集一致
		if (this.charsetIndex != clientCharSetIndex) {
			setCharset(CharsetUtil.getCharset(clientCharSetIndex));
			charsetSyn = 1;
		}
		int txIsoLationSyn = (txIsolation == clientTxIsoLation) ? 0 : 1;
		int autoCommitSyn = (conAutoComit == expectAutocommit) ? 0 : 1;
		int synCount = schemaSyn + charsetSyn + txIsoLationSyn + autoCommitSyn + (xaCmd!=null?1:0);
		if (synCount == 0 && this.xaStatus != TxState.TX_STARTED_STATE) {
			//不需要同步连接,难道这个是因为不需要事务吗?需要事务的才需要同步执行?
			sendQueryCmd(rrn.getStatement());
			return;
		}
		 。。。。。

	}

	protected void sendQueryCmd(String query) {
		// 创建了一个命令包
		CommandPacket packet = new CommandPacket();
		packet.packetId = 0;
		packet.command = MySQLPacket.COM_QUERY;
		try {
			packet.arg = query.getBytes(charset);
		} catch (UnsupportedEncodingException e) {
			throw new RuntimeException(e);
		}
		lastTime = TimeUtil.currentTimeMillis();
		packet.write(this);
	}
2
3
4
5
6
7
8
9
10
11
12
13
14
15
16
17
18
19
20
21
22
23
24
25
26
27
28
29
30
31
32
33
34
35
36
37
38
39
40
41
42
43
44
45
46
47
48
49
50
51
52
53
54
55
56
57
58
59
60
61
62
63
64
65
66
67
# 命令包转成 buffer
io.mycat.net.mysql.CommandPacket#write(io.mycat.net.BackendAIOConnection)
public void write(BackendAIOConnection c) {
        ByteBuffer buffer = c.allocate();
        try {
					// 把命令包转换成 mysql 协议 buffer
	        BufferUtil.writeUB3(buffer, calcPacketSize());
	        buffer.put(packetId);
	        buffer.put(command);
	        buffer = c.writeToBuffer(arg, buffer);
					// 连接对象开始写buffer对象
	        c.write(buffer);
        } catch(java.nio.BufferOverflowException e1) {
        	//fixed issues #98 #1072
        	buffer =  c.checkWriteBuffer(buffer, c.getPacketHeaderSize() + calcPacketSize(), false);
	        BufferUtil.writeUB3(buffer, calcPacketSize());
	        buffer.put(packetId);
	        buffer.put(command);
	        buffer = c.writeToBuffer(arg, buffer);
	        c.write(buffer);
        }
    }
2
3
4
5
6
7
8
9
10
11
12
13
14
15
16
17
18
19
20
21
io.mycat.net.AbstractConnection#write(java.nio.ByteBuffer)
@Override
 public final void write(ByteBuffer buffer) {


	 if (isSupportCompress()) {
		 // 如果需要压缩支持,则压缩包
		 ByteBuffer newBuffer = CompressUtil.compressMysqlPacket(buffer, this, compressUnfinishedDataQueue);
		 writeQueue.offer(newBuffer);
	 } else {
		 // 放入队列中
		 writeQueue.offer(buffer);
	 }

	 // 一个 MySQLConnection 中也绑定了一个 io.mycat.net.NIOSocketWR
	 try {
		 this.socketWR.doNextWriteCheck();
	 } catch (Exception e) {
		 LOGGER.warn("write err:", e);
		 this.close("write err:" + e);
	 }
 }
2
3
4
5
6
7
8
9
10
11
12
13
14
15
16
17
18
19
20
21
22
# NIO 写查询命令包
io.mycat.net.NIOSocketWR#doNextWriteCheck
public void doNextWriteCheck() {

		if (!writing.compareAndSet(false, true)) {
			return;
		}

		try {
			// 使用 channel 写数据
			boolean noMoreData = write0();
			writing.set(false);
			if (noMoreData && con.writeQueue.isEmpty()) {
				if ((processKey.isValid() && (processKey.interestOps() & SelectionKey.OP_WRITE) != 0)) {
					// 当没有可写数据的时候,则关闭 SelectionKey 的写事件
					disableWrite();
				}

			} else {

				if ((processKey.isValid() && (processKey.interestOps() & SelectionKey.OP_WRITE) == 0)) {
					enableWrite(false);
				}
			}

		} catch (IOException e) {
			if (AbstractConnection.LOGGER.isDebugEnabled()) {
				AbstractConnection.LOGGER.debug("caught err:", e);
			}
			con.close("err:" + e);
		}

	}

// 这里终于看到了 nio 的底层代码
private void disableWrite() {
	try {
		SelectionKey key = this.processKey;
		key.interestOps(key.interestOps() & OP_NOT_WRITE);
	} catch (Exception e) {
		AbstractConnection.LOGGER.warn("can't disable write " + e + " con "
				+ con);
	}

}
2
3
4
5
6
7
8
9
10
11
12
13
14
15
16
17
18
19
20
21
22
23
24
25
26
27
28
29
30
31
32
33
34
35
36
37
38
39
40
41
42
43
# 终于到了底层 NIO 代码的写出
前面经历了很多代码,终于看到了底层使用了 nio 的写法写出, 这里可以看到,NIO 相关的代码其实比较少,Reactor 模型进化成性能更改的模式。其他的代码都是业务功能代码
先进行总结,一条数据,达到底层 nio 经历了哪些流程?
# 小结
- mysql 协议解包
- 只支持单条语句执行,去掉 ";"
- 防火墙策略检查
- DML 权限检测
- 用户权限检测
- 找到要执行的命令处理器 SelectHandler
- 路由计算,找到具体要在哪些节点上执行该sql
- 单节点构造 singleNodeHandler 执行
- 多节点构造 multiNodeHandler 执行
- 开始循环获取连接(这里很奇葩,在获取连接方法里面执行了后续流程)
- 在连接获取中回调回到了 MultiNodeQueryHandler 中
- session 绑定路由和连接信息,并把 MultiNodeQueryHandler 处理器设置为数据响应处理器
- 到达mysql连接对象中真正底层开始执行的地方。
- 构造命令包 CommandPacket
- 把命令包转成 channel 需要的 buffer 对象
- nio channel 写出该数据。发送到后端真实的 mysql 服务器中
把上面的业务流程压缩之后:
- 接收用户发送的 mysql 包
- 路由解析到真实后端 mysql 服务器
- 发送数据
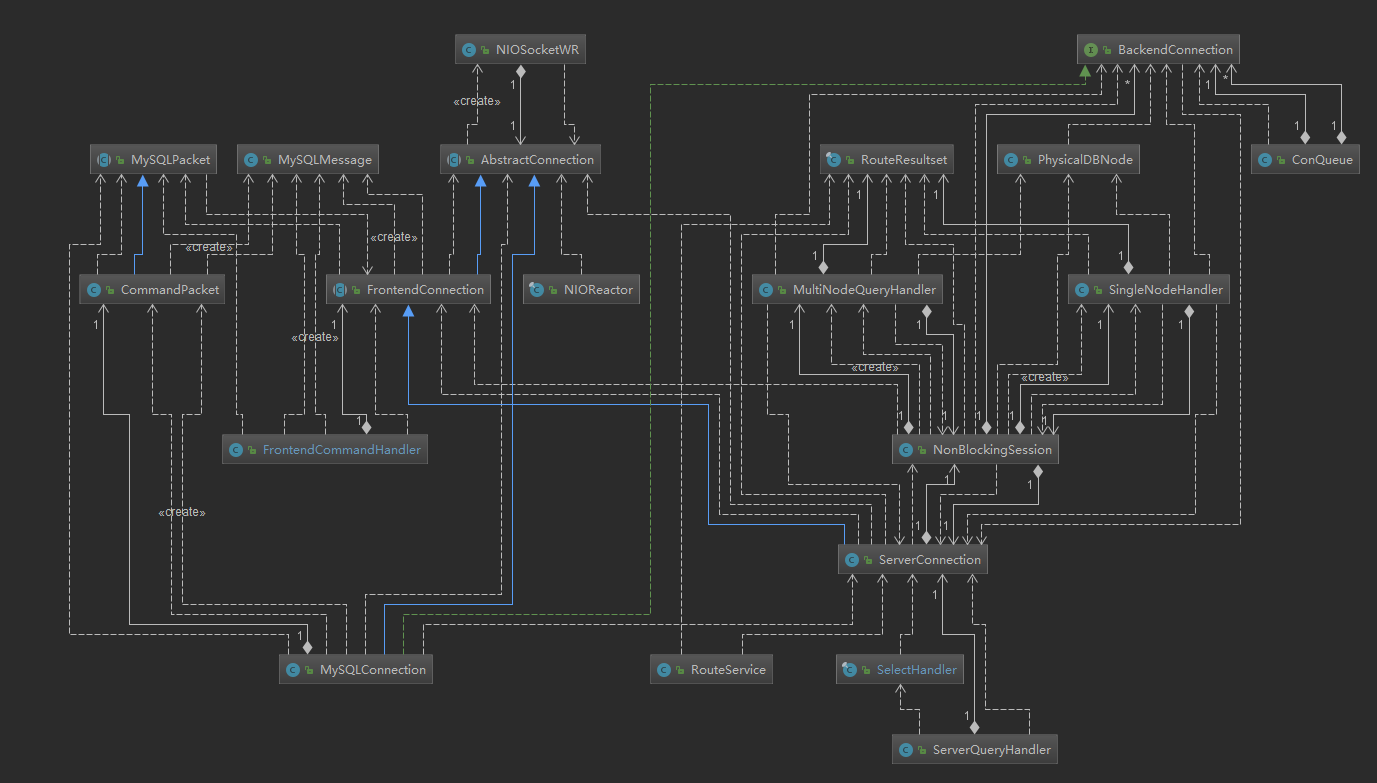
- FrontendCommandHandler:解析一条 sql 语句是什么命令类型
- MySQLMessage: 把 mysql 协议数据,解析成对象,拿到原始发送的字符串查询语句
- ServerQueryHandler:再次解析语句类型,并委托具体的命令对象处理
- SelectHandler:查询处理器
- RouteService: 路由服务,开始解析 sql 语句
- RouteResultset:解析成功的路由结果
- RouteResultsetNode:每条语句对应的真实要执行的节点信息
- MultiNodeQueryHandler:多节点查询处理器
- PhysicalDBNode:后端数据库节点管理,包含了该节点的所有连接池
- BackendConnection:后端连接抽象
- MySQLConnection:mysql 连接实现
- NIOSocketWR:nio socket 写处理,每个连接都包含一个处理器
下一章节继续,当数据回来的时候,怎么返回到前段 socket 的