# 实战案例:使用 Spring Security 搭建一套基于 JWT 的 OAuth 2.0 架构
如果你熟悉 Spring Security 的话,肯定知道它因为功能多、组件抽象程度高、配置方式多样,导致了强大且复杂的特性。也因此,Spring Security 的学习成本几乎是 Spring 家族中最高的。但不仅于此,在结合实际的复杂业务场景使用 Spring Security 时,我们还要去理解一些组件的工作原理和流程,不然需要自定义和扩展框架的时候就会手足无措。这就让使用 Spring Security 的门槛更高了。
因此,在决定使用 Spring Security 搭建整套安全体系(授权、认证、权限、审计)之前,我们还需要考虑的是:将来我们的业务会多复杂,徒手写一套安全体系来得划算,还是使用 Spring Security 更好?这也是本课程前面并没有使用 Spring Security 来演示 OAuth 2.0 流程的原因之一。
反过来说,如果你的应用已经使用了 Spring Security 来做鉴权、认证和权限管理的话,那么仍然使用 Spring Security 来实现 OAuth 的成本是很低的。而且,在学习了 OAuth 2.0 的流程打下扎实的基础之后,我们再使用 Spring Security 来配置 OAuth 2.0 就不会那么迷茫了。这也是我在工作中使用 Spring Security 来实现 OAuth 2.0 的直观感受。
所以,我就结合自己的实践和积累,带你使用 Spring Security 来一步一步地搭建一套基于 JWT 的 OAuth 2.0 授权体系。这些内容会涉及 OAuth 2.0 的三角色(客户端、授权服务、受保护资源),以及资源拥有者凭据许可、客户端凭据许可和授权码许可这三种常用的授权许可类型(隐式许可类型,不太安全也不太常用)。同时,我还会演示 OAuth 2.0 的权限控制,以及使用 OAuth 2.0 实现 SSO 单点登录体系。
这样一来,今天这一讲涉及到的流程就会比较多,内容也会很长。不过不用担心,我会手把手带你从零开始,完成整个程序的搭建,并给出所有流程的演示。
# 项目准备工作
实战之前,我们先来搭建项目父依赖和初始化数据库结构,为后面具体的编码做准备。
首先,我们来创建一个父 POM(笔者这里使用 gradle 来搭建),内含三个模块:
springsecurity101-cloud-oauth2-client,用来扮演客户端角色;
springsecurity101-cloud-oauth2-server,用来扮演授权服务器角色;
springsecurity101-cloud-oauth2-userservice,是用户服务,用来扮演资源提供者角色。
然后,我们来创建一个 oauth 数据库,初始化将来会用到的 5 个表。
authorities 表:记录账号的权限,需要我们在后面配置。
oauth_approvals 表:记录授权批准的状态。
oauth_client_details 表:记录 OAuth 的客户端,需要我们在后面做配置。
oauth_code 表:记录授权码。
users 表:记录账号,需要我们在后面做初始化。
SET NAMES utf8mb4;
SET FOREIGN_KEY_CHECKS = 0;
-- ----------------------------
-- Table structure for authorities
-- ----------------------------
DROP TABLE IF EXISTS `authorities`;
CREATE TABLE `authorities` (
  `username` varchar(50) NOT NULL,
  `authority` varchar(50) NOT NULL,
  UNIQUE KEY `ix_auth_username` (`username`,`authority`),
  CONSTRAINT `fk_authorities_users` FOREIGN KEY (`username`) REFERENCES `users` (`username`)
) ENGINE=InnoDB DEFAULT CHARSET=utf8mb4;
-- ----------------------------
-- Table structure for oauth_approvals
-- ----------------------------
DROP TABLE IF EXISTS `oauth_approvals`;
CREATE TABLE `oauth_approvals` (
  `userId` varchar(256) DEFAULT NULL,
  `clientId` varchar(256) DEFAULT NULL,
  `partnerKey` varchar(32) DEFAULT NULL,
  `scope` varchar(256) DEFAULT NULL,
  `status` varchar(10) DEFAULT NULL,
  `expiresAt` datetime DEFAULT NULL,
  `lastModifiedAt` datetime DEFAULT NULL
) ENGINE=InnoDB DEFAULT CHARSET=utf8;
-- ----------------------------
-- Table structure for oauth_client_details
-- ----------------------------
DROP TABLE IF EXISTS `oauth_client_details`;
-- client_id 长度过长,255 -> 128
CREATE TABLE `oauth_client_details` (
  `client_id` varchar(128) NOT NULL,
  `resource_ids` varchar(255) DEFAULT NULL,
  `client_secret` varchar(255) DEFAULT NULL,
  `scope` varchar(255) DEFAULT NULL,
  `authorized_grant_types` varchar(255) DEFAULT NULL,
  `web_server_redirect_uri` varchar(255) DEFAULT NULL,
  `authorities` varchar(255) DEFAULT NULL,
  `access_token_validity` int(11) DEFAULT NULL,
  `refresh_token_validity` int(11) DEFAULT NULL,
  `additional_information` varchar(4096) DEFAULT NULL,
  `autoapprove` varchar(255) DEFAULT NULL,
  PRIMARY KEY (`client_id`)
) ENGINE=InnoDB DEFAULT CHARSET=utf8mb4;
-- ----------------------------
-- Table structure for oauth_code
-- ----------------------------
DROP TABLE IF EXISTS `oauth_code`;
CREATE TABLE `oauth_code` (
  `code` varchar(255) DEFAULT NULL,
  `authentication` blob
) ENGINE=InnoDB DEFAULT CHARSET=utf8mb4;
-- ----------------------------
-- Table structure for users
-- ----------------------------
DROP TABLE IF EXISTS `users`;
CREATE TABLE `users` (
  `username` varchar(50) NOT NULL,
  `password` varchar(100) NOT NULL,
  `enabled` tinyint(1) NOT NULL,
  PRIMARY KEY (`username`)
) ENGINE=InnoDB DEFAULT CHARSET=utf8mb4;
SET FOREIGN_KEY_CHECKS = 1;
2
3
4
5
6
7
8
9
10
11
12
13
14
15
16
17
18
19
20
21
22
23
24
25
26
27
28
29
30
31
32
33
34
35
36
37
38
39
40
41
42
43
44
45
46
47
48
49
50
51
52
53
54
55
56
57
58
59
60
61
62
63
这 5 个表是 Spring Security OAuth 需要用到的存储表,我们不要去修改既有的表结构。这里可以看到,我们并没有在数据库中创建相应的表,来存放访问令牌和刷新令牌。这是因为,我们之后的实现会使用 JWT 来传输令牌信息,以便进行本地校验,所以并不一定要将其存放到数据库中。基本上所有的这些表都是可以自己扩展的,只需要继承实现 Spring 的一些既有类即可,这里不做展开。
接下来,我们开始搭建授权服务器和受保护资源服务器。
# 搭建授权服务器
build.gradle
plugins {
    id 'org.springframework.boot' version '2.4.1'
    id 'io.spring.dependency-management' version '1.0.10.RELEASE'
    id 'java'
}

group = 'cn.mrcode.cloudoath2.server'
version = '0.0.1-SNAPSHOT'
sourceCompatibility = '1.8'

repositories {
    mavenCentral()
    maven { url 'https://repo.spring.io/milestone' }
}

ext {
    set('springCloudVersion', "2020.0.0-RC1")
}

dependencies {
    implementation 'org.springframework.boot:spring-boot-starter-data-jdbc'
    implementation 'org.springframework.boot:spring-boot-starter-thymeleaf'
    implementation 'org.springframework.boot:spring-boot-starter-web'
    implementation 'org.springframework.cloud:spring-cloud-starter-oauth2'
    testImplementation 'org.springframework.boot:spring-boot-starter-test'

    implementation 'mysql:mysql-connector-java'
    // ~ lombok 编译等支持==========================
    compileOnly('org.projectlombok:lombok')
    annotationProcessor('org.projectlombok:lombok')
}

dependencyManagement {
    imports {
        mavenBom "org.springframework.cloud:spring-cloud-dependencies:${springCloudVersion}"
    }
}

test {
    useJUnitPlatform()
}
2
3
4
5
6
7
8
9
10
11
12
13
14
15
16
17
18
19
20
21
22
23
24
25
26
27
28
29
30
31
32
33
34
35
36
37
38
39
40
41
这里,我们使用了 Spring Cloud 的 spring-cloud-starter-oauth2 组件,而不是直接使用的 Spring Security,因为前者做了一些自动化配置的工作,使用起来会更方便。
此外,我们还在 POM 中加入了数据访问、Web 等依赖,因为我们的受保护资源服务器需要使用数据库来保存客户端的信息、用户信息等数据,同时也会引入 thymeleaf 模板引擎依赖,来稍稍美化一下登录页面。
然后创建一个配置文件 application.yml 实现程序配置:
server:
  port: 8080
spring:
  application:
    name: oauth2-server
  datasource:
    url: jdbc:mysql://localhost:6657/oauth?useSSL=false
    username: root
    password: kIo9u7Oi0eg
    driver-class-name: com.mysql.cj.jdbc.Driver
2
3
4
5
6
7
8
9
10
可以看到,我们配置了 oauth 数据库的连接字符串,定义了授权服务器的监听端口是 8080。
最后,使用 keytool 工具生成密钥对,把密钥文件 jks 保存到资源目录下,并要导出一个公钥留作以后使用。
# 运行下面的命令生成私钥,姓名国家啥的可以不填
$ keytool -genkey -alias oath2-jwt -keyalg RSA -keysize 1024 -keystore jwt.jks -validity 365 -keypass 123456 -storepass 123456
# -alias 选项为别名,-keypass 和 -storepass 为密码选项,-validity 为配置 jks 文件的过期时间(单位:天)。
# 完成之后,要求转移到新的标准
$ keytool -importkeystore -srckeystore jwt.jks -destkeystore jwt.jks -deststoretype pkcs12

# 获取的 jks 文件作为私钥,是如何解密JWT的呢?这时就需要使用 jks 文件的公钥。获取jks文件的公钥命令如下:
$ keytool -list -rfc --keystore jwt.jks | openssl x509 -inform pem -pubkey
# 输入密码后:123456 ,将生产下面的
-----BEGIN PUBLIC KEY-----
MIGfMA0GCSqGSIb3DQEBAQUAA4GNADCBiQKBgQCM0iHtBw+Kbmynd34MS1g8DvcQ
hhDNacxRepPKmzMs524UX1bLeMlM6A4TE1Gp106nz5xRGPB4AVHq7BFe25H/xdT3
SpoSvfnkb9SgfPX7Y+PuNLxhGxUt8qNgzHEjsJomxEiYGsYIaxScFuGK6uXhPi4d
c4csrdiaAelTIAASRQIDAQAB
-----END PUBLIC KEY-----
-----BEGIN CERTIFICATE-----
MIICcjCCAdugAwIBAgIEG0oUDzANBgkqhkiG9w0BAQsFADBsMRAwDgYDVQQGEwdV
bmtub3duMRAwDgYDVQQIEwdVbmtub3duMRAwDgYDVQQHEwdVbmtub3duMRAwDgYD
VQQKEwdVbmtub3duMRAwDgYDVQQLEwdVbmtub3duMRAwDgYDVQQDEwdVbmtub3du
MB4XDTIwMTIxODA2MjIwMloXDTIxMTIxODA2MjIwMlowbDEQMA4GA1UEBhMHVW5r
bm93bjEQMA4GA1UECBMHVW5rbm93bjEQMA4GA1UEBxMHVW5rbm93bjEQMA4GA1UE
ChMHVW5rbm93bjEQMA4GA1UECxMHVW5rbm93bjEQMA4GA1UEAxMHVW5rbm93bjCB
nzANBgkqhkiG9w0BAQEFAAOBjQAwgYkCgYEAjNIh7QcPim5sp3d+DEtYPA73EIYQ
zWnMUXqTypszLOduFF9Wy3jJTOgOExNRqddOp8+cURjweAFR6uwRXtuR/8XU90qa
Er355G/UoHz1+2Pj7jS8YRsVLfKjYMxxI7CaJsRImBrGCGsUnBbhiurl4T4uHXOH
LK3YmgHpUyAAEkUCAwEAAaMhMB8wHQYDVR0OBBYEFLB6k0kr0YK9fgG2qJ7fK+MQ
+984MA0GCSqGSIb3DQEBCwUAA4GBAEdv2UMAzqVDXvnIbBnP+kUafemA2rxxT+jg
9d/sVMcqrLgvGXv555U1OWGoSMKe1t3exiXvoYSaOzQUeTjyqxAXycb12N07CqB8
+XV1a+AA6vnksdB8HqfsUUAMWUnYPZPmI3FEEs2g2/PhHt1ItkH6LUAknSMqqe/t
58VPFwUO
-----END CERTIFICATE-----
2
3
4
5
6
7
8
9
10
11
12
13
14
15
16
17
18
19
20
21
22
23
24
25
26
27
28
29
30
31
以上完成了项目框架搭建工作,接下来,我们正式开始编码。
第一步,创建一个最核心的类用于配置授权服务器。我把每段代码的作用放在了注释里,你可以直接看下。
package cn.mrcode.cloudoath2.server;

import org.springframework.beans.factory.annotation.Autowired;
import org.springframework.context.annotation.Bean;
import org.springframework.context.annotation.Configuration;
import org.springframework.core.io.ClassPathResource;
import org.springframework.security.authentication.AuthenticationManager;
import org.springframework.security.crypto.password.NoOpPasswordEncoder;
import org.springframework.security.oauth2.config.annotation.configurers.ClientDetailsServiceConfigurer;
import org.springframework.security.oauth2.config.annotation.web.configuration.AuthorizationServerConfigurerAdapter;
import org.springframework.security.oauth2.config.annotation.web.configuration.EnableAuthorizationServer;
import org.springframework.security.oauth2.config.annotation.web.configurers.AuthorizationServerEndpointsConfigurer;
import org.springframework.security.oauth2.config.annotation.web.configurers.AuthorizationServerSecurityConfigurer;
import org.springframework.security.oauth2.provider.approval.JdbcApprovalStore;
import org.springframework.security.oauth2.provider.code.AuthorizationCodeServices;
import org.springframework.security.oauth2.provider.code.JdbcAuthorizationCodeServices;
import org.springframework.security.oauth2.provider.token.TokenEnhancer;
import org.springframework.security.oauth2.provider.token.TokenEnhancerChain;
import org.springframework.security.oauth2.provider.token.TokenStore;
import org.springframework.security.oauth2.provider.token.store.JwtAccessTokenConverter;
import org.springframework.security.oauth2.provider.token.store.JwtTokenStore;
import org.springframework.security.oauth2.provider.token.store.KeyStoreKeyFactory;
import org.springframework.web.servlet.config.annotation.ViewControllerRegistry;
import org.springframework.web.servlet.config.annotation.WebMvcConfigurer;

import java.util.Arrays;

import javax.sql.DataSource;

@Configuration
@EnableAuthorizationServer //开启授权服务器
public class OAuth2ServerConfiguration extends AuthorizationServerConfigurerAdapter {
    @Autowired
    private DataSource dataSource;
    @Autowired
    private AuthenticationManager authenticationManager;

    /**
     * <pre>
     *  我们配置了使用数据库来维护客户端信息。虽然在各种 Demo 中我们经常看到的是在内存中维护客户端信息, 通过配置直接写死在这里。
     *
     *  但是,对于实际的应用我们一般都会用数据库来维护这个信息,甚至还会建立一套工作流来允许客户端自己申请 ClientID,实现 OAuth 客户端接入的审批。
     * </pre>
     *
     * @param clients
     * @throws Exception
     */
    @Override
    public void configure(ClientDetailsServiceConfigurer clients) throws Exception {
        clients.jdbc(dataSource);
    }

    /**
     * 这里干了两件事儿。
     * <pre>
     *   首先,打开了验证 Token 的访问权限(以便之后我们演示)。
     *   然后,允许 ClientSecret 明文方式保存,并且可以通过表单提交(而不仅仅是 BasicAuth方式提交),之后会演示到这个。
     * </pre>
     *
     * @param security
     * @throws Exception
     */
    @Override
    public void configure(AuthorizationServerSecurityConfigurer security) throws Exception {
        security.checkTokenAccess("permitAll()")
                .allowFormAuthenticationForClients()
                .passwordEncoder(NoOpPasswordEncoder.getInstance());
    }

    /**
     * <pre>
     * 干了以下4件事儿:
     * 1. 配置我们的令牌存放方式为 JWT方式,而不是内存、数据库或 Redis方式。
     *      JWT 是 Json Web Token 的缩写,也就是使用 JSON 数据格式包装的令牌,由 .号把整个 JWT分隔为头、数据体、签名三部分。
     *      JWT保存 Token 虽然易于使用但是不是那么安全,一般用于内部,且需要走 HTTPS 并配置比较短的失效时间。
     * 2. 配置 JWT Token 的非对称加密来进行签名
     * 3. 配置一个自定义的 Token 增强器,把更多信息放入 Token 中
     * 4. 配置使用 JDBC 数据库方式来保存用户的授权批准记录
     * </pre>
     *
     * @param endpoints
     * @throws Exception
     */
    @Override
    public void configure(AuthorizationServerEndpointsConfigurer endpoints) {
        TokenEnhancerChain tokenEnhancerChain = new TokenEnhancerChain();
        tokenEnhancerChain.setTokenEnhancers(
                Arrays.asList(tokenEnhancer(), jwtTokenEnhancer()));
        endpoints.approvalStore(approvalStore())
                .authorizationCodeServices(authorizationCodeServices())
                .tokenStore(tokenStore())
                .tokenEnhancer(tokenEnhancerChain)
                .authenticationManager(authenticationManager);
    }

    /**
     * 使用 JDBC 数据库方式来保存授权码
     *
     * @return
     */
    @Bean
    public AuthorizationCodeServices authorizationCodeServices() {
        return new JdbcAuthorizationCodeServices(dataSource);
    }

    /**
     * 使用 JWT 存储
     *
     * @return
     */
    @Bean
    public TokenStore tokenStore() {
        return new JwtTokenStore(jwtTokenEnhancer());
    }

    /**
     * 使用 JDBC 数据库方式来保存用户的授权批准记录
     *
     * @return
     */
    @Bean
    public JdbcApprovalStore approvalStore() {
        return new JdbcApprovalStore(dataSource);
    }

    /**
     * 自定义的Token增强器,把更多信息放入Token中
     *
     * @return
     */
    @Bean
    public TokenEnhancer tokenEnhancer() {
        return new CustomTokenEnhancer();
    }

    /**
     * 配置 JWT 使用非对称加密方式来验证
     *
     * @return
     */
    @Bean
    protected JwtAccessTokenConverter jwtTokenEnhancer() {
        // 生成的 jks 文件 和 密码
        KeyStoreKeyFactory keyStoreKeyFactory = new KeyStoreKeyFactory(new ClassPathResource("jwt.jks"), "123456".toCharArray());
        JwtAccessTokenConverter converter = new JwtAccessTokenConverter();
        converter.setKeyPair(keyStoreKeyFactory.getKeyPair("oath2-jwt")); // 生成时候的别名
        return converter;
    }

    /**
     * 配置登录页面的视图信息(其实可以独立一个配置类,这样会更规范)
     */
    @Configuration
    static class MvcConfig implements WebMvcConfigurer {
        @Override
        public void addViewControllers(ViewControllerRegistry registry) {
            registry.addViewController("login").setViewName("login");
        }
    }
}
2
3
4
5
6
7
8
9
10
11
12
13
14
15
16
17
18
19
20
21
22
23
24
25
26
27
28
29
30
31
32
33
34
35
36
37
38
39
40
41
42
43
44
45
46
47
48
49
50
51
52
53
54
55
56
57
58
59
60
61
62
63
64
65
66
67
68
69
70
71
72
73
74
75
76
77
78
79
80
81
82
83
84
85
86
87
88
89
90
91
92
93
94
95
96
97
98
99
100
101
102
103
104
105
106
107
108
109
110
111
112
113
114
115
116
117
118
119
120
121
122
123
124
125
126
127
128
129
130
131
132
133
134
135
136
137
138
139
140
141
142
143
144
145
146
147
148
149
150
151
152
153
154
155
156
157
158
159
160
第二步,还记得吗,刚才在第一步的代码中我们还用到了一个自定义的 Token 增强器,把用户信息嵌入到 JWT Token 中去(如果使用的是客户端凭据许可类型,这段代码无效,因为和用户没关系)。
这是一个常见需求。因为,默认情况下 Token 中只会有用户名这样的基本信息,我们往往需要把关于用户的更多信息返回给客户端(在实际应用中,你可能会从数据库或外部服务查询更多的用户信息加入到 JWT Token 中去)。这个时候,我们就可以自定义增强器来丰富 Token 的内容:
package cn.mrcode.cloudoath2.server;

import org.springframework.security.core.Authentication;
import org.springframework.security.oauth2.common.DefaultOAuth2AccessToken;
import org.springframework.security.oauth2.common.OAuth2AccessToken;
import org.springframework.security.oauth2.provider.OAuth2Authentication;
import org.springframework.security.oauth2.provider.token.TokenEnhancer;

import java.util.HashMap;
import java.util.Map;

public class CustomTokenEnhancer implements TokenEnhancer {
    @Override
    public OAuth2AccessToken enhance(OAuth2AccessToken accessToken, OAuth2Authentication authentication) {
        Authentication userAuthentication = authentication.getUserAuthentication();
        if (userAuthentication != null) {
            Object principal = authentication.getUserAuthentication().getPrincipal();
            //把用户标识嵌入 JWT Token 中去(Key 是 userDetails)
            Map<String, Object> additionalInfo = new HashMap<>();
            additionalInfo.put("userDetails", principal);
            ((DefaultOAuth2AccessToken) accessToken).setAdditionalInformation(additionalInfo);
        }
        return accessToken;
    }
}
2
3
4
5
6
7
8
9
10
11
12
13
14
15
16
17
18
19
20
21
22
23
24
25
26
第三步,实现安全方面的配置。你可以直接看下代码注释,来了解关键代码的作用。
package cn.mrcode.cloudoath2.server;

import org.springframework.beans.factory.annotation.Autowired;
import org.springframework.context.annotation.Bean;
import org.springframework.context.annotation.Configuration;
import org.springframework.security.authentication.AuthenticationManager;
import org.springframework.security.config.annotation.authentication.builders.AuthenticationManagerBuilder;
import org.springframework.security.config.annotation.web.builders.HttpSecurity;
import org.springframework.security.config.annotation.web.configuration.WebSecurityConfigurerAdapter;
import org.springframework.security.crypto.bcrypt.BCryptPasswordEncoder;

import javax.sql.DataSource;

@Configuration
public class WebSecurityConfig extends WebSecurityConfigurerAdapter {
    @Autowired
    private DataSource dataSource;

    @Override
    @Bean
    public AuthenticationManager authenticationManagerBean() throws Exception {
        return super.authenticationManagerBean();
    }

    /**
     * 配置用户账户的认证方式。
     * <pre>
     * 显然,我们把用户存在了数据库中希望配置 JDBC 的方式。
     * 此外,我们还配置了使用 BCryptPasswordEncoder 哈希来保存用户的密码(生产环境中,用户密码肯定不能是明文保存的)
     * </pre>
     *
     * @param auth
     * @throws Exception
     */
    @Override
    protected void configure(AuthenticationManagerBuilder auth) throws Exception {
        auth.jdbcAuthentication()
                .dataSource(dataSource)
                .passwordEncoder(new BCryptPasswordEncoder());
    }

    /**
     * <pre>
     * 开放 /login 和 /oauth/authorize 两个路径的匿名访问。
     * 前者用于登录,后者用于换授权码,这两个端点访问的时机都在登录之前。
     * 设置 /login 使用表单验证进行登录。
     *
     * </pre>
     *
     * @param http
     * @throws Exception
     */
    @Override
    protected void configure(HttpSecurity http) throws Exception {
        http.authorizeRequests()
                .antMatchers("/login", "/oauth/authorize")
                .permitAll()
                .anyRequest().authenticated()
                .and()
                .formLogin().loginPage("/login");
    }
}
2
3
4
5
6
7
8
9
10
11
12
13
14
15
16
17
18
19
20
21
22
23
24
25
26
27
28
29
30
31
32
33
34
35
36
37
38
39
40
41
42
43
44
45
46
47
48
49
50
51
52
53
54
55
56
57
58
59
60
61
62
第四步,在资源目录下创建一个 templates 文件夹,然后创建一个 login.html 登录页:
<!DOCTYPE html>
<html lang="en" xmlns:th="http://www.thymeleaf.org">
<head>
    <meta charset="UTF-8">
    <title>登录页面</title>
</head>
<body class="uk-height-1-1">
<div class="uk-vertical-align uk-text-center uk-height-1-1">
    <div class="uk-vertical-align-middle" style="width: 250px;">
        <h1>Login Form</h1>
        <p class="uk-text-danger" th:if="${param.error}">
            用户名或密码错误...
        </p>
        <form class="uk-panel uk-panel-box uk-form" method="post" th:action="@{/login}">
            <div class="uk-form-row">
                <input class="uk-width-1-1 uk-form-large" type="text" placeholder="Username"
                       name="username"
                       value="reader"/>
            </div>
            <div class="uk-form-row">
                <input class="uk-width-1-1 uk-form-large" type="password" placeholder="Password"
                       name="password"
                       value="reader"/>
            </div>
            <div class="uk-form-row">
                <button class="uk-width-1-1 uk-button uk-button-primary uk-button-large">Login
                </button>
            </div>
        </form>
    </div>
</div>
</body>
</html>
2
3
4
5
6
7
8
9
10
11
12
13
14
15
16
17
18
19
20
21
22
23
24
25
26
27
28
29
30
31
32
33
至此,授权服务器的编码工作就完成了。
# 搭建受保护资源服务器
接下来,我们搭建一个用户服务模拟资源提供者(受保护资源服务器)。我们先看看项目初始化工作。
这次创建的 POM 没有什么特殊,依赖了 spring-cloud-starter-oauth2:
plugins {
    id 'org.springframework.boot' version '2.4.1'
    id 'io.spring.dependency-management' version '1.0.10.RELEASE'
    id 'java'
}

group = 'cn.mrcode.cloudoath2.server'
version = '0.0.1-SNAPSHOT'
sourceCompatibility = '1.8'

repositories {
    mavenCentral()
    maven { url 'https://repo.spring.io/milestone' }
}

ext {
    set('springCloudVersion', "2020.0.0-RC1")
}

dependencies {
    implementation 'org.springframework.boot:spring-boot-starter-web'
    implementation 'org.springframework.cloud:spring-cloud-starter-oauth2'
}

dependencyManagement {
    imports {
        mavenBom "org.springframework.cloud:spring-cloud-dependencies:${springCloudVersion}"
    }
}

test {
    useJUnitPlatform()
}
2
3
4
5
6
7
8
9
10
11
12
13
14
15
16
17
18
19
20
21
22
23
24
25
26
27
28
29
30
31
32
33
34
配置文件非常简单,只是声明了资源服务端口为 8081:
server:
  port: 8081
2
同时,还要记得把我们之前在项目准备工作时生成的密钥对的公钥命名为 public.cert,并放到资源文件下。这样,资源服务器可以本地校验 JWT 的合法性。内容大概是这样的:
-----BEGIN PUBLIC KEY-----
MIGfMA0GCSqGSIb3DQEBAQUAA4GNADCBiQKBgQCM0iHtBw+Kbmynd34MS1g8DvcQ
hhDNacxRepPKmzMs524UX1bLeMlM6A4TE1Gp106nz5xRGPB4AVHq7BFe25H/xdT3
SpoSvfnkb9SgfPX7Y+PuNLxhGxUt8qNgzHEjsJomxEiYGsYIaxScFuGK6uXhPi4d
c4csrdiaAelTIAASRQIDAQAB
-----END PUBLIC KEY-----
2
3
4
5
6
好了,让我们正式开始编码吧。
第一步,创建一个可以匿名访问的接口 GET /hello,用来测试无需登录就可以访问的服务端资源:
package cn.mrcode.cloudoath2.userservice;

import org.springframework.web.bind.annotation.GetMapping;
import org.springframework.web.bind.annotation.RestController;

@RestController
public class HelloController {
    @GetMapping("hello")
    public String hello() {
        return "Hello";
    }
}
2
3
4
5
6
7
8
9
10
11
12
13
第二步,创建三个需要登录 + 授权才能访问到的接口。我们通过 @PreAuthorize 在方法执行前进行权限控制:
GET /user/name接口,读权限或写权限可访问,返回登录用户名;GET /user接口,读权限或写权限可访问,返回登录用户信息;POST /user接口,只有写权限可以访问,返回访问令牌中的额外信息(也就是自定义的 Token 增强器 CustomTokenEnhancer 加入到访问令牌中的额外信息,Key 是 userDetails),这里也演示了使用 TokenStore 来解析 Token 的方式。
package cn.mrcode.cloudoath2.userservice;

import org.springframework.beans.factory.annotation.Autowired;
import org.springframework.security.access.prepost.PreAuthorize;
import org.springframework.security.oauth2.common.OAuth2AccessToken;
import org.springframework.security.oauth2.provider.OAuth2Authentication;
import org.springframework.security.oauth2.provider.authentication.OAuth2AuthenticationDetails;
import org.springframework.security.oauth2.provider.token.TokenStore;
import org.springframework.web.bind.annotation.GetMapping;
import org.springframework.web.bind.annotation.PostMapping;
import org.springframework.web.bind.annotation.RequestMapping;
import org.springframework.web.bind.annotation.RestController;

@RestController
@RequestMapping("user")
public class UserController {
    @Autowired
    private TokenStore tokenStore;

    /***
     * 读权限或写权限可访问,返回登录用户名
     * @param authentication
     * @return
     */
    @PreAuthorize("hasAuthority('READ') or hasAuthority('WRITE')")
    @GetMapping("name")
    public String name(OAuth2Authentication authentication) {
        return authentication.getName();
    }

    /**
     * 读权限或写权限可访问,返回登录用户信息
     *
     * @param authentication
     * @return
     */
    @PreAuthorize("hasAuthority('READ') or hasAuthority('WRITE')")
    @GetMapping
    public OAuth2Authentication read(OAuth2Authentication authentication) {
        return authentication;
    }

    /**
     * 只有写权限可以访问,返回访问令牌中的额外信息
     *
     * @param authentication
     * @return
     */
    @PreAuthorize("hasAuthority('WRITE')")
    @PostMapping
    public Object write(OAuth2Authentication authentication) {
        OAuth2AuthenticationDetails details = (OAuth2AuthenticationDetails) authentication.getDetails();
        OAuth2AccessToken accessToken = tokenStore.readAccessToken(details.getTokenValue());
        return accessToken.getAdditionalInformation().getOrDefault("userDetails", null);
    }
}
2
3
4
5
6
7
8
9
10
11
12
13
14
15
16
17
18
19
20
21
22
23
24
25
26
27
28
29
30
31
32
33
34
35
36
37
38
39
40
41
42
43
44
45
46
47
48
49
50
51
52
53
54
55
56
第三步,创建核心的资源服务器配置类。这里我们需要注意下面两点:
我们硬编码了资源服务器的 ID 为 userservice;
现在我们使用的是不落数据库的 JWT 方式 + 非对称加密,需要通过本地公钥进行验证,因此在这里我们配置了公钥的路径。
package cn.mrcode.cloudoath2.userservice;

import org.springframework.context.annotation.Bean;
import org.springframework.context.annotation.Configuration;
import org.springframework.core.io.ClassPathResource;
import org.springframework.core.io.Resource;
import org.springframework.security.config.annotation.method.configuration.EnableGlobalMethodSecurity;
import org.springframework.security.config.annotation.web.builders.HttpSecurity;
import org.springframework.security.oauth2.config.annotation.web.configuration.EnableResourceServer;
import org.springframework.security.oauth2.config.annotation.web.configuration.ResourceServerConfigurerAdapter;
import org.springframework.security.oauth2.config.annotation.web.configurers.ResourceServerSecurityConfigurer;
import org.springframework.security.oauth2.provider.token.TokenStore;
import org.springframework.security.oauth2.provider.token.store.JwtAccessTokenConverter;
import org.springframework.security.oauth2.provider.token.store.JwtTokenStore;
import org.springframework.util.FileCopyUtils;

import java.io.IOException;

@Configuration
@EnableResourceServer //启用资源服务器
@EnableGlobalMethodSecurity(prePostEnabled = true) //启用方法注解方式来进行权限控制
public class ResourceServerConfiguration extends ResourceServerConfigurerAdapter {
    /**
     * 声明了资源服务器的 ID 是 userservice,声明了资源服务器的 TokenStore 是 JWT
     *
     * @param resources
     * @throws Exception
     */
    @Override
    public void configure(ResourceServerSecurityConfigurer resources) throws Exception {
        resources.resourceId("userservice").tokenStore(tokenStore());
    }

    /**
     * 配置 TokenStore
     *
     * @return
     */
    @Bean
    public TokenStore tokenStore() {
        return new JwtTokenStore(jwtAccessTokenConverter());
    }

    /**
     * 配置公钥
     *
     * @return
     */
    @Bean
    protected JwtAccessTokenConverter jwtAccessTokenConverter() {
        JwtAccessTokenConverter converter = new JwtAccessTokenConverter();
        Resource resource = new ClassPathResource("public.cert");
        String publicKey = null;
        try {
            publicKey = new String(FileCopyUtils.copyToByteArray(resource.getInputStream()));
        } catch (IOException e) {
            e.printStackTrace();
        }
        converter.setVerifierKey(publicKey);
        return converter;
    }

    /**
     * 配置了除了 /user 路径之外的请求可以匿名访问
     *
     * @param http
     * @throws Exception
     */
    @Override
    public void configure(HttpSecurity http) throws Exception {
        http.authorizeRequests()
                .antMatchers("/user/**").authenticated()
                .anyRequest().permitAll();
    }
}
2
3
4
5
6
7
8
9
10
11
12
13
14
15
16
17
18
19
20
21
22
23
24
25
26
27
28
29
30
31
32
33
34
35
36
37
38
39
40
41
42
43
44
45
46
47
48
49
50
51
52
53
54
55
56
57
58
59
60
61
62
63
64
65
66
67
68
69
70
71
72
73
74
75
76
到这里,我们来想一下,如果授权服务器产生 Token 的话,受保护资源服务器必须要有一种办法来验证 Token,那如果这里的 Token 不是 JWT 的方式,我们可以怎么办呢?
我来说下我的方法吧:
首先,Token 可以保存在数据库或 Redis 中,资源服务器和授权服务器共享底层的 TokenStore 来验证;
然后,资源服务器可以使用 RemoteTokenServices,来从授权服务器的
/oauth/check_token端点进行 Token 校验。
到这里,资源服务器就配置完成了,我们还在资源服务器中分别创建了两个控制器 HelloController 和 UserController,用于分别测试可以匿名访问以及受到权限保护的资源。
# 初始化数据配置
在实现了授权服务器和受保护资源服务器代码后,我们再来初始化 oauth 数据库的数据就非常容易理解了。总结起来,我们需要配置用户、权限和客户端三部分。
配置两个用户。
- 其中,读用户 reader 具有读权限,密码为 reader;
- 写用户 writer 具有读写权限,密码为 writer。
还记得吗,密码我们使用的是 BCryptPasswordEncoder 加密(准确说是哈希)?
INSERT INTO `users` VALUES ('reader', '$2a$04$C6pPJvC1v6.enW6ZZxX.luTdpSI/1gcgTVN7LhvQV6l/AfmzNU/3i', 1);
INSERT INTO `users` VALUES ('writer', '$2a$04$M9t2oVs3/VIreBMocOujqOaB/oziWL0SnlWdt8hV4YnlhQrORA0fS', 1);
1
2配置两个权限,也就是配置 reader 用户具有读权限,writer 用户具有写权限:
INSERT INTO `authorities` VALUES ('reader', 'READ');
INSERT INTO `authorities` VALUES ('writer', 'READ,WRITE');
1
2配置三个客户端:
- 其中客户端 userservice1 使用资源拥有者凭据许可类型
- 客户端 userservice2 使用客户端凭据许可类型
- 客户端 userservice3 使用授权码许可类型。
INSERT INTO `oauth_client_details` VALUES ('userservice1', 'userservice', '1234', 'FOO', 'password,refresh_token', '', 'READ,WRITE', 7200, NULL, NULL, 'true');
INSERT INTO `oauth_client_details` VALUES ('userservice2', 'userservice', '1234', 'FOO', 'client_credentials,refresh_token', '', 'READ,WRITE', 7200, NULL, NULL, 'true');
INSERT INTO `oauth_client_details` VALUES ('userservice3', 'userservice', '1234', 'FOO', 'authorization_code,refresh_token', 'https://baidu.com,http://localhost:8082/ui/login,http://localhost:8083/ui/login,http://localhost:8082/ui/remoteCall', 'READ,WRITE', 7200, NULL, NULL, 'false');
1
2
3
值得说明的是:
三个客户端账号能使用的资源 ID 都是 userservice,对应我们受保护资源服务器刚才配置的资源 ID,也就是 userservice,这两者需要一致。
三个客户端账号的密码都是 1234。
三个客户端账号的授权范围都是 FOO(并不是关键信息),它们可以拿到的权限是读写。不过,对于和用户相关的授权许可类型(比如资源拥有者凭据许可、授权码许可),最终拿到的权限还取决于客户端权限和用户权限的交集。
通过 grant_types 字段配置支持不同的授权许可类型。这里为了便于测试观察,我们给三个客户端账号各自配置了一种授权许可类型;在实际业务场景中,你完全可以为同一个客户端配置支持 OAuth 2.0 的四种授权许可类型。
userservice1 和 userservice2 我们配置了用户自动批准授权(不会弹出一个页面要求用户进行授权)。
# 演示三种授权许可类型
到这里,授权服务器和受保护资源服务器程序都搭建完成了,数据库也配置了用于测试的用户、权限和客户端。接下来,我们就使用 Postman 来手工测试一下 OAuth 2.0 的授权码许可、资源拥有者凭据许可、客户端凭据许可这三种授权许可类型吧。
# 资源拥有者凭据许可类型
首先,我们测试的是资源拥有者凭据许可,POST 请求地址是:
http://localhost:8080/oauth/token?grant_type=password&client_id=userservice1&client_secret=1234&username=writer&password=writer
得到的结果如下
POST http://localhost:8080/oauth/token?grant_type=password&client_id=userservice1&client_secret=1234&username=writer&password=writer

HTTP/1.1 200
Cache-Control: no-store
Pragma: no-cache
X-Content-Type-Options: nosniff
X-XSS-Protection: 1; mode=block
X-Frame-Options: DENY
Content-Type: application/json;charset=UTF-8
Transfer-Encoding: chunked
Date: Fri, 18 Dec 2020 07:00:21 GMT
Keep-Alive: timeout=60
Connection: keep-alive

{
  "access_token": "eyJhbGciOiJSUzI1NiIsInR5cCI6IkpXVCJ9.eyJhdWQiOlsidXNlcnNlcnZpY2UiXSwidXNlcl9uYW1lIjoid3JpdGVyIiwic2NvcGUiOlsiRk9PIl0sImV4cCI6MTYwODI4MjAyMSwidXNlckRldGFpbHMiOnsicGFzc3dvcmQiOm51bGwsInVzZXJuYW1lIjoid3JpdGVyIiwiYXV0aG9yaXRpZXMiOlt7ImF1dGhvcml0eSI6IlJFQUQsV1JJVEUifV0sImFjY291bnROb25FeHBpcmVkIjp0cnVlLCJhY2NvdW50Tm9uTG9ja2VkIjp0cnVlLCJjcmVkZW50aWFsc05vbkV4cGlyZWQiOnRydWUsImVuYWJsZWQiOnRydWV9LCJhdXRob3JpdGllcyI6WyJSRUFELFdSSVRFIl0sImp0aSI6ImVjM2Y3YTY1LTA4MzQtNDQ2ZC05NDkyLWVhZjhkN2VhZjZjOCIsImNsaWVudF9pZCI6InVzZXJzZXJ2aWNlMSJ9.BA8vH4KN2Cx4EG0mA78VM0rNDDNrYDxcuNpa6jCT49YA7xNeWXbv3Q47nEJg_idv59EAkJdxtJfIMgX8olhik1YxwAgJcA92BlEoqY4N2jNAkgNXtvIHaa_V2Eq3m8B_KhMV2xNQFm0G2JEr0DIfSK6Lr8o_ODbu3cBfAKvy648",
  "token_type": "bearer",
  "refresh_token": "eyJhbGciOiJSUzI1NiIsInR5cCI6IkpXVCJ9.eyJhdWQiOlsidXNlcnNlcnZpY2UiXSwidXNlcl9uYW1lIjoid3JpdGVyIiwic2NvcGUiOlsiRk9PIl0sImF0aSI6ImVjM2Y3YTY1LTA4MzQtNDQ2ZC05NDkyLWVhZjhkN2VhZjZjOCIsImV4cCI6MTYxMDg2NjgyMSwidXNlckRldGFpbHMiOnsicGFzc3dvcmQiOm51bGwsInVzZXJuYW1lIjoid3JpdGVyIiwiYXV0aG9yaXRpZXMiOlt7ImF1dGhvcml0eSI6IlJFQUQsV1JJVEUifV0sImFjY291bnROb25FeHBpcmVkIjp0cnVlLCJhY2NvdW50Tm9uTG9ja2VkIjp0cnVlLCJjcmVkZW50aWFsc05vbkV4cGlyZWQiOnRydWUsImVuYWJsZWQiOnRydWV9LCJhdXRob3JpdGllcyI6WyJSRUFELFdSSVRFIl0sImp0aSI6IjhmYTk0NTJmLTE4NTktNDg0Ni1iZGUxLThlM2ZmMmIwOGRjNSIsImNsaWVudF9pZCI6InVzZXJzZXJ2aWNlMSJ9.P9yxZYDEmxBWGZm0RDq6ZA9vTHXz_rPIKLICjSrTRDbe-dGprvqZaiqJfstzXt3inThnuj_CCK61nA6wOTxf1rM8rkjyBC3y9TK8a-A_DInxIjnPPnlBJWjoknyHeDC9Bh4eCK2auSV9BE1HTAMhLdpoZdkgLAPhNX0z0fgpkUk",
  "expires_in": 7199,
  "scope": "FOO",
  "userDetails": {
    "password": null,
    "username": "writer",
    "authorities": [
      {
        "authority": "READ,WRITE"
      }
    ],
    "accountNonExpired": true,
    "accountNonLocked": true,
    "credentialsNonExpired": true,
    "enabled": true
  },
  "jti": "ec3f7a65-0834-446d-9492-eaf8d7eaf6c8"
}
2
3
4
5
6
7
8
9
10
11
12
13
14
15
16
17
18
19
20
21
22
23
24
25
26
27
28
29
30
31
32
33
34
35
再使用 JWT 解析工具 (opens new window) 看下请求 Token 中的信息:
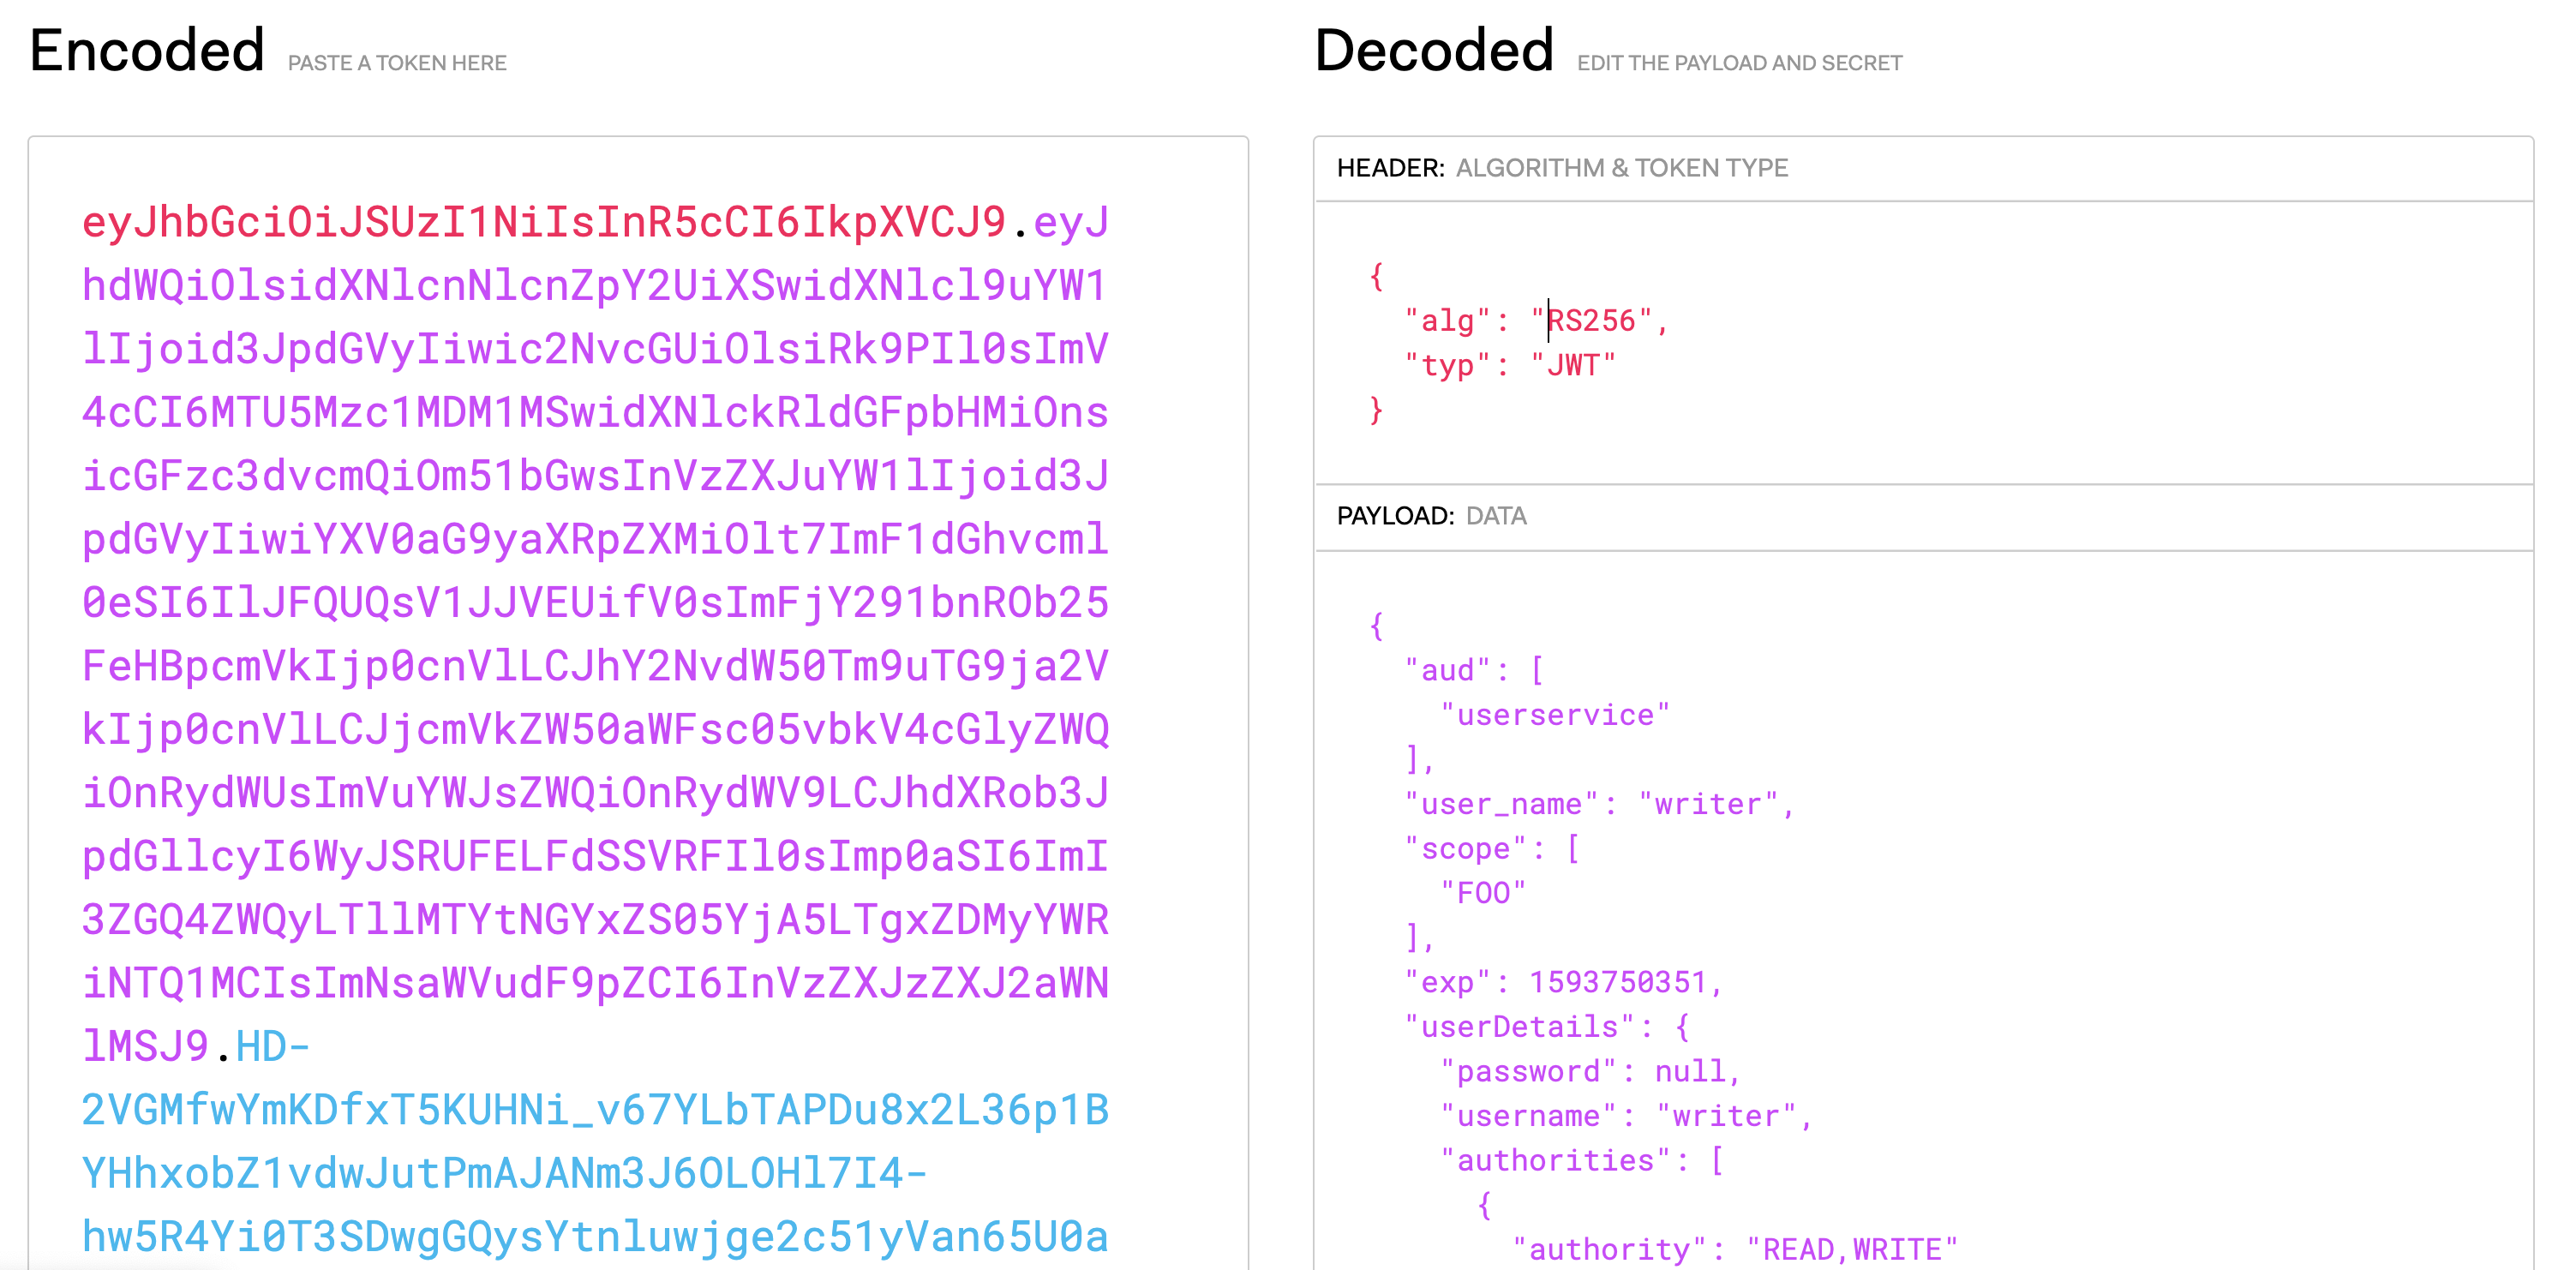
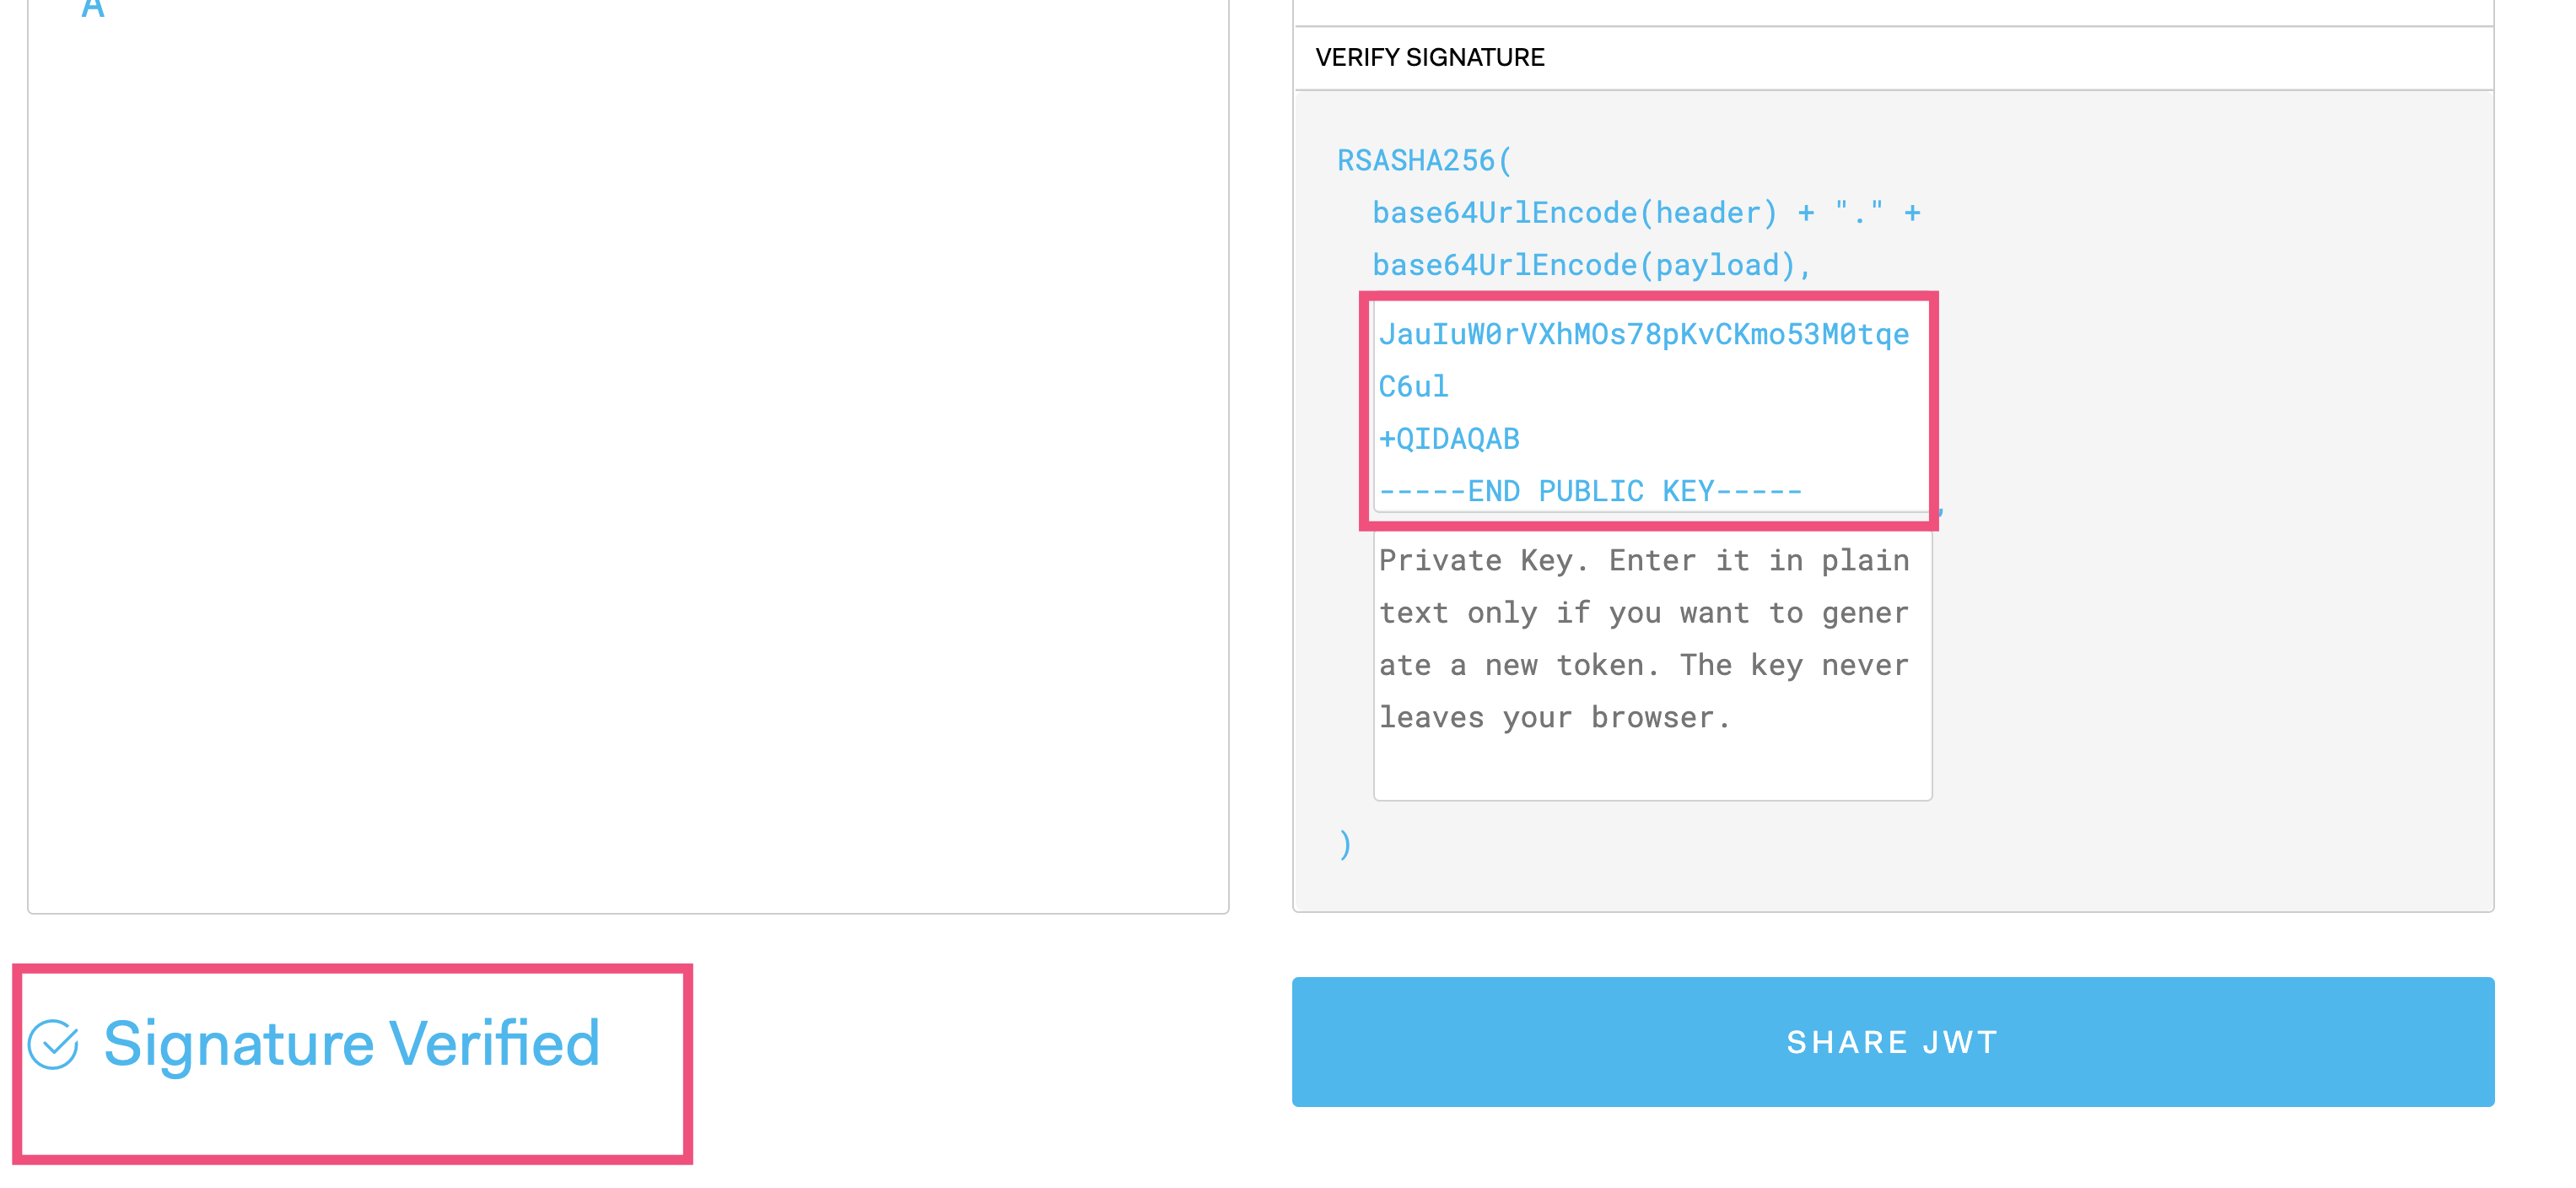
可以看到,Token 中果然包含了 Token 增强器加入的 userDetails 自定义信息。如果我们把公钥粘贴到页面的话,可以看到这个 JWT 校验成功了:
除了本地校验外,还可以访问授权服务器来校验 JWT:
http://localhost:8080/oauth/check_token?client_id=userservice1&client_secret=1234&token=...
GET http://localhost:8080/oauth/check_token?client_id=userservice1&client_secret=1234&token=eyJhbGciOiJSUzI1NiIsInR5cCI6IkpXVCJ9.eyJhdWQiOlsidXNlcnNlcnZpY2UiXSwidXNlcl9uYW1lIjoid3JpdGVyIiwic2NvcGUiOlsiRk9PIl0sImV4cCI6MTYwODI4MjAyMSwidXNlckRldGFpbHMiOnsicGFzc3dvcmQiOm51bGwsInVzZXJuYW1lIjoid3JpdGVyIiwiYXV0aG9yaXRpZXMiOlt7ImF1dGhvcml0eSI6IlJFQUQsV1JJVEUifV0sImFjY291bnROb25FeHBpcmVkIjp0cnVlLCJhY2NvdW50Tm9uTG9ja2VkIjp0cnVlLCJjcmVkZW50aWFsc05vbkV4cGlyZWQiOnRydWUsImVuYWJsZWQiOnRydWV9LCJhdXRob3JpdGllcyI6WyJSRUFELFdSSVRFIl0sImp0aSI6ImVjM2Y3YTY1LTA4MzQtNDQ2ZC05NDkyLWVhZjhkN2VhZjZjOCIsImNsaWVudF9pZCI6InVzZXJzZXJ2aWNlMSJ9.BA8vH4KN2Cx4EG0mA78VM0rNDDNrYDxcuNpa6jCT49YA7xNeWXbv3Q47nEJg_idv59EAkJdxtJfIMgX8olhik1YxwAgJcA92BlEoqY4N2jNAkgNXtvIHaa_V2Eq3m8B_KhMV2xNQFm0G2JEr0DIfSK6Lr8o_ODbu3cBfAKvy648

HTTP/1.1 200
X-Content-Type-Options: nosniff
X-XSS-Protection: 1; mode=block
Cache-Control: no-cache, no-store, max-age=0, must-revalidate
Pragma: no-cache
Expires: 0
X-Frame-Options: DENY
Content-Type: application/json
Transfer-Encoding: chunked
Date: Fri, 18 Dec 2020 07:05:55 GMT
Keep-Alive: timeout=60
Connection: keep-alive

{
  "aud": [
    "userservice"
  ],
  "user_name": "writer",
  "scope": [
    "FOO"
  ],
  "active": true,
  "exp": 1608282021,
  "userDetails": {
    "password": null,
    "username": "writer",
    "authorities": [
      {
        "authority": "READ,WRITE"
      }
    ],
    "accountNonExpired": true,
    "accountNonLocked": true,
    "credentialsNonExpired": true,
    "enabled": true
  },
  "authorities": [
    "READ,WRITE"
  ],
  "jti": "ec3f7a65-0834-446d-9492-eaf8d7eaf6c8",
  "client_id": "userservice1"
}
2
3
4
5
6
7
8
9
10
11
12
13
14
15
16
17
18
19
20
21
22
23
24
25
26
27
28
29
30
31
32
33
34
35
36
37
38
39
40
41
42
43
44
45
# 客户端授权许可类型
我们再来测试下客户端授权许可类型。POST 请求地址:
POST http://localhost:8080/oauth/token?grant_type=client_credentials&client_id=userservice2&client_secret=1234

HTTP/1.1 200
Cache-Control: no-store
Pragma: no-cache
X-Content-Type-Options: nosniff
X-XSS-Protection: 1; mode=block
X-Frame-Options: DENY
Content-Type: application/json;charset=UTF-8
Transfer-Encoding: chunked
Date: Fri, 18 Dec 2020 07:06:56 GMT
Keep-Alive: timeout=60
Connection: keep-alive

{
  "access_token": "eyJhbGciOiJSUzI1NiIsInR5cCI6IkpXVCJ9.eyJhdWQiOlsidXNlcnNlcnZpY2UiXSwic2NvcGUiOlsiRk9PIl0sImV4cCI6MTYwODI4MjQxNiwiYXV0aG9yaXRpZXMiOlsiUkVBRCIsIldSSVRFIl0sImp0aSI6IjI0ZjhjMGMzLWE0NTQtNGQwYy04NTAxLTQ2MjY0YjMyZTliMCIsImNsaWVudF9pZCI6InVzZXJzZXJ2aWNlMiJ9.H5knrswTnlEnWYfb21EGcYFenIg1gU0hNyy1RELKrQWFuBAocDA_P4OxxzCQ-I4IVxq2N4E5_ve-Oo28jzgWvpgT9LD6BX6KZkw8a2mozgy4Jh-6eLKyIrvf-kX9qaCkztcQoFrqcFloLEsJMeCO7aCXwsflli4f6VbdfltGXpk",
  "token_type": "bearer",
  "expires_in": 7199,
  "scope": "FOO",
  "jti": "24f8c0c3-a454-4d0c-8501-46264b32e9b0"
}
2
3
4
5
6
7
8
9
10
11
12
13
14
15
16
17
18
19
20
21
这里需要注意的是,并没有提供刷新令牌。这是因为,刷新令牌用于避免访问令牌失效后需要用户再次登录的问题,而客户端授权许可类型没有用户的概念,因此没有刷新令牌,也无法注入额外的 userDetails 信息。
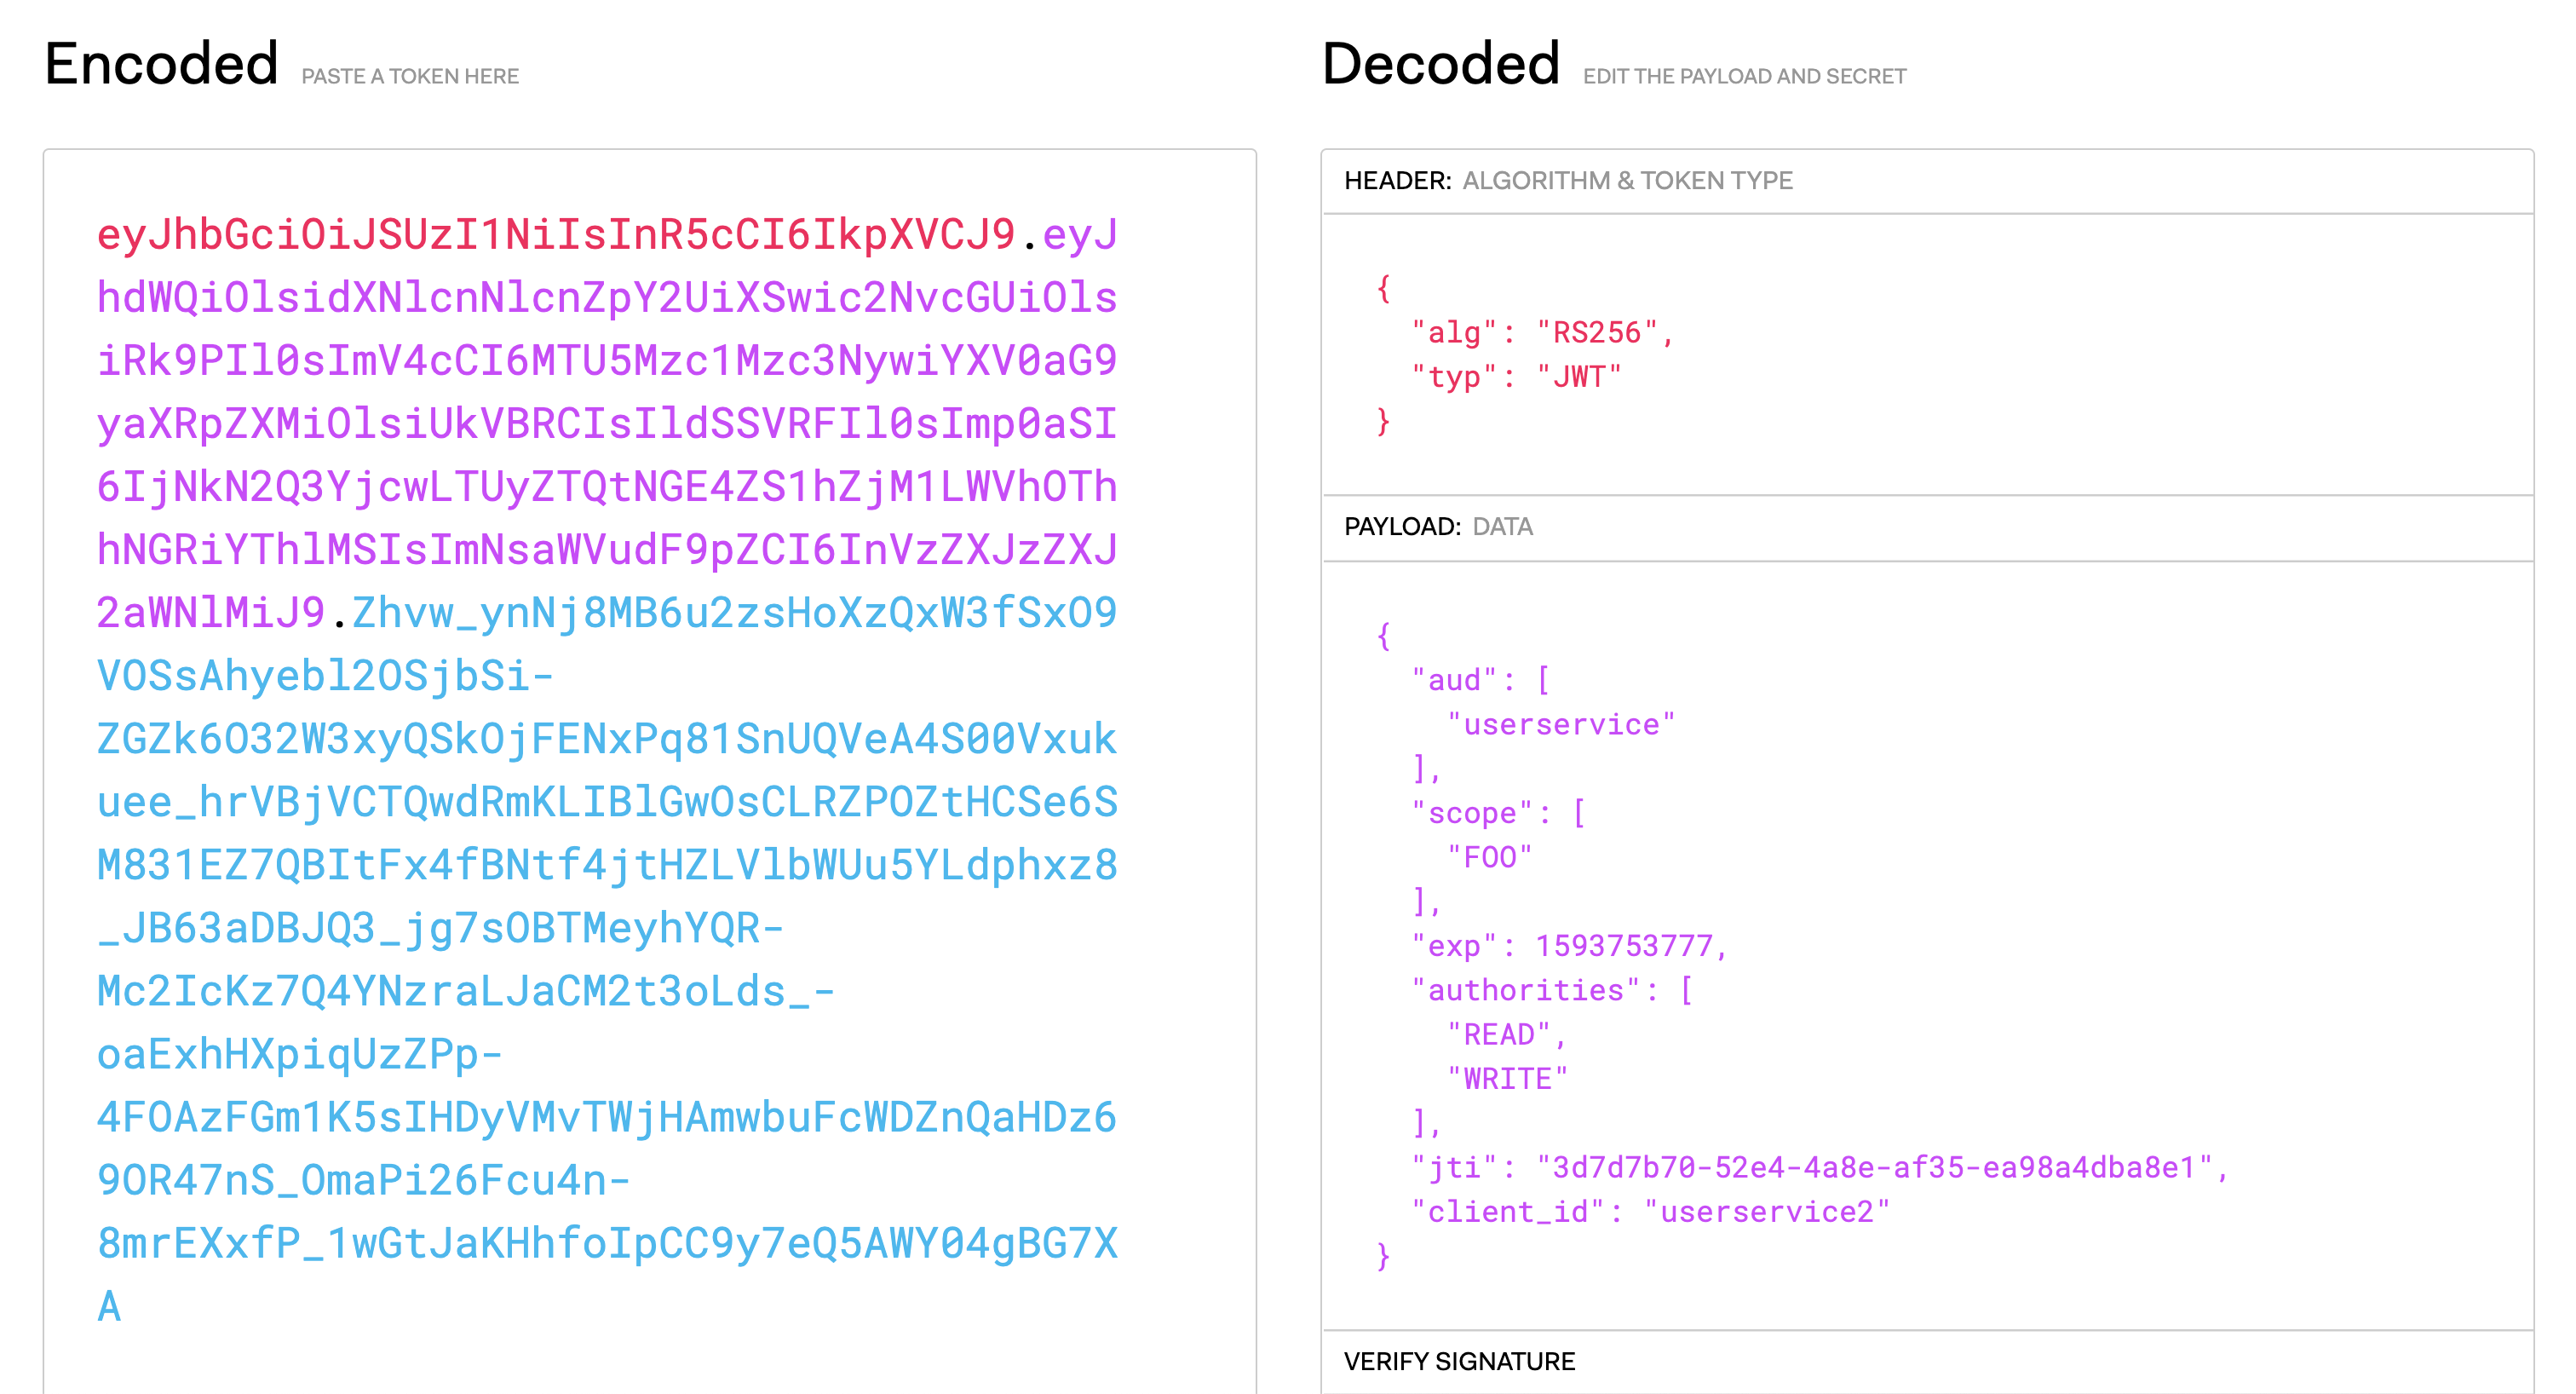
也可以试一下,如果我们的授权服务器没有开启 allowFormAuthenticationForClients 参数(允许表单提交认证)的话,客户端的凭证需要通过 Basic Auth 传过去而不是通过 Post:
# 授权码许可类型
最后,我们来测试下比较复杂的授权码许可。
第一步,打开浏览器访问地址:
http://localhost:8080/oauth/authorize?response_type=code&client_id=userservice3&redirect_uri=https://baidu.com
注意,客户端跳转地址需要和数据库中配置的一致(百度的 URL https://baidu.com 我们之前已经在数据库中有配置了)。访问后页面会直接跳转到登录界面,我们使用用户名 「reader」、密码「reader」来登录:
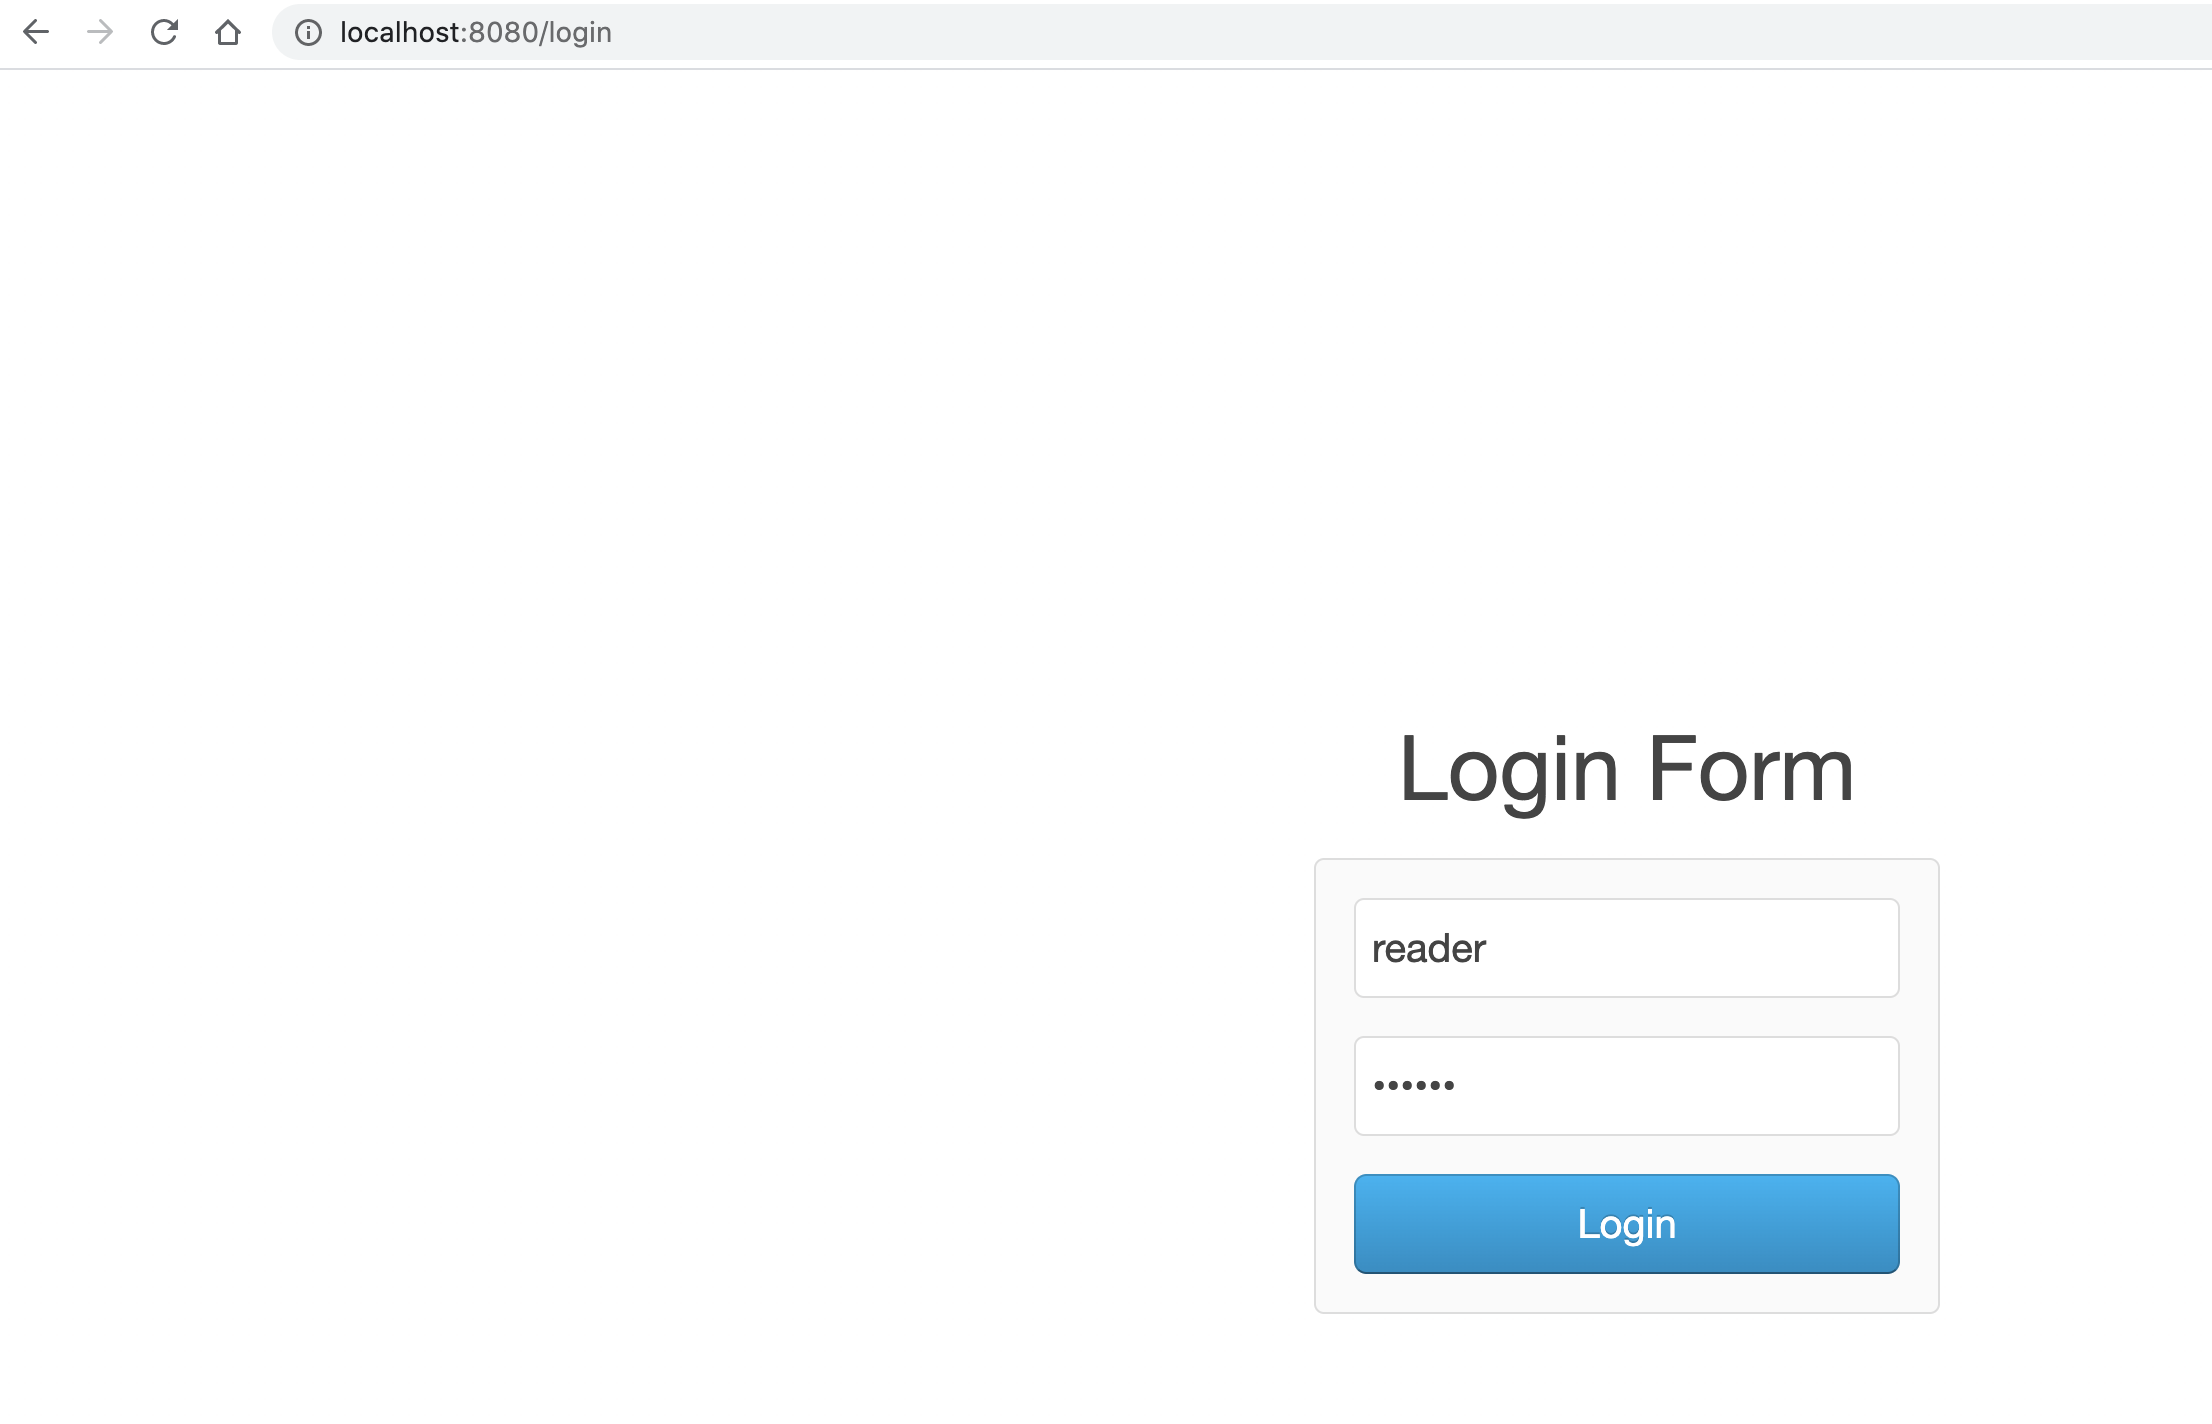
由于我们在数据库中设置的是禁用自动批准授权的模式,所以登录后来到了批准界面:

点击同意后可以看到,数据库中也会产生授权通过记录:

**第二步,**我们可以看到浏览器转到了百度并且提供给了我们授权码:
https://www.baidu.com/?code=XKkHGY
2
数据库中也记录了授权码:

然后 POST 访问下面的地址(code 参数替换为刚才获得的授权码):
http://localhost:8080/oauth/token?grant_type=authorization_code&client_id=userservice3&client_secret=1234&code=XKkHGY&redirect_uri=https://baidu.com
2
可以通过授权码换取访问令牌:
POST http://localhost:8080/oauth/token?grant_type=authorization_code&client_id=userservice3&client_secret=1234&code=A1813M&redirect_uri=https%3A%2F%2Fbaidu.com

HTTP/1.1 200
Cache-Control: no-store
Pragma: no-cache
X-Content-Type-Options: nosniff
X-XSS-Protection: 1; mode=block
X-Frame-Options: DENY
Content-Type: application/json;charset=UTF-8
Transfer-Encoding: chunked
Date: Fri, 18 Dec 2020 09:23:37 GMT
Keep-Alive: timeout=60
Connection: keep-alive

{
  "access_token": "eyJhbGciOiJSUzI1NiIsInR5cCI6IkpXVCJ9.eyJhdWQiOlsidXNlcnNlcnZpY2UiXSwidXNlcl9uYW1lIjoicmVhZGVyIiwic2NvcGUiOlsiRk9PIl0sImV4cCI6MTYwODI5MDYxNywidXNlckRldGFpbHMiOnsicGFzc3dvcmQiOm51bGwsInVzZXJuYW1lIjoicmVhZGVyIiwiYXV0aG9yaXRpZXMiOlt7ImF1dGhvcml0eSI6IlJFQUQifV0sImFjY291bnROb25FeHBpcmVkIjp0cnVlLCJhY2NvdW50Tm9uTG9ja2VkIjp0cnVlLCJjcmVkZW50aWFsc05vbkV4cGlyZWQiOnRydWUsImVuYWJsZWQiOnRydWV9LCJhdXRob3JpdGllcyI6WyJSRUFEIl0sImp0aSI6ImVjNWM2NzhmLWYxNTktNGY5YS1iMGJlLWYyNjVkNDZhYjVhYyIsImNsaWVudF9pZCI6InVzZXJzZXJ2aWNlMyJ9.Fv1cuEJChoqZE2xjyW8tk0H8wRcyD2SkdruBrGTJB_V_FoCzFSY5_7WKHR2VTLXeiraq33B21J4S_UKzbNxFnUg1AY_dx6hXSKewXP8obZPOAxP7JUgbewJv7yNr-fQ15LZF1poLZgZp2XDvH4LeVLe-xkpG5I2a6MEE4ItUXJU",
  "token_type": "bearer",
  "refresh_token": "eyJhbGciOiJSUzI1NiIsInR5cCI6IkpXVCJ9.eyJhdWQiOlsidXNlcnNlcnZpY2UiXSwidXNlcl9uYW1lIjoicmVhZGVyIiwic2NvcGUiOlsiRk9PIl0sImF0aSI6ImVjNWM2NzhmLWYxNTktNGY5YS1iMGJlLWYyNjVkNDZhYjVhYyIsImV4cCI6MTYxMDg3NTQxNywidXNlckRldGFpbHMiOnsicGFzc3dvcmQiOm51bGwsInVzZXJuYW1lIjoicmVhZGVyIiwiYXV0aG9yaXRpZXMiOlt7ImF1dGhvcml0eSI6IlJFQUQifV0sImFjY291bnROb25FeHBpcmVkIjp0cnVlLCJhY2NvdW50Tm9uTG9ja2VkIjp0cnVlLCJjcmVkZW50aWFsc05vbkV4cGlyZWQiOnRydWUsImVuYWJsZWQiOnRydWV9LCJhdXRob3JpdGllcyI6WyJSRUFEIl0sImp0aSI6IjNkZjMxMDRjLTczNTYtNGVkOS04M2ZlLTBhZTg2ZmFkNTk4MiIsImNsaWVudF9pZCI6InVzZXJzZXJ2aWNlMyJ9.aFxewJI1ekZEcusuOuleQoqE5byjFL5oyUvVSUzzcHkSntvgxOFFYte8kEyfVXaCMAVTdpF1r3WmprdtyQ8qxsNbWIr2SBy7YKUbECf0JVKOSQ6FEMpdzMu9Pvmvds_nT4WGpfUDVf2fFgVQtqA4VnQeZxUeEHwBu9NV_1Rsgt0",
  "expires_in": 7199,
  "scope": "FOO",
  "userDetails": {
    "password": null,
    "username": "reader",
    "authorities": [
      {
        "authority": "READ"
      }
    ],
    "accountNonExpired": true,
    "accountNonLocked": true,
    "credentialsNonExpired": true,
    "enabled": true
  },
  "jti": "ec5c678f-f159-4f9a-b0be-f265d46ab5ac"
}
2
3
4
5
6
7
8
9
10
11
12
13
14
15
16
17
18
19
20
21
22
23
24
25
26
27
28
29
30
31
32
33
34
35
虽然 userservice3 客户端可以有读权限和写权限,但是因为我们登录的用户 reader 只有读权限,所以最后拿到也只有读权限。
# 演示权限控制
现在我们来测试一下之前定义的两个账号,也就是读账号和写账号,看看它们的权限控制是否有效。
首先,测试一下我们的安全配置,访问 http://localhost:8081/hello 端点不需要认证可以匿名访问:

访问 http://localhost:8081/user 需要身份认证:

不管以哪种模式拿到访问令牌,我们用具有读权限的访问令牌访问资源服务器的如下地址(请求头加入 Authorization: Bearer XXXXXXXXXX,其中 XXXXXXXXXX 代表访问令牌):
GET http://localhost:8081/user

HTTP/1.1 200
X-Content-Type-Options: nosniff
X-XSS-Protection: 1; mode=block
Cache-Control: no-cache, no-store, max-age=0, must-revalidate
Pragma: no-cache
Expires: 0
X-Frame-Options: DENY
Content-Type: application/json
Transfer-Encoding: chunked
Date: Fri, 18 Dec 2020 09:37:57 GMT
Keep-Alive: timeout=60
Connection: keep-alive

{
  "authorities": [
    {
      "authority": "READ"
    }
  ],
  "details": {
    "remoteAddress": "127.0.0.1",
    "sessionId": null,
    "tokenValue": "eyJhbGciOiJSUzI1NiIsInR5cCI6IkpXVCJ9.eyJhdWQiOlsidXNlcnNlcnZpY2UiXSwidXNlcl9uYW1lIjoicmVhZGVyIiwic2NvcGUiOlsiRk9PIl0sImV4cCI6MTYwODI5MTMwNiwidXNlckRldGFpbHMiOnsicGFzc3dvcmQiOm51bGwsInVzZXJuYW1lIjoicmVhZGVyIiwiYXV0aG9yaXRpZXMiOlt7ImF1dGhvcml0eSI6IlJFQUQifV0sImFjY291bnROb25FeHBpcmVkIjp0cnVlLCJhY2NvdW50Tm9uTG9ja2VkIjp0cnVlLCJjcmVkZW50aWFsc05vbkV4cGlyZWQiOnRydWUsImVuYWJsZWQiOnRydWV9LCJhdXRob3JpdGllcyI6WyJSRUFEIl0sImp0aSI6IjQzMjhlZDViLTA3OTItNDkxZC04NTJkLWYwMWJhNGEzNGRmZSIsImNsaWVudF9pZCI6InVzZXJzZXJ2aWNlMyJ9.TIz5G2S-gIvgKRWWMRHAPYHB27s4uD0w6Sl9GPMj1L-LCgmiEbi-y2eBl9sW5CgS4bbC9o2zcHeuYx5BAFkaBtfe74dtOejhhCm20ql4kkrzCc352o7IP4h_udeebTIh5qD_76xCQY3Mwwt1a5ThTTJ3Wz_G94872XiYMDqAq9o",
    "tokenType": "bearer",
    "decodedDetails": null
  },
  "authenticated": true,
  "userAuthentication": {
    "authorities": [
      {
        "authority": "READ"
      }
    ],
    "details": null,
    "authenticated": true,
    "principal": "reader",
    "credentials": "N/A",
    "name": "reader"
  },
  "credentials": "",
  "principal": "reader",
  "oauth2Request": {
    "clientId": "userservice3",
    "scope": [
      "FOO"
    ],
    "requestParameters": {
      "client_id": "userservice3"
    },
    "resourceIds": [
      "userservice"
    ],
    "authorities": [],
    "approved": true,
    "refresh": false,
    "redirectUri": null,
    "responseTypes": [],
    "extensions": {},
    "grantType": null,
    "refreshTokenRequest": null
  },
  "clientOnly": false,
  "name": "reader"
}
2
3
4
5
6
7
8
9
10
11
12
13
14
15
16
17
18
19
20
21
22
23
24
25
26
27
28
29
30
31
32
33
34
35
36
37
38
39
40
41
42
43
44
45
46
47
48
49
50
51
52
53
54
55
56
57
58
59
60
61
62
63
64
65
66
以 POST 方式访问 http://localhost:8081/user/,显然是失败的:
POST http://localhost:8081/user

HTTP/1.1 403
Cache-Control: no-store
Pragma: no-cache
X-Content-Type-Options: nosniff
X-XSS-Protection: 1; mode=block
X-Frame-Options: DENY
Content-Type: application/json
Transfer-Encoding: chunked
Date: Fri, 18 Dec 2020 09:39:42 GMT
Keep-Alive: timeout=60
Connection: keep-alive

{
  "error": "access_denied",
  "error_description": "不允许访问"
}
2
3
4
5
6
7
8
9
10
11
12
13
14
15
16
17
18
因为这个接口要求有写权限:
@PreAuthorize("hasAuthority('WRITE')")
@PostMapping
public Object write(OAuth2Authentication authentication) {
2
3
我们换一个具有读写权限的访问令牌来试试:
# 登录页面
http://localhost:8080/oauth/authorize?response_type=code&client_id=userservice3&redirect_uri=https://baidu.com

用 writer/writer 登录

# 换取 token
POST http://localhost:8080/oauth/token?grant_type=authorization_code&client_id=userservice3&client_secret=1234&code=Ipbkuq&redirect_uri=https://baidu.com

# 访问资源
POST http://localhost:8081/user

HTTP/1.1 200
X-Content-Type-Options: nosniff
X-XSS-Protection: 1; mode=block
Cache-Control: no-cache, no-store, max-age=0, must-revalidate
Pragma: no-cache
Expires: 0
X-Frame-Options: DENY
Content-Type: application/json
Transfer-Encoding: chunked
Date: Fri, 18 Dec 2020 09:47:34 GMT
Keep-Alive: timeout=60
Connection: keep-alive

{
  "password": null,
  "username": "writer",
  "authorities": [
    {
      "authority": "READ,WRITE"
    }
  ],
  "accountNonExpired": true,
  "accountNonLocked": true,
  "credentialsNonExpired": true,
  "enabled": true
}
2
3
4
5
6
7
8
9
10
11
12
13
14
15
16
17
18
19
20
21
22
23
24
25
26
27
28
29
30
31
32
33
34
35
36
37
38
# 搭建客户端程序
在上面的演示中,我们使用的是 Postman,也就是手动 HTTP 请求的方式来申请和使用 Token。最后,我们来搭建一个 OAuth 客户端程序自动实现这个过程。
plugins {
    id 'org.springframework.boot' version '2.4.1'
    id 'io.spring.dependency-management' version '1.0.10.RELEASE'
    id 'java'
}

group = 'cn.mrcode.cloudoath2.client'
version = '0.0.1-SNAPSHOT'
sourceCompatibility = '1.8'

repositories {
    mavenCentral()
    maven { url 'https://repo.spring.io/milestone' }
}

ext {
    set('springCloudVersion', "2020.0.0-RC1")
}

dependencies {
    implementation 'org.springframework.boot:spring-boot-starter-web'
    implementation 'org.springframework.cloud:spring-cloud-starter-oauth2'
    implementation 'org.springframework.boot:spring-boot-starter-thymeleaf'
}

dependencyManagement {
    imports {
        mavenBom "org.springframework.cloud:spring-cloud-dependencies:${springCloudVersion}"
    }
}

test {
    useJUnitPlatform()
}
2
3
4
5
6
7
8
9
10
11
12
13
14
15
16
17
18
19
20
21
22
23
24
25
26
27
28
29
30
31
32
33
34
35
配置文件如下:
server:
  port: 8082
  servlet:
    context-path: /ui
security:
  oauth2:
    client:
      clientId: userservice3
      clientSecret: 1234
      accessTokenUri: http://localhost:8080/oauth/token
      userAuthorizationUri: http://localhost:8080/oauth/authorize
      scope: FOO
    resource:
      jwt:
        key-value: |
          -----BEGIN PUBLIC KEY-----
          MIGfMA0GCSqGSIb3DQEBAQUAA4GNADCBiQKBgQCM0iHtBw+Kbmynd34MS1g8DvcQ
          hhDNacxRepPKmzMs524UX1bLeMlM6A4TE1Gp106nz5xRGPB4AVHq7BFe25H/xdT3
          SpoSvfnkb9SgfPX7Y+PuNLxhGxUt8qNgzHEjsJomxEiYGsYIaxScFuGK6uXhPi4d
          c4csrdiaAelTIAASRQIDAQAB
          -----END PUBLIC KEY-----
spring:
  thymeleaf:
    cache: false
#logging:
#  level:
#    ROOT: DEBUG
2
3
4
5
6
7
8
9
10
11
12
13
14
15
16
17
18
19
20
21
22
23
24
25
26
27
28
客户端项目端口 8082,几个需要说明的地方:
本地测试的时候有一个坑,也就是我们需要配置 context-path,否则可能会出现客户端和授权服务器服务端 Cookie 干扰,导致 CSRF 防御触发的问题。这个问题出现后程序没有任何错误日志输出,只有开启 DEBUG 模式后才能看到 DEBUG 日志里有提示,因此这个问题非常难以排查。说实话,我也不知道 Spring 为什么不把这个信息作为 WARN 级别的日志输出。
作为 OAuth 客户端,我们需要配置 OAuth 服务端获取 Token 的地址、授权(获取授权码)的地址,需要配置客户端的 ID、密码和授权范围。
因为使用的是 JWT Token,我们需要配置公钥(当然,如果不在这里直接配置公钥的话,也可以配置从授权服务器服务端获取公钥)。
接下来,我们可以开始编码了。
第一步,实现 MVC 的配置:
package cn.mrcode.cloudoath2.client;

import org.springframework.context.annotation.Bean;
import org.springframework.context.annotation.Configuration;
import org.springframework.web.context.request.RequestContextListener;
import org.springframework.web.servlet.config.annotation.EnableWebMvc;
import org.springframework.web.servlet.config.annotation.ViewControllerRegistry;
import org.springframework.web.servlet.config.annotation.WebMvcConfigurer;

@Configuration
@EnableWebMvc
public class WebMvcConfig implements WebMvcConfigurer {
    /**
     * 配置 RequestContextListener 用于启用 session scope 的 Bean
     *
     * @return
     */
    @Bean
    public RequestContextListener requestContextListener() {
        return new RequestContextListener();
    }

    /**
     * 配置 index 路径的首页 Controller
     *
     * @param registry
     */
    @Override
    public void addViewControllers(ViewControllerRegistry registry) {
        registry.addViewController("/")
                .setViewName("forward:/index");
        registry.addViewController("/index");
    }
}
2
3
4
5
6
7
8
9
10
11
12
13
14
15
16
17
18
19
20
21
22
23
24
25
26
27
28
29
30
31
32
33
34
35
这里做了两件事情:
配置 RequestContextListener,用于启用 session scope 的 Bean;
配置了 index 路径的首页 Controller。
第二步,实现安全方面的配置:
package cn.mrcode.cloudoath2.client;

import org.springframework.context.annotation.Configuration;
import org.springframework.core.annotation.Order;
import org.springframework.security.config.annotation.web.builders.HttpSecurity;
import org.springframework.security.config.annotation.web.configuration.WebSecurityConfigurerAdapter;

@Configuration
@Order(200)
public class WebSecurityConfig extends WebSecurityConfigurerAdapter {
    /**
     * / 路径和 /login 路径允许访问,其它路径需要身份认证后才能访问
     * @param http
     * @throws Exception
     */
    @Override
    protected void configure(HttpSecurity http) throws Exception {
        http
                .authorizeRequests()
                .antMatchers("/", "/login**")
                .permitAll()
                .anyRequest()
                .authenticated();
    }
}
2
3
4
5
6
7
8
9
10
11
12
13
14
15
16
17
18
19
20
21
22
23
24
25
这里我们实现的是 / 路径和 /login 路径允许访问,其它路径需要身份认证后才能访问。
第三步,我们来创建一个控制器:
package cn.mrcode.cloudoath2.client;

import org.springframework.beans.factory.annotation.Autowired;
import org.springframework.http.ResponseEntity;
import org.springframework.security.oauth2.client.OAuth2RestTemplate;
import org.springframework.security.oauth2.provider.OAuth2Authentication;
import org.springframework.web.bind.annotation.GetMapping;
import org.springframework.web.bind.annotation.RestController;
import org.springframework.web.servlet.ModelAndView;

@RestController
public class DemoController {
    @Autowired
    OAuth2RestTemplate restTemplate;
    // 演示登录后才能访问的安全页面
    @GetMapping("/securedPage")
    public ModelAndView securedPage(OAuth2Authentication authentication) {
        return new ModelAndView("securedPage").addObject("authentication", authentication);
    }
    // 演示通过 OAuth2RestTemplate 调用受保护资源
    @GetMapping("/remoteCall")
    public String remoteCall() {
        ResponseEntity<String> responseEntity = restTemplate.getForEntity("http://localhost:8081/user/name", String.class);
        return responseEntity.getBody();
    }
}
2
3
4
5
6
7
8
9
10
11
12
13
14
15
16
17
18
19
20
21
22
23
24
25
26
这里我们实现了两个功能:
securedPage 页面,实现的功能是,把用户信息作为模型传入了视图,这样打开页面后就能显示用户名和权限。
remoteCall 接口,实现的功能是,通过引入 OAuth2RestTemplate,在登录后就可以使用凭据直接从受保护资源服务器拿资源,不需要繁琐地实现获得访问令牌、在请求头里加入访问令牌的过程。
第四步,配置一下刚才用到的 OAuth2RestTemplate Bean,并启用 OAuth2Sso 功能:
@Configuration
@EnableOAuth2Sso //这个注解包含了 @EnableOAuth2Client
public class OAuthClientConfig {
    /**
     * 定义了 OAuth2RestTemplate,网上一些比较老的资料给出的是手动读取配置文件来实现,
     * 最新版本已经可以自动注入 OAuth2ProtectedResourceDetails
     * @param oAuth2ClientContext
     * @param details
     * @return
     */
    @Bean
    public OAuth2RestTemplate oauth2RestTemplate(OAuth2ClientContext oAuth2ClientContext,
                                                 OAuth2ProtectedResourceDetails details) {
        return new OAuth2RestTemplate(details, oAuth2ClientContext);
    }
}
2
3
4
5
6
7
8
9
10
11
12
13
14
15
16
第五步,实现首页:index.html
<!DOCTYPE html>
<html lang="en">
<head>
    <meta charset="UTF-8">
    <title>Title</title>
</head>

<body>
<div class="container">
    <div class="col-sm-12">
        <h1>Spring Security SSO Client</h1>
        <a class="btn btn-primary" href="securedPage">Login</a>
    </div>
</div>
</body>
</html>
2
3
4
5
6
7
8
9
10
11
12
13
14
15
16
以及登录后才能访问的 securedPage 页面:securedPage.html
<!DOCTYPE html>
<html lang="en" xmlns:th="http://www.thymeleaf.org">
<head>
    <meta charset="UTF-8">
    <title>Title</title>
</head>
<body>
<div class="container">
    <div class="col-sm-12">
        <h1>Secured Page</h1>
        Welcome, <span th:text="${authentication.name}">Name</span>
        <br/>
        Your authorities are <span th:text="${authentication.authorities}">authorities</span>
    </div>
</div>
</body>
</html>
2
3
4
5
6
7
8
9
10
11
12
13
14
15
16
17
# 演示单点登录
好,客户端程序搭建好之后,我们先来测试一下单点登录的功能。启动客户端项目,打开浏览器访问:
http://localhost:8082/ui/securedPage
可以看到,页面自动转到了授权服务器(8080 端口)的登录页面:
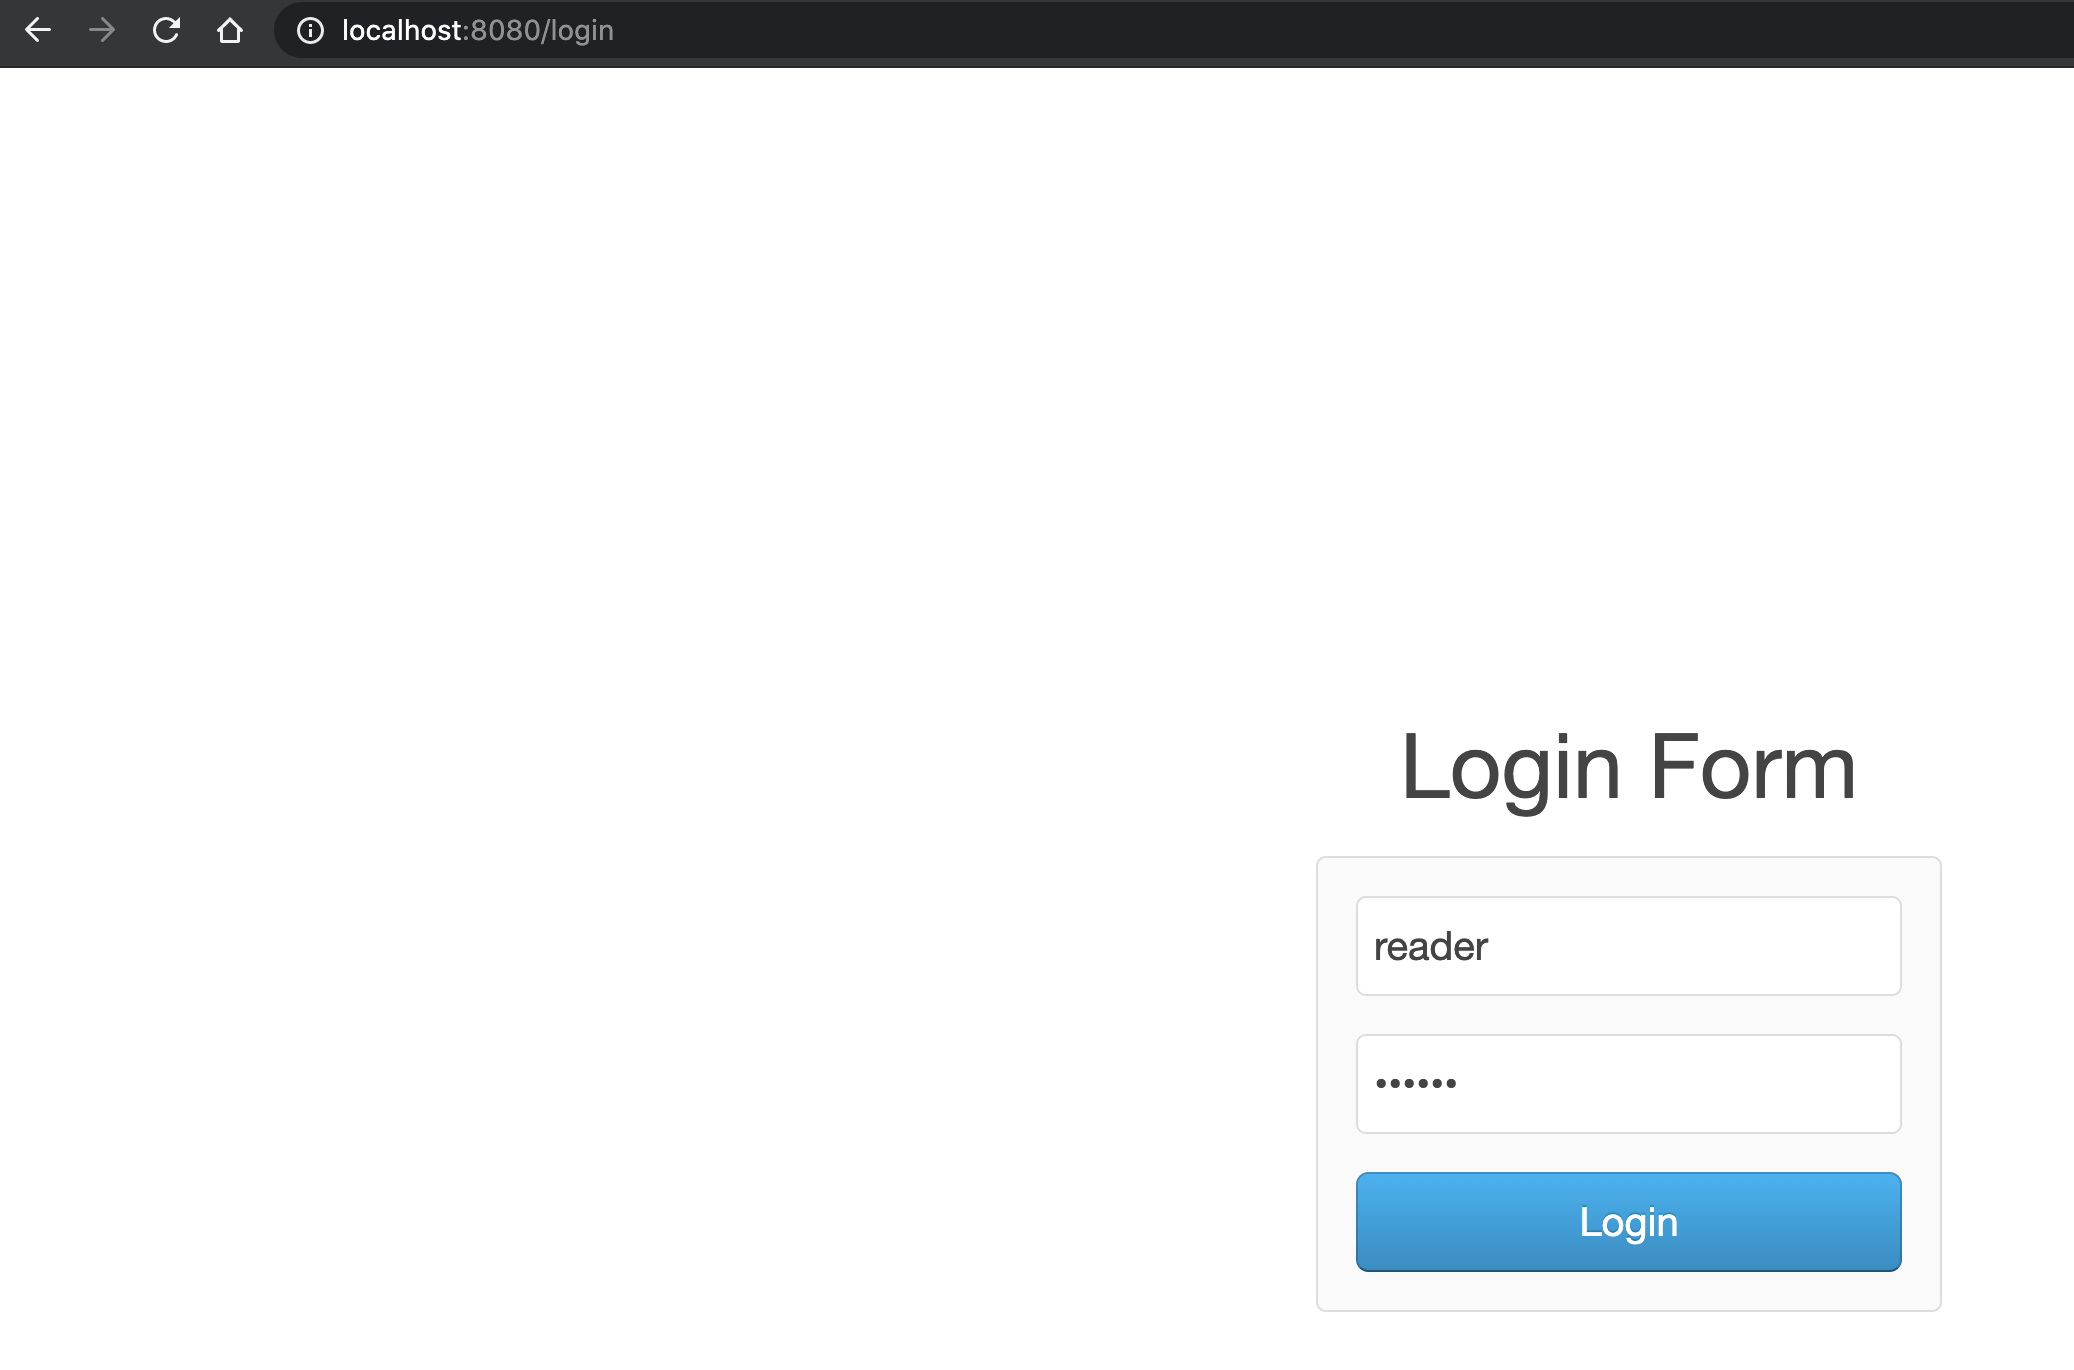
登录后显示了当前用户名和权限:
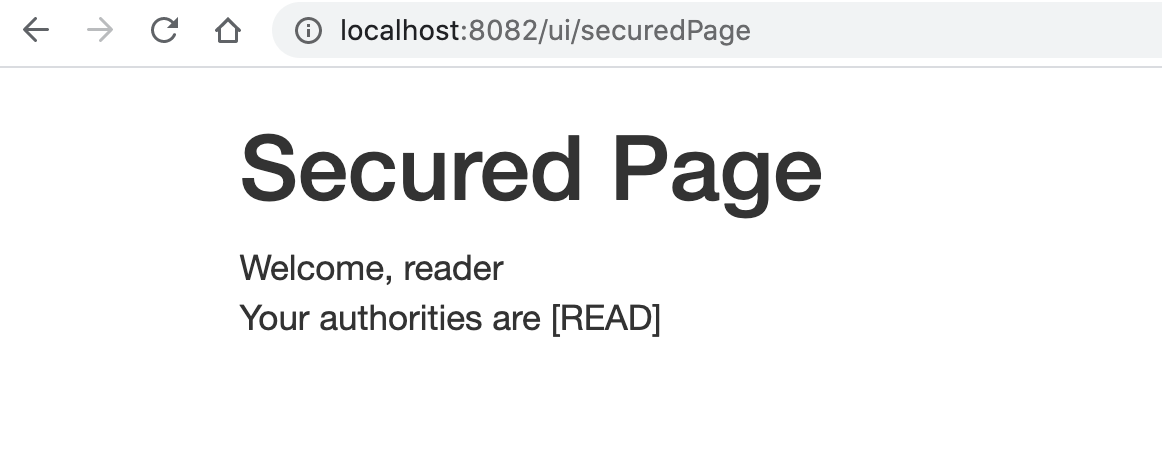
我们再启动另一个客户端网站,端口改为 8083,然后访问同样的地址:
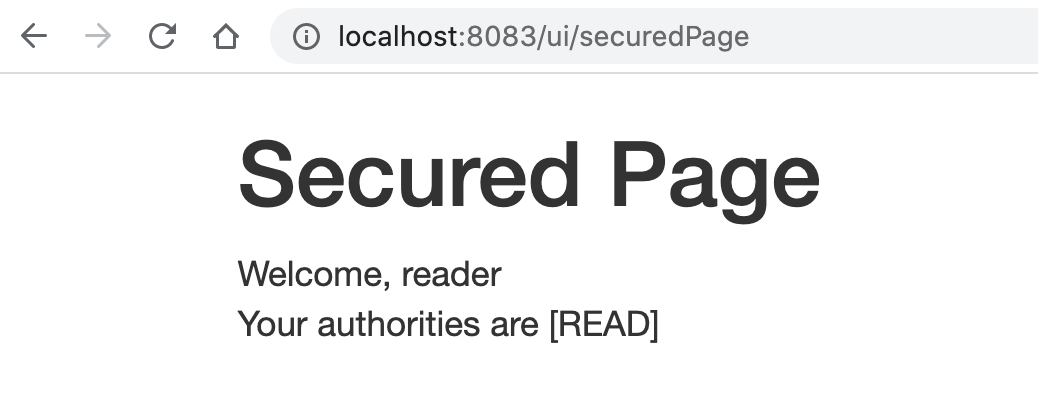
可以看到直接是登录状态,单点登录测试成功。是不是很方便?其实,为了达成单点登录的效果,程序在背后自动实现了多次 302 重定向,整个流程为:
http://localhost:8083/ui/securedPage ->
http://localhost:8083/ui/login ->
http://localhost:8080/oauth/authorize?client_id=userservice3&redirect_uri=http://localhost:8083/ui/login&response_type=code&scope=FOO&state=Sobjqe ->
http://localhost:8083/ui/login?code=CDdvHa&state=Sobjqe ->
http://localhost:8083/ui/securedPage
2
3
4
5
# 演示客户端请求资源服务器资源
还记得吗,在上一节「搭建客户端程序」中,我们还定义了一个 remoteCall 接口,直接使用 OAuth2RestTemplate 来访问远程资源服务器的资源。现在,我们来测试一下这个接口是否可以实现自动的 OAuth 流程。访问:
http://localhost:8082/ui/remoteCall
2
会先转到授权服务器登录,登录后自动跳转回来:

可以看到输出了用户名,对应的资源服务器服务端接口是:
@PreAuthorize("hasAuthority('READ') or hasAuthority('WRITE')")
@GetMapping("name")
public String name(OAuth2Authentication authentication) {
    return authentication.getName();
}
2
3
4
5
换一个 writer 用户登录试试,也能得到正确的输出:

# 总结
今天这一讲,我们完整演示了如何使用 Spring Cloud 的 OAuth 2.0 组件基于三个程序角色(授权服务器、受保护资源服务器和客户端)实现三种 OAuth 2.0 的授权许可类型(资源拥有者凭据许可、客户端凭据许可和授权码许可)。
我们先演示了三种授权许可类型的手动流程,然后也演示了如何实现权限控制和单点登录,以及如何使用客户端程序来实现自动的 OAuth 2.0 流程。
我把今天用到的所有代码都放到了 GitHub (opens new window) 上,你可以点击这个链接查看。
最后,我再提一下,将来 Spring 对于 OAuth 2.0 的支持可能会转移到由社区推进的 Spring Authorization Server 项目上来继续运作。如果你感兴趣的话,可以及时关注这个项目的进展。