
# 快速入门
本次构建使用工具:
- gradle 4.8.1
- idea 2018.3
- 项目使用 spring initializr ui 创建
- spring cloud 版本 Greenwich.SR1
# 配置仓库
先创建一个配置仓库, cloud config 默认策略是使用 git 来管理配置文件的;
新建一个 F:/dir/config-repo 目录;
TIP
我本地测试目录太长都会使用 dir 来标识前面的所有路径
并初始化成 git 仓库(可以使用 git 小乌龟来初始化)。
在根目录下直接放置配置文件,命名规则 服务名-环境名.yml 的方式来存储,如
mrcode-dev.yml
mrcode-prod.yml
1
2
2
注意:记得需要 commit 文件;
# 快速搭建配置中心程序
通过几个简单配置快速搭建 config server,在一个 boot 项目下
config-server/build.gradle
plugins {
    id 'org.springframework.boot' version '2.1.6.RELEASE'
    id 'java'
}

apply plugin: 'io.spring.dependency-management'

group = 'cn.mrcode.example.spring.cloud.tutorial.config'
version = '0.0.1-SNAPSHOT'
sourceCompatibility = '1.8'

repositories {
    mavenCentral()
}

ext {
    set('springCloudVersion', "Greenwich.SR1")
}

dependencies {
    implementation 'org.springframework.cloud:spring-cloud-config-server'
    testImplementation 'org.springframework.boot:spring-boot-starter-test'
}

dependencyManagement {
    imports {
        mavenBom "org.springframework.cloud:spring-cloud-dependencies:${springCloudVersion}"
    }
}
1
2
3
4
5
6
7
8
9
10
11
12
13
14
15
16
17
18
19
20
21
22
23
24
25
26
27
28
29
30
2
3
4
5
6
7
8
9
10
11
12
13
14
15
16
17
18
19
20
21
22
23
24
25
26
27
28
29
30
添加 git 存储库,通过 git 仓库来管理配置文件的(这个是默认策略,使用 git 仓库来管理配置文件)
application.yml
server:
  port: 11000
spring:
  cloud:
    config:
      server:
        git:
          # uri: http://localhost/mrcode/config.git
          # username: xx
          # password: xx
          uri: file://f:/dir/config-repo
1
2
3
4
5
6
7
8
9
10
11
2
3
4
5
6
7
8
9
10
11
uri 可以使用本地文件目录,此方式只适用于本地测试
file://f:/dir/config-repo
file:///f:/dir/config-repo   # 而 windows 上需要多一个斜杠

http://localhost/mrcode/config.git # 线上需要使用 git 地址
1
2
3
4
2
3
4
使用注解开启服务
@EnableConfigServer
1
# 查看某个服务的配置信息
http:配置中心IP:端口/服务名/环境
1
如 mrcode 服务
http://localhost:11000/mrcode/development
http://localhost:11000/mrcode/dev
http://localhost:11000/mrcode/prod
1
2
3
2
3
输出如下信息,propertySources 中是具体的配置文件信息,
- name:是标识该配置文件具体在配置仓库的路径
- source:配置文件原本的内容信息
如果 propertySources 为空,则标识没有对应环境的配置文件
{
    "name": "mrcode",
    "profiles": [
        "dev"
    ],
    "label": null,
    "version": "c0fe8977dd5935f84c991e1ff501df339f012d16",
    "state": null,
    "propertySources": [
        {
            "name": "file:///F:/dir/config-repo/mrcode-dev.yml",
            "source": {
                "test": "测试"
            }
        }
    ]
}
1
2
3
4
5
6
7
8
9
10
11
12
13
14
15
16
17
2
3
4
5
6
7
8
9
10
11
12
13
14
15
16
17
# 客户端使用
创建一个客户端程序
config-client/build.gradle
plugins {
    id 'org.springframework.boot' version '2.1.6.RELEASE'
    id 'java'
}

apply plugin: 'io.spring.dependency-management'

group = 'cn.mrcode.example.spring.cloud.tutorial.config'
version = '0.0.1-SNAPSHOT'
sourceCompatibility = '1.8'

repositories {
    mavenCentral()
}

ext {
    set('springCloudVersion', "Greenwich.SR1")
}

dependencies {
    implementation 'org.springframework.cloud:spring-cloud-starter-config'
    implementation 'org.springframework.boot:spring-boot-starter-web'
    implementation 'org.springframework.boot:spring-boot-starter-actuator'
    testImplementation 'org.springframework.boot:spring-boot-starter-test'
}

dependencyManagement {
    imports {
        mavenBom "org.springframework.cloud:spring-cloud-dependencies:${springCloudVersion}"
    }
}
1
2
3
4
5
6
7
8
9
10
11
12
13
14
15
16
17
18
19
20
21
22
23
24
25
26
27
28
29
30
31
32
2
3
4
5
6
7
8
9
10
11
12
13
14
15
16
17
18
19
20
21
22
23
24
25
26
27
28
29
30
31
32
yml 配置
server:
  port: 11001
spring:
  application:
    name: config-client  # 默认名称为 application
  cloud:
    config:
      uri: http://localhost:11000 # 指向刚才创建的配置中心项目
      profile: dev # 默认为 default

logging:
  level:
    root: info
    # 打印 requestMapping
    org.springframework.web: trace

management:
  endpoints:
    web:
      exposure:
        # 配合 spring-boot-starter-actuator 包,打开 /actuator/env 接口
        include: "*"
1
2
3
4
5
6
7
8
9
10
11
12
13
14
15
16
17
18
19
20
21
22
2
3
4
5
6
7
8
9
10
11
12
13
14
15
16
17
18
19
20
21
22
启动客户端项目后访问:http://localhost:11001/actuator/env,输出如下信息
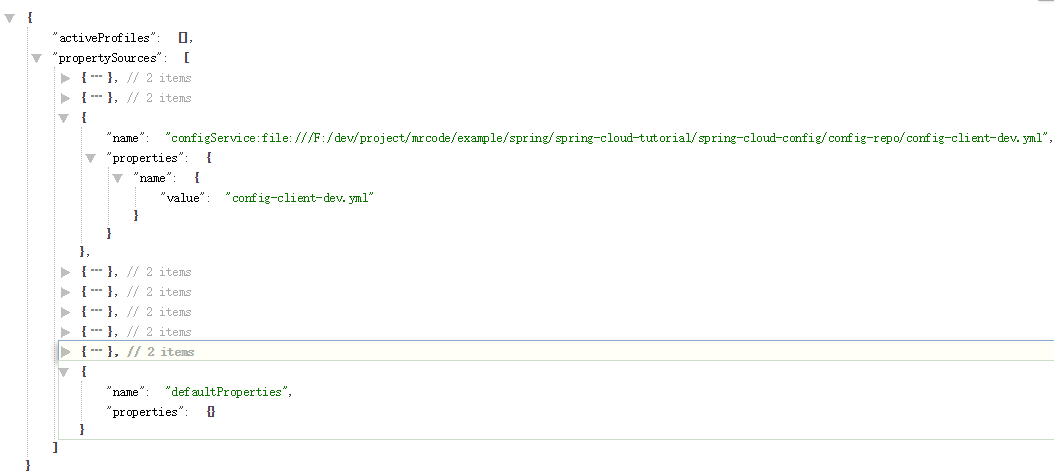
上图的 configService 是必须要先在配置中心新址一个 config-client-dev.yml 的文件,才能看到。否则启动后是看不到这项信息的