
# Spring Cloud Config Client
Spring boot 程序可以立即利用 Spring config server(或应用程序开发人员提供的其他外部属性源)。它还获得了一些与环境更改事件相关的其他有用特性。
# 直连配置服务器模式 / Config First Bootstrap
客户端程序在类路径下包含 Spring Cloud Config Client 时,它的默认行为如下: 当客户端启动时,自动绑定到 config server(通过 spring.cloud.config.uri 配置)并使用远程属性源初始化 spring Environment
这种行为的最终结果是,所有希望使用配置服务器的客户机应用程序都需要一个 bootstrap.yml (或 environment variable,这个环境变量到现在我都不知道是什么东西),
可以通过 spring.cloud.config.uri 来配置 config server 地址,默认地址是 http://localhost:8888
添加 spring-cloud-starter-config 依赖
implementation 'org.springframework.cloud:spring-cloud-starter-config'
// 下面的依赖在快速开始里面讲解过
implementation 'org.springframework.boot:spring-boot-starter-web'
implementation 'org.springframework.boot:spring-boot-starter-actuator'
2
3
4
在 bootstrap.yml 中配置 配置中心的地址
spring:
  application:
    name: config-client  # 默认名称为 application
  profiles:
    active: dev
  cloud:
    config:
      uri: http://localhost:11000
2
3
4
5
6
7
8
# 服务发现模式 / Discovery First Bootstrap
如果您使用 DiscoveryClient 实现,比如 Spring Cloud Netflix 和 Eureka Service Discovery 或 Spring Cloud Consul, 您可以让配置服务器注册到注册中心。但是,在 Config First 模式下,客户端就不能通过服务注册中心来发现配置服务器
客户端:bootstrap.yml
spring:
  cloud:
    config:
      discovery:
        enabled: true  # 默认值是关闭的
        service-id: config-server  # 默认值是 configserver,配置中心的服务 ID,也就是 spring.application.name
2
3
4
5
6
如果配置服务器使用了 HTTP Basic 保护的,则可以通过 eureka 元数据进行配置,让客户端能正常连接上
配置服务:bootstrap.yml
eureka:
  instance:
    ...
    metadataMap:
      # Http Basic 所需要的用户名和密码
      user: osufhalskjrtl
      password: lviuhlszvaorhvlo5847
      configPath: /config  # 如果配置中心有项目名称(学名称为上下文路径),可以通过该属性指定
2
3
4
5
6
7
8
这样配置之后,客户端通过服务注册中心获取到配置服务信息,并通过这个信息链接上配置服务。 这样就多了一次网络开销,但是带来的好处是,配置中心可以更改自己的坐标(如 ip 地址,上下文路径等)、 而客户端在最差的情况下,只需要重启即可
# 配置客户端快速失败 / Config Client Fail Fast
在某些情况下,如果服务无法连接到配置服务器,则可能希望启动失败。
可以通过以下属性,假如不能连接到配置服务器则抛出异常
java.lang.IllegalStateException: Could not locate PropertySource and the fail fast property is set, failing
项目启动失败;为 false 则不能连接到配置中心项目也可以启动成功
spring:
  cloud:
    config:
      failFast: true
2
3
4
# 配置客户端重试 / Config Client Retry
希望开启重试机制需要满足以下 2 点:
spring.cloud.config.fail-fast=true- 添加依赖
'org.springframework.boot:spring-boot-starter-aop'org.springframework.retry:spring-retry
默认行为是重试 6 次,初始重试间隔为 1000ms,后续间隔的指数乘数为 1.1。
可以通过 spring.cloud.config.retry.* configuration 定制重试
cloud:
  config:
    retry:
      initial-interval: 10000
      max-interval: 20000
      max-attempts: 10
      multiplier: 1.2
2
3
4
5
6
7
要完全控制重试行为,可以提供一个 RetryOperationsInterceptor
该段代码是 自动配置里面的,也就是默认重试机制里面的声明,我们只要模仿这个提供即可
@Bean
@ConditionalOnMissingBean(name = "configServerRetryInterceptor")
public RetryOperationsInterceptor configServerRetryInterceptor(
    RetryProperties properties) {
  return RetryInterceptorBuilder.stateless()
      .backOffOptions(properties.getInitialInterval(),
          properties.getMultiplier(), properties.getMaxInterval())
      .maxAttempts(properties.getMaxAttempts()).build();
}
2
3
4
5
6
7
8
9
10
# 定位远程配置资源
服务端使用端点 /{name}/{profile}/{label} 提供属性源服务,其中客户端应用程序的默认绑定如下:
- "name" =
${spring.application.name} - "profile" =
${spring.profiles.active}(实际上是通过 Environment.getActiveProfiles() 获取的) - "label" = "master"
TIP
在配置 ${spring.application.name} 时,不要使用暴露前缀 application-,否则有可能出现找不到资源的问题
可以通过配置覆盖默认值,spring.cloud.config.* ( * 可以是 name, profile or label);
label 对于回滚到以前版本的配置非常有用。使用默认的配置服务实现,label 的值可以是
- git label
- branch name
- commit ID
同时 label 也可以使用逗号分隔提供多个值。在这种情况下,列表中的项将逐一尝试,直到成功为止。在处理特性分支时,此行为可能非常有用。比如你希望通过 label 配置分支名称 spring.cloud.config.label=myfeature,develop
# 配置服务的高可用性
如果部署了多个配置服务,那么客户端需要提供多个配置中心的地址信息, 才能做到当其中一个或多个配置服务不可用时,具有高可用性
- Config First 模式下可以使用
spring.cloud.config.uri用逗号分隔方式提供多个地址 - Discovery-First 模式下,需要将所有配置服务都注册到服务注册中心
注意:只有在配置服务器不运行时(即应用程序退出时)或连接超时时,这样做才能确保高可用性。例如,如果配置服务器返回 500(内部服务器错误)响应,或者配置客户端从配置服务器接收 401(由于糟糕的凭证或其他原因),配置客户端不会尝试从其他 url 获取属性。这种错误表示用户问题,而不是可用性问题。
配置服务如果使用 HTTP basic 方式进行安全保护那么需要将用户名和密码嵌入到每个 uri 地址中;如果使用任何其他类型的安全机制,则无法(目前)支持每配置服务器身份验证和授权。
怎么内嵌用户名和密码到 uri 中,后面章节会讲解
# 配置读取超时
如果想配置读取超时,可以使用 spring.cloud.config.request-read-timeout 属性,以毫秒为单位,默认值 0(不超时)
# 安全 / Security
如果是使用 HTTP Basic security 来保护 config server,客户端需要知道用户名和密码,可以通过以下方式指定
bootstrap.yml
spring:
  cloud:
    config:
      uri: http://user:123456@localhost:11000
      # 多个配置服务实例可以使用逗号分隔
      # uri: http://user:123456@localhost:11000,http://user:123456@localhost:11003
2
3
4
5
6
这里为了测试方便,简单说下服务端的配置,默认密码是随机的,这里需要修改为固定的
spring:
  security:
    user:
      name: user
      password: 123456
2
3
4
5
下面例子可以配置所有 uri 的用户名和密码为同一个
spring:
  cloud:
    config:
      uri: http://user:123456@localhost:11000,http://user:0123@localhost:11003
      username: user
      password: 123456
2
3
4
5
6
uri 中的用户名和密码配置会被覆盖
如果你使用的是其他的安全认证方式,就需要为 ConfigServicePropertySourceLocator(环境定位(可能是远程)属性源的策略) 提供一个 RestTemplate 实现,并注入到 spring boot 上下文中
# 健康指示器 / Health Indicator
客户机通过 org.springframework.boot:spring-boot-starter-actuator 尝试从配置服务器加载配置(这里也作解释了之前搭建客户机时为什么需要添加一个 actuator 的依赖了)。
可以通过 health.config.enabled=false 关闭指示器
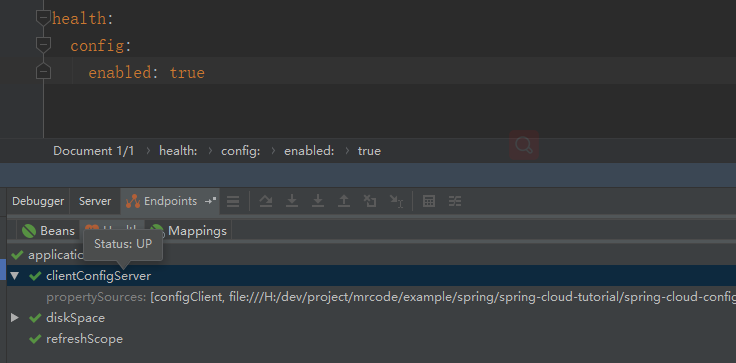
通过尝试,发现关闭之后,只是这个状态没有了,那么健康指示器应该只是用于检查健康状态的。
出于性能原因,还缓存了响应。默认的缓存存活时间是 5分钟。要更改该值,请设置 health.config.time-to-live。属性(以毫秒为单位)。
health:
  config:
    enabled: true
    time-to-live: 50000 # 健康结果缓存 5 分钟
2
3
4
# 提供自定义 RestTemplate
在某些情况下,您可能需要自定义从客户机向配置服务器发出的请求。通常,这样做需要传递特殊的授权头来对服务器的请求进行身份验证。要提供自定义 RestTemplate:
第一步:创建一个绑定了自定义 RestTemplate 的 PropertySourceLocator 实例
package cn.mrcode.example.spring.cloud.tutorial.config.configclient;

import org.springframework.cloud.config.client.ConfigClientProperties;
import org.springframework.cloud.config.client.ConfigServicePropertySourceLocator;
import org.springframework.context.annotation.Bean;
import org.springframework.context.annotation.Configuration;

/**
 * @author : zhuqiang
 * @date : 2019/6/22 18:11
 */
@Configuration
public class CustomConfigServiceBootstrapConfiguration {
    @Bean
    public ConfigServicePropertySourceLocator configServicePropertySourceLocator() {
        // ConfigClientProperties 配置属性就是 spring.cloud.config 下的配置实现类
        ConfigClientProperties clientProperties = configClientProperties();
        ConfigServicePropertySourceLocator configServicePropertySourceLocator = new ConfigServicePropertySourceLocator(clientProperties);
        // org.springframework.cloud.config.client.ConfigServicePropertySourceLocator.getSecureRestTemplate
        // 提供了一个 SecureRestTemplate 的实现,可以模仿这个
        configServicePropertySourceLocator.setRestTemplate(customRestTemplate(clientProperties));
        return configServicePropertySourceLocator;
    }
}
2
3
4
5
6
7
8
9
10
11
12
13
14
15
16
17
18
19
20
21
22
23
24
25
第二步:在 resources/META-INF 下创建 spring.factories 并提供自定义配置
spring.factories
org.springframework.cloud.bootstrap.BootstrapConfiguration = cn.mrcode.example.spring.cloud.tutorial.config.configclient.CustomConfigServiceBootstrapConfiguration
下面是复制源码中的 org.springframework.cloud.config.client.ConfigServicePropertySourceLocator#getSecureRestTemplate 实现。
package cn.mrcode.example.spring.cloud.tutorial.config.configclient;

import org.springframework.beans.factory.annotation.Autowired;
import org.springframework.cloud.config.client.ConfigClientProperties;
import org.springframework.cloud.config.client.ConfigServicePropertySourceLocator;
import org.springframework.context.annotation.Bean;
import org.springframework.context.annotation.Configuration;
import org.springframework.http.client.ClientHttpRequestInterceptor;
import org.springframework.http.client.SimpleClientHttpRequestFactory;
import org.springframework.web.client.RestTemplate;

import java.util.Arrays;
import java.util.HashMap;
import java.util.Map;

import static org.springframework.cloud.config.client.ConfigClientProperties.AUTHORIZATION;

/**
 * @author : zhuqiang
 * @date : 2019/6/22 18:11
 */
@Configuration
public class CustomConfigServiceBootstrapConfiguration {
    @Autowired
    private ConfigClientProperties configClientProperties;

    @Bean
    public ConfigServicePropertySourceLocator configServicePropertySourceLocator() {
        // ConfigClientProperties 配置属性就是 spring.cloud.config 下的配置实现类
        ConfigClientProperties clientProperties = configClientProperties();
        ConfigServicePropertySourceLocator configServicePropertySourceLocator = new ConfigServicePropertySourceLocator(clientProperties);
        // org.springframework.cloud.config.client.ConfigServicePropertySourceLocator.getSecureRestTemplate
        // 提供了一个 SecureRestTemplate 的实现,可以模仿这个
        configServicePropertySourceLocator.setRestTemplate(customRestTemplate(clientProperties));
        return configServicePropertySourceLocator;
    }

    private ConfigClientProperties configClientProperties() {
        return configClientProperties;
    }

    private RestTemplate customRestTemplate(ConfigClientProperties client) {
        SimpleClientHttpRequestFactory requestFactory = new SimpleClientHttpRequestFactory();
        if (client.getRequestReadTimeout() < 0) {
            throw new IllegalStateException("Invalid Value for Read Timeout set.");
        }
        requestFactory.setReadTimeout(client.getRequestReadTimeout());
        RestTemplate template = new RestTemplate(requestFactory);
        Map<String, String> headers = new HashMap<>(client.getHeaders());
        if (headers.containsKey(AUTHORIZATION)) {
            headers.remove(AUTHORIZATION); // To avoid redundant addition of header
        }
        if (!headers.isEmpty()) {
            template.setInterceptors(Arrays.<ClientHttpRequestInterceptor>asList(
                    new ConfigServicePropertySourceLocator.GenericRequestHeaderInterceptor(headers)));
        }

        return template;
    }
}
2
3
4
5
6
7
8
9
10
11
12
13
14
15
16
17
18
19
20
21
22
23
24
25
26
27
28
29
30
31
32
33
34
35
36
37
38
39
40
41
42
43
44
45
46
47
48
49
50
51
52
53
54
55
56
57
58
59
60
61
测试过可以正常使用,但是目前还是不了解 RestTemplate 在这充当上面角色功能,请求流程是上面样子的,所以不知道怎么利用这个之定义配置来实现自己的其他授权