
# partial update
本章共记录原教程的 3 个章节,他们都是关于 partial update 的知识
- 第23节:图解 partial update 实现原理以及动手实战演练
- 第24节:上机动手实战演练基于 groovy 脚本进行 partial update
- 第25节:图解 partial update 乐观锁并发控制原理以及相关操作讲解
# 图解实现原理与实战演练
# 什么是 partial update?
PUT /index/type/id,创建文档&替换文档,就是一样的语法
一般对应到应用程序中,每次的执行流程基本是这样的:
- 应用程序先发起一个 get 请求,获取到 document,展示到前台界面,供用户查看和修改
- 用户在前台界面修改数据,发送到后台
- 后台代码,会将用户修改的数据在内存中进行执行,然后封装好修改后的全量数据
- 然后发送 PUT 请求,到 es 中,进行全量替换
- es 将老的 document 标记为 deleted,然后重新创建一个新的 document
partial update 语法
post /index/type/id/_update
{
   "doc": {
      "要修改的少数几个field即可,不需要全量的数据"
   }
}
2
3
4
5
6
看起来,好像就比较方便了,每次就传递少数几个发生修改的 field 即可,不需要将全量的 document 数据发送过去
# 图解 partial update 实现原理以及其优点
partial update,看起来很方便的操作,实际内部的原理是什么样子的,然后它的优点是什么
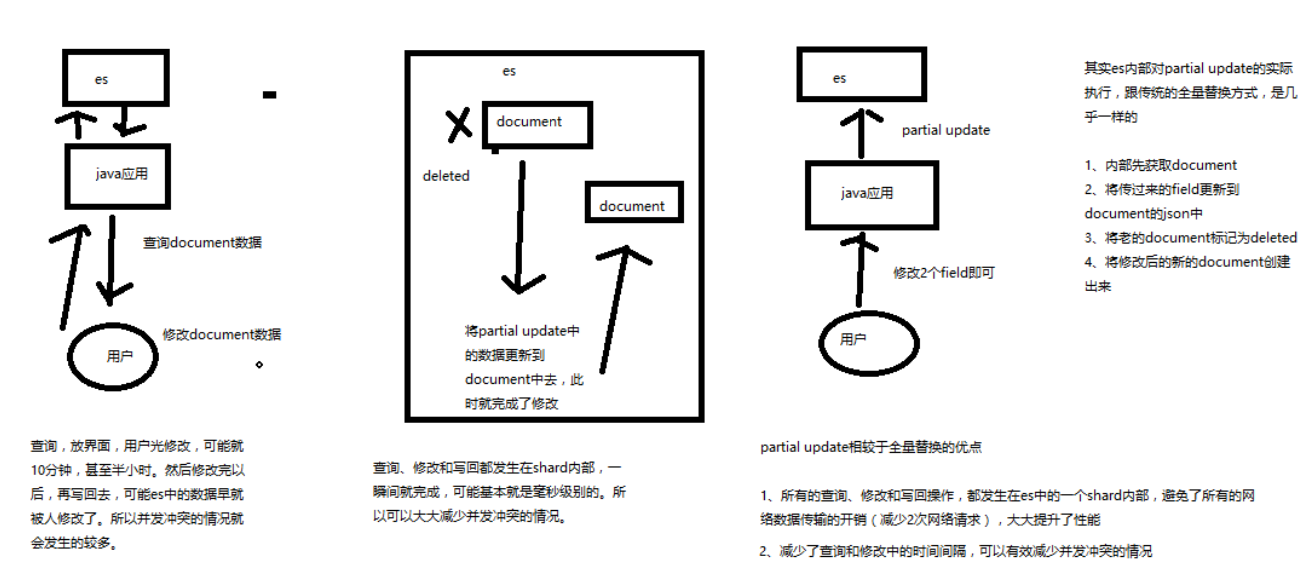
要明白在原理上与全量替换方法几乎一致:
- 内部先获取 document
- 将传递过来的 field 更新到 document 的 json 中
- 将老的 document 标记为 deleted
- 将修改后的新的 document 创建出来
partial update 相较于全量替换的优点:
所有的查询、修改和协会操作,都发生在 es 中的一个 shard 内部
避免网络数据传输的开销(减少两次网络请求,查询写回),大大提升性能
减少了查询和修改中的间隔,可有效减少并发冲突情况
先获取数据,再修改,这中间可能会存在号几分钟的人工填写时间, 如果存在并发,则需要多次获取版本号再写入的操作。 而这里在一个 shard 内部就完成了这些
# 演练
PUT /test_index/test_type/10
{
  "test_field1": "test1",
  "test_field2": "test2"
}

POST /test_index/test_type/10/_update
{
  "doc": {
    "test_field2": "updated test2"
  }
}
2
3
4
5
6
7
8
9
10
11
12
13
# groovy 语法实现
es,其实是有个内置的脚本支持的,可以基于 groovy 脚本实现各种各样的复杂操作
本节基于 groovy 脚本,简单讲解如何执行 partial update
es scripting module,我们会在高手进阶篇去讲解,这里就只是初步讲解一下
# 内置脚本
什么是内置脚本? 语法内容通过 api 发送
新增一条数据,通过这条数据的来讲解怎么操作
PUT /test_index/test_type/11
{
  "num": 0,
  "tags": []
}
2
3
4
5
自增操作
POST /test_index/test_type/11/_update
{
  "script": "ctx._source.num+=1"
}

----- 响应

{
  "_index": "test_index",
  "_type": "test_type",
  "_id": "11",
  "_version": 2,
  "result": "updated",
  "_shards": {
    "total": 2,
    "successful": 1,
    "failed": 0
  }
}
2
3
4
5
6
7
8
9
10
11
12
13
14
15
16
17
18
19
数组操作
POST /test_index/test_type/11/_update
{
  "script": "ctx._source.tags.add('xx')"
}
2
3
4
这些语法在官方文档中有介绍,比如后面的 painless 脚本语法介绍中给出的官方文档链接
# 外置脚本
什么是外置脚本? 语法内容存储在 /config/scripts 目录中的文件中,通过 api 指定哪一个文件获取文件中的脚本内容
test-add-tags.groovy
ctx._source.tags+=new_tag
POST /test_index/test_type/11/_update
{
  "script": {
    "lang": "groovy",
    "file": "test-add-tags",
    "params": {
      "new_tag":"tag1"
    }
  }
}
2
3
4
5
6
7
8
9
10
TIP
外置脚本里面的语法放在内置脚本中的话,结果是不一样的, 内置中会把数组的 json 串当成字符串操作,如下
"_source": {
    "num": 1,
    "tags": "[xx, tag1]tag2"
  }
2
3
4
# 用脚本删除文档
脚本做的事情:当 num 等于指定值的时候,就删除,否则不做操作
test-delete-document.groovy
ctx.op = ctx._source.num == count ? 'delete' : 'none'
POST /test_index/test_type/11/_update
{
  "script": {
    "lang": "groovy",
    "file": "test-delete-document",
    "params": {
      "count": 1
    }
  }
}
2
3
4
5
6
7
8
9
10
TIP
注意 count 的值类型,如果写成 “1” 的话,是不会被匹配的
# upsert 操作
什么是 upsert ? 可以理解为 document 存在就更新,不存在则插入
刚刚把 id=11 的 document 删除了,现在直接更新操作,会报错
POST /test_index/test_type/11/_update
{
  "doc": {
    "num": 1
  }
}

------ 响应

{
  "error": {
    "root_cause": [
      {
        "type": "document_missing_exception",
        "reason": "[test_type][11]: document missing",
        "index_uuid": "g4RJx2v8TXK95LdwlhRx5A",
        "shard": "0",
        "index": "test_index"
      }
    ],
    "type": "document_missing_exception",
    "reason": "[test_type][11]: document missing",
    "index_uuid": "g4RJx2v8TXK95LdwlhRx5A",
    "shard": "0",
    "index": "test_index"
  },
  "status": 404
}
2
3
4
5
6
7
8
9
10
11
12
13
14
15
16
17
18
19
20
21
22
23
24
25
26
27
28
使用脚本实现:如果指定的 document 不存在,就执行 upsert 中的初始化操作;如果指定的 document 存在,就执行 doc 或者 script 指定的 partial update 操作
POST /test_index/test_type/11/_update
{
   "script" : "ctx._source.num+=1",
   "upsert": {
       "num": 0,
       "tags": []
   }
}
2
3
4
5
6
7
8
可以执行两次该操作,查看内容。
# painless 脚本语法
TIP
本小节是后补的,实际项目中用到了,可能是与这个版本不一致,默认的脚本语言已经不是 groovy 了
这里的创建索引等功能,是后续章节的用法
默认脚本使用的是 painless ,这个在 官方文档中有介绍 (opens new window),该语言的 API 继承了 JAVA 的 部分类的部分方法,这个说明在 官方文档 附录 A 中有说明 (opens new window) 哪些方法可以使用
比如下面的查询和批量更新中都可以使用该脚本处理
// 先创建索引,主要目的是让 email 的字段为 keyword,不然在查询的时候会报错(这个错误后续章节学完后可以自行解决的)
PUT /test_index2
{
  "mappings": {
    "test_type2": {
      "properties": {
        "email": {
          "type": "keyword"
        }
      }
    }
  }
}

// 插入两条测试数据
PUT /test_index2/test_type2/110
{
    "email":"99299684@qq.com"
}
PUT /test_index2/test_type2/111
{
    "email":"99299684@163.com"
}
2
3
4
5
6
7
8
9
10
11
12
13
14
15
16
17
18
19
20
21
22
23
看下两条数据在数据库中的样子
GET /test_index2/test_type2/_search
响应
{
  "took": 1,
  "timed_out": false,
  "_shards": {
    "total": 5,
    "successful": 5,
    "failed": 0
  },
  "hits": {
    "total": 2,
    "max_score": 1,
    "hits": [
      {
        "_index": "test_index2",
        "_type": "test_type2",
        "_id": "110",
        "_score": 1,
        "_source": {
          "email": "99299684@qq.com"
        }
      },
      {
        "_index": "test_index2",
        "_type": "test_type2",
        "_id": "111",
        "_score": 1,
        "_source": {
          "email": "99299684@163.com"
        }
      }
    ]
  }
}
2
3
4
5
6
7
8
9
10
11
12
13
14
15
16
17
18
19
20
21
22
23
24
25
26
27
28
29
30
31
32
33
# 查询中使用 painless script
查询的时候,使用脚本将 email 字段处理成 test 字段返回,并使用脚本语言的字符串函数对 email 字段进行裁剪操作
GET /test_index2/test_type2/_search
{
  "size": 1,
  "script_fields": {
    "test": {
      "script": {
        "lang": "painless",
        "inline": "doc['email'].value.substring(doc['email'].value.indexOf('@'))"
      }
    }
  }
}
2
3
4
5
6
7
8
9
10
11
12
响应
{
  "took": 1,
  "timed_out": false,
  "_shards": {
    "total": 5,
    "successful": 5,
    "failed": 0
  },
  "hits": {
    "total": 2,
    "max_score": 1,
    "hits": [
      {
        "_index": "test_index2",
        "_type": "test_type2",
        "_id": "110",
        "_score": 1,
        "fields": {
          "test": [
            "@qq.com"
          ]
        }
      }
    ]
  }
}
2
3
4
5
6
7
8
9
10
11
12
13
14
15
16
17
18
19
20
21
22
23
24
25
26
# _update_by_query 批量更新中使用 painless script
对所有文档新增一个 emailSuffix 字段,emailSuffix 字段的值是 email 字段邮箱后缀
POST /test_index2/test_type2/_update_by_query
{
    "query": {
      "match_all": {}
    },
    "script": {
        "inline": "ctx._source.emailSuffix = ctx._source.email.substring(ctx._source.email.indexOf('@')+1)"
    }
}
2
3
4
5
6
7
8
9
查询看看结果
GET /test_index2/test_type2/_search
响应
{
  "took": 1,
  "timed_out": false,
  "_shards": {
    "total": 5,
    "successful": 5,
    "failed": 0
  },
  "hits": {
    "total": 2,
    "max_score": 1,
    "hits": [
      {
        "_index": "test_index2",
        "_type": "test_type2",
        "_id": "110",
        "_score": 1,
        "_source": {
          "emailSuffix": "qq.com",
          "email": "99299684@qq.com"
        }
      },
      {
        "_index": "test_index2",
        "_type": "test_type2",
        "_id": "111",
        "_score": 1,
        "_source": {
          "emailSuffix": "163.com",
          "email": "99299684@163.com"
        }
      }
    ]
  }
}
2
3
4
5
6
7
8
9
10
11
12
13
14
15
16
17
18
19
20
21
22
23
24
25
26
27
28
29
30
31
32
33
34
35
# 监控批量更新状态
如上,使用脚本批量更新的话,当数据量很大的时候,就需要监控他的执行状态了
GET _tasks?detailed=true&actions=*byquery
# 图解乐观锁并发控制原理与操作
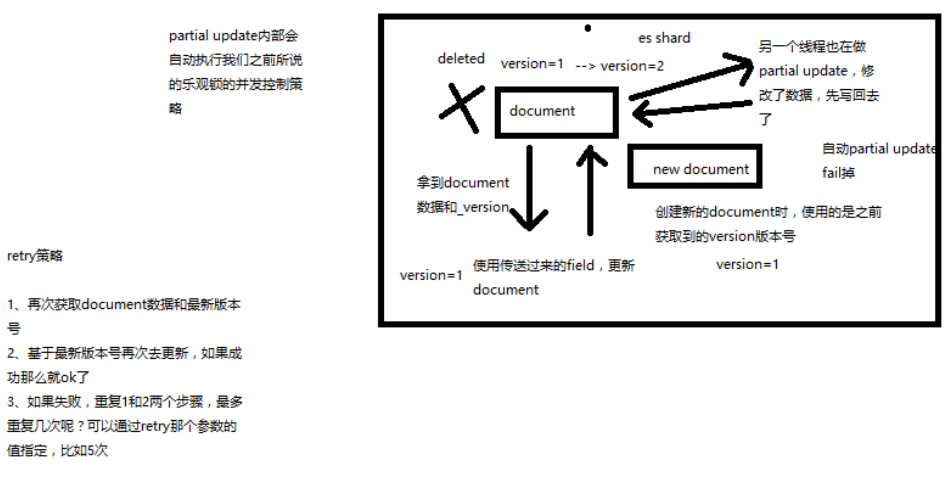
partial update 内置乐观锁并发控制
retry_on_conflict
retry 策略大致如下:
- 再次获取 document 数据和最新版本
- 基于最新版本号再次去更新
重试的次数为指定的次数,次数用完,还更新不了就失败了
_version
POST /test_index/test_type/11/_update?retry_on_conflict=2
{
  "doc": {
    "num" : 2
  }
}
2
3
4
5
6
← 并发更新冲突 mget 批量查询 API →